background image

15 


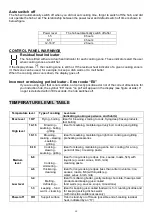
Auto switch off


The hob will automatically switch off when you did not set cooking time, forgot to switch off the hob, and did 
not operate the hob at all. The relationship between the power level and default switch off time is shown in 
below figure. 


Power level 

The hob automatically switch off after 

1-5 

8 hours 

6-11 

4 hours 

12-16/P 

2 hours 


CONTROL PANEL WARNINGS


Residual heat indicator 

The hob is fitted with a residual heat indicator for each cooking zone. These indicators alert the user 
when cooking zones are still hot. 

If the display shows 

, the cooking zone is still hot. If the residual heat indicator of a given cooking zone is 

lit, that zone can be used, for example, to keep a dish warm or to melt butter. 
When the cooking zone cools down, the display goes off. 


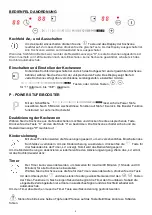
Incorrect or missing pot indicator – Error code “E0” 

If you are using a pot that is not suitable, not correctly positioned or not of the correct dimensions for 
your induction hob, the symbol ”E0” mean “no pot” will appear in the display (see figure at side). If 
no pot is detected within 180 seconds, the hob switches off. 

TEMPERATURE LEVEL TABLE 

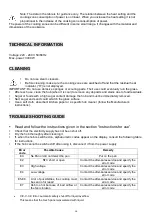
Temperature level 

Type of cooking  Level use 

(indicating cooking experience and habits) 

  Max level 

16/P 

  Frying - boiling  Ideal for browning, starting to cook, frying deep frozen products, 

fast boiling 


High level 

14-16 

Browning - 

sautéing - boiling 

- grilling 

Ideal for sautéing, maintaining a lively boil, cooking and grilling 

10-13 

Browning – 

cooking – stewing 

- sautéing - 

grilling 

Ideal for sautéing, maintaining a light boil, cooking and grilling , 
preheating accessories 


Medium 

level 

8-10 

Cooking – 

stewing - 

sautéing - grilling 

Ideal for stewing, maintaining a gentle boil, cooking (for a long 
period of time). Creaming pasta 

6-8 


Cooking – 

simmering – 

thickening - 

creaming 

Ideal for long-cooking recipes (rice, sauces, roasts, fish) with 
liquids (e.g. water, wines, broth, milk), 
creaming pasta 

4-6 

Ideal for long-cooking recipes (less than a liter in volume: rice, 
sauces, roasts, fish) with liquids (e.g. 
water, wines, broth, milk) 


Low level 

3-4 


Melting – 

defrosting – 

keeping – food 

warm - creaming 

Ideal for softening butter, gently melting chocolate, thawing small 
products and keeping just-cooked 
food warm (e.g. sauces, soups, minestrone) 

1-3 

Ideal for keeping just-cooked food warm, for creaming risottos and 
for keeping serving dishes warm 
(with induction-suitable accessory) 

Power off 

  0/H 

Support surface 

Hob in stand-by or off mode (possible end-of-cooking residual 
heat, indicated by an “H”) 


Summary of Contents for SDIN-3502W

Page 1: ...Gebrauchsanleitung Doppel Induktionskochfeld SDIN 3502W Ma e 600 x 375mm...

Page 2: ...m Symbol INDUKTION Abbildung unten oder emaillierte T pfe Stellen Sie den Topf auf die gew nschte Kochzone bevor Sie das Kochfeld einschalten Geeignetes Kochgeschirr Verwenden Sie einen Magneten um zu...

Page 3: ...iker dieses austauschen Verwenden Sie nicht das Ger t wenn es nicht richtig Funktioniert Besch digungen aufweist oder im Falle dass es fallen gelassen wurde Lassen Sie das Ger t nicht unbeobachtet w h...

Page 4: ...uss lang genug sein damit das Kochfeld von der Arbeitsplatte rausgezogen werden kann Es muss sichergestellt sein dass die Spannung des Ger tes siehe Typenschild die sich auf der R ckseite dem Boden de...

Page 5: ...e die Kochzone aus die Sie abschalten m chten und dr cken Sie die entsprechende Taste Dr cken Sie die Taste 0 um den die Stufe 0 zu bestimmen Die Kochzone schaltet sich ab und die Restw rmeanzeige H l...

Page 6: ...as Induktionskochfeld entspricht erscheint das Symbol E0 Wird kein Topf innerhalb von 180 Sekunden erkannt schaltet sich das Kochfeld ausgeschaltet TEMPERATURNIVEAUTABELLE Temperaturniveau Zubereitung...

Page 7: ...im Abschnitt Gebrauchsanweisung berpr fen Sie ob die Stromversorgung nicht abgeschaltet worden ist Wischen Sie das Kochfeld nach dem s ubern mit einem trockenen Tuch ab Wenn das Kochfeld eingeschalte...

Page 8: ...Bevor Sie sich an den Kundendienst wenden 1 Versuchen Sie das Problem selbst mit Hilfe der Fehlerbehebung zu l sen 2 Schalten Sie das Ger t aus und dann wieder ein um zu sehen ob das Problem behoben i...

Page 9: ...uer h here Gewalt falsche Netzspannung unzureichende Bel ftung oder andere von uns nicht zu verantwortende Gr nde entstanden sind Reparaturen und Ab nderungen die von dritter nicht autorisierter Seite...

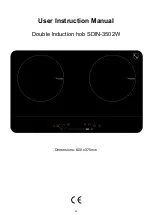
Page 10: ...10 User Instruction Manual Double Induction hob SDIN 3502W Dimensions 600 x 375mm...

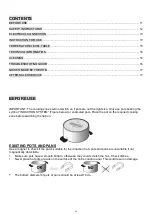
Page 11: ...ts bearing the symbol INDUCTION SYSTEM Figure below or enameled pots Place the pot on the required cooking zone before switching the hob on EXISTING POTS AND PANS Use a magnet to check if the pot is s...

Page 12: ...ervised The accessible parts can become very hot during use Children must be kept away from the appliance and watched over to ensure they do not play with it Do not touch the appliance heating element...

Page 13: ...to property resulting from failure to observe the regulations provided in this chapter The power cable must be long enough to allow the hob to be removed from the worktop Make sure the voltage specifi...

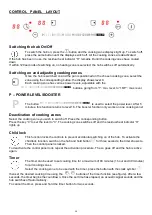
Page 14: ...ks on one cooking zone Deactivation of cooking zones Select the cooking zone you wish to switch off Press the corresponding button Press the key 0 to set the level to 0 The cooking zone switches off a...

Page 15: ...level Type of cooking Level use indicating cooking experience and habits Max level 16 P Frying boiling Ideal for browning starting to cook frying deep frozen products fast boiling High level 14 16 Br...

Page 16: ...absorbent kitchen paper or a specific hob cleaner follow the Manufacturer s instructions TROUBLESHOOTING GUIDE Read and follow the instructions given in the section Instructions for use Check that the...

Page 17: ...nce AFTER SALES SERVICE Before contacting the After sales Service 1 See if you can solve the problem yourself with the help of the Troubleshooting guide 2 Switch the appliance off and then on again it...

Reviews: