background image

Spark plug


SPARK PLUG INSPECTION:

SPARK PLUG INSPECTION:

1. Remove the cap from the spark plug.

2. Remove the spark plug by means of a corresponding spanner.
3.   Examine the spark plug. 

If it is shattered – it is necessary to replace it. Recommended replacement spark  

plugs – A5RTC. 

4. Measure the gap. It has to be within range 0.6 – 0.7 mm.

5. Place the spark plug in its place by means of a spark plug spanner.
6. Replace the spark plug cap.

The engine and muffler will be very hot after the engine has been run. Avoid touching the engine and muffler while 

they are still hot with any part of your body or clothing during inspection or repair.

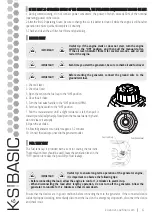
MUFFLER SCREEN AND SPARK ARRESTER 

TECHNICAL MAINTENANCE

13

1. Remove the screws, and then pull outward on the areas of the cover.

2.  Loosen the bolt and remove the muffler cap, the muffler screen and spark arrester.

3.  Clean the carbon deposits on the muffler screen and spark arrester using a wire brush.

4. Check the muffler screen and spark arrester. Replace them if damaged.

5. Replace the flame arrester.

6. Replace the screen and cover of the damper.

7. Replace the cover and tighten the screws.

1. Remove the fuel tank cap and filter.

2. Clean the filter with gasoline.

3. Wipe the filter and install it.

4. Install the fuel tank cap.

Be sure the fuel tank cap is tightened securely.

FUEL TANK FILTER TECHNICAL MAINTENANCE

14

Tip: Align the spark arrester projection with the hole in the 

muffler pipe.

IMPORTANT!

Never use the gasoline while smoking or in the vicinity of an open 

flame.

ATTENTION - DANGER!

GENERATOR STORAGE

15

The generator must be stored in a dry, well-ventilated area that is free from dust. Keep away from children and 

animals.

Generator should always remain ready for operation. Therefore 

in case of device malfunctions, they are to be repaired before 

dismounting the generator for storage.

IMPORTANT!


GENERATOR LONG-TERM STORAGE

GENERATOR LONG-TERM STORAGE

If the generator will not be used for a long time, it is recommended to:

- Drain the fuel into the tank.
- Drain the motor oil.

koenner-soehnen.com


|

    10

Summary of Contents for KSB 12i S

Page 1: ...Please read this manual carefully before use OWNER S MANUAL Inverter Generator KSB 12i S EN...

Page 2: ...oes and gloves We care about the environment therefore we consider it expedient to savepaper and We care about the environment therefore we consider it expedient to savepaper and leave in print a shor...

Page 3: ...Manufacturer reserves the right to make changes and or improvements in design components set and technical attributes without notice and without incurring obligation The pictures in this manual are s...

Page 4: ...Model KSB 12i S Voltage V 230 Max Power kW 1 2 Nominal Power kW 1 0 Frequency Hz 50 Current A max 5 2 Outlets 1 16 Engine start manual Fuel tank volume l 2 5 Noise level LPA 7m LWA dB 62 87 Output 12V...

Page 5: ...rest K S Basic TM Service Center IMPORTANT When the overload indicator light comes on and power generation stops proceed as follows 1 Turn off any connected electric devices and stop the engine 2 Redu...

Page 6: ...el is below the mark on the oil dipstick 5 Screw on the dipstick Do not change the controller settings in terms of the amount of fuel or speed governor this adjustment was made at the factory Otherwis...

Page 7: ...check oil and fuel level Before starting the generator connect the ground wire to the ground terminal IMPORTANT IMPORTANT FUEL TANK VENT FUEL TANK VENT The fuel tank cap is provided with a vent for se...

Page 8: ...ne speed As a result fuel consumption is optimized and noise levels are reduced OFF MODE OFF MODE The ECON switch must be set back to OFF when using electrical devices requiring a high starting curren...

Page 9: ...r every 10 operating hours If you missed the maintenance time perform it as soon as possible to save the generator engine Motor oil has a serious impact on performance charac teristics and is a major...

Page 10: ...l 7 Wipe the oil drain cap with a clean dry cloth and wipe off any oil spills if any Make sure that no dirt dust etc are caught in the crankcase 8 Replace the cap Do not tilt the generator while addin...

Page 11: ...a wire brush 4 Check the muffler screen and spark arrester Replace them if damaged 5 Replace the flame arrester 6 Replace the screen and cover of the damper 7 Replace the cover and tighten the screws...

Page 12: ...your local dealer The Seller which sells the product is responsible for granting the warranty Please contact the Seller for warranty Within the warranty period if the product fails because of defects...

Page 13: ......

Page 14: ...sche Kundendienst technische Fragen und Unterst tzung Fragen und Unterst tzung support dimaxgroup de Garantie Reparatur und Garantie Reparatur und Service Service service dimaxgroup de Sonstiges Sonst...

Reviews: