KanguruClone 7HDS, 15HDS & 23HDS
Pro Duplicator
User Manual
Copyright 2017, All Rights Reserved.
Model no.:
KCLONE-7HDS-PRO
KCLONE-15HDS-PRO
KCLONE-23HDS-PRO
Page 1: ...KanguruClone 7HDS 15HDS 23HDS Pro Duplicator User Manual Copyright 2017 All Rights Reserved Model no KCLONE 7HDS PRO KCLONE 15HDS PRO KCLONE 23HDS PRO...
Page 2: ...icular purpose Kanguru Solutions reserves the right to revise or update its products software or documentation without obligation to notify any individual or entity Export Law Compliance Regardless of...
Page 3: ...o 15 3 2 Duplication 16 3 2 1 Duplicating From a Master HDD 16 3 2 2 Duplicating From a Storage Center 18 3 2 3 Formatting a hard drive as a Storage Center 18 3 2 4 Loading a Master HDD image to the S...
Page 4: ...Optimize Log Table 37 6 1 23 Advanced Brief Mode 38 6 1 24 Scan Size 38 6 1 25 Set HDD Wipe 39 6 1 26 Burn In 39 6 1 27 Total Copy Count 39 6 1 28 Skip Read Error 40 6 1 29 No Button Sound 40 6 1 30...
Page 5: ...t Partition 48 6 2 26 Resize Last Partition 49 6 2 27 Need Resize 49 6 2 28 Brief Verify Source 49 6 2 29 Disk Verify Source 49 6 3 Storage Center Setup 50 6 3 1 Load Full Image 50 6 3 2 Copy Storage...
Page 6: ...c and many more 5 Copy Operations Smart Copy System automatically detects the most efficient copy method Brief Copy Copies only sectors with data compatible with most major file systems Resize Copy Co...
Page 7: ...nguruClone 15HDS PRO LCD Screen 20 x 2 Characters back lit LCD Input Device 7 Push Buttons Dimensions 16 x 21 x 9 5 Weight 25 lbs Power Supply 800W 115V 230V 12A 6AAutoswitching Operating Temperature...
Page 8: ...by a rocker switch located at the rear of the unit The KanguruClone supplies power to all drives during a cloning session There is no need to connect an external power source to the drives The unit ca...
Page 9: ...9 1 4 Function Tree Diagram Parts and Functions...
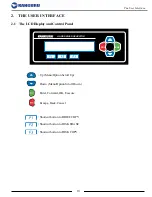
Page 10: ...e LCD Display and Control Panel HARD DRIVE DUPLICATOR ENT ESC Up Menu Option Scroll Up Down Menu Option Scroll Down Enter Forward OK Execute Escape Back Cancel Shortcut button to BRIEF COPY Shortcut b...
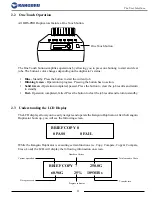
Page 11: ...ton to clear the job results and return to standby Red Operation completed failed Press the button to clear the job results and return to standby 2 3 Understanding the LCD Display The LCD display allo...
Page 12: ...button to enter the Setup Selection Menu The duplicator contains four Setup subcategories used to configure the way different features on the duplicator operate The Setup sub categories are Main Advan...
Page 13: ...T32 exFAT NTFS EXT2 EXT3 EXT4 XFS RFS HFS HFS 2 If the duplicator is able to recognize the file system of the Source it will compare the capacity between the Source and the Target If the Source is for...
Page 14: ...c or Linux operating systems The total data content on the Master must be smaller than the total capacity on the Target e g if the Master drive is a 500GB HDD with 100GB of used space then the Target...
Page 15: ...to copy a defined percentage of the Master hard drive The Master hard drive is divided in 1000 units You must define the beginning and ending percentages before using this operation To define the per...
Page 16: ...the desired copy mode For more information on the different available copy modes see chapter 3 1 Duplication Modes on page 13 The screen will display the following BRIEF COPY 0 0 PASS 0 FAIL Current...
Page 17: ...lid green or red LED before disconnecting a drive If you want to cancel the current process press and hold the ESC button and wait for a solid red LED to come on 4 When the copy process has completed...
Page 18: ...u want to format as a Storage Center to the Source port on the duplicator WARNING Making a hard drive into a storage center drive will require it to be formatted which will erase any data previously s...
Page 19: ...nking indicating that it is currently selected Tap the UP DOWN button to increase decrease the digit by one b Tap the ENT button to select the next digit to the right Tap the UP DOWN button to increas...
Page 20: ...file name press and hold the ENT button for 3 seconds to begin copying Note If you receive the following error message NO DATA FOUND then the image file that you selected does not contain any data Aft...
Page 21: ...ther manually kick a slow drive or configure settings which will automatically kick slow drives that fall below a defined threshold 3 3 1 Manually Kick Slow Drives During a copy compare or erase opera...
Page 22: ...ed option to define the low speed threshold see section 6 2 10 Set Kick Speed 15 and 23 target duplicators only on page 44 Drives that fall below this speed will be kicked after a designated amount of...
Page 23: ...sure that all data previously saved the disk is overwritten Caution Although Disk Erase will delete all data from your drive with the high level forensic tools it may still be possible to recover the...
Page 24: ...wiped 4 5 Enhanced Secure Erase Secure Erase is a set of firmware commands available on many ATA drives These commands are used as a secure method of data sanitization by completely overwriting all da...
Page 25: ...run tests to verify the health of the duplicator and of any connected drives If you are experiencing a high rate of failures during the duplication process there could be something mechanically malfun...
Page 26: ...track of duplication and or disk wipe jobs when logs are required for auditing and they are also provide useful information that can be used by Kanguru s technical support staff to diagnose problems...
Page 27: ...troubleshoot problems with the duplicator To generate a log file using a USB flash drive 1 Format a USB flash drive using the FAT32 file system 2 Before powering on the Kanguru Clone duplicator insert...
Page 28: ...e connects to a USB port on your PC Note If this is your first time connecting the Serial to USB adapter cable to your computer you will need to install the device driver The device driver can be foun...
Page 29: ...to a local hard drive and not a removable device c Select the COM port d Click on the Connect button 3 When a connection between the duplicator and the Control Manager is established you will see the...
Page 30: ...Setup and About You can open any of these setup menus from Setup Select menu To open the Setup Select menu simply tap the ESC button while in the Main Copy menu Once you have entered the Setup Selecti...
Page 31: ...m will not check for DCO partitions DCO Check is enabled When DCO Check is enabled the duplicator will support Device Configuration Overlay configurations When you duplicate a Master drive that contai...
Page 32: ...ecksum information will be displayed at the end of each duplication process 6 1 6 Verify Checksum The Verify Checksum option allows you to configure whether the duplicator will compare the checksum va...
Page 33: ...he ENT button to change this option s setting Erase Source Port is disabled default A drive connected to the Source port will not be erased if you run Quick Erase Disk Erase or Disk Wipe Erase Source...
Page 34: ...MART Check is enabled you can configure what level of SMART check performed There are 3 levels of SMART checking 0 Level 0 Checks for critical uncorrectable errors e g read write errors 1 Level 1 Chec...
Page 35: ...Transfer Size settings can be set to 8KB 16KB 32KB 64KB 128KB 256KB 512KB 1MB 2MB 4MB 8MB and 16MB The default setting is 4MB Tap the ENT button and then press the UP DOWN buttons to change this optio...
Page 36: ...s and start the copy process as normal Capacity Check is enabled default When a Disk or Brief copy process is executed the system will check the capacity between the Master and Target drive s to dete...
Page 37: ...nd analysis are done at the same time during Brief Copy This is the fastest option Brief Immediate is disabled default When you run a Brief Copy the duplicator will analyze the Source completely first...
Page 38: ...t you ve created a Master drive we need to load an image of it to a Storage Center drive 1 Connect a drive formatted as a Storage Center to the Source port 2 Connect the Master drive to the last Targe...
Page 39: ...he ENT button and then press the UP DOWN buttons to configure the Burn In option Tap the ENT button to set Burn In The next time you run a Copy Compare Erase or Load operation the duplicator will cont...
Page 40: ...t sounds when you tap or hold a button Tap the ENT button to change this option Button sounds are disabled No audible tones will sound when you tap or hold a button Button sounds are enabled default T...
Page 41: ...32 Real Time Messaging The Real Time Messaging option allows you to configure how the duplicator sends information about the duplication process to a connected PC see section 5 2 Logging Using the Co...
Page 42: ...ion menu Enter the password as 0000 to disable password protection 6 2 2 Set Error Retry Count The Set Error Retry Count option allows you to configure the number of times that the duplicator retries...
Page 43: ...Retry Count When the machine has major problem or a critical error the Physical Retry Count is the number of times that the duplicator will reset the drives in an attempt to allow the duplication to...
Page 44: ...ted manually by holding the F1 button 6 2 9 Set Kick Time 15 and 23 target duplicators only If Auto Kick Slow has been enabled the Set Kick Time option will define the how long a drive can operate bel...
Page 45: ...nge this option s setting Tap the ENT button to set the Ratio Length 6 2 13 Set Ratio Erase Start Ratio Erase erases only a defined percentage of the Master drive The Set Ratio Erase Start option allo...
Page 46: ...ifferent value 15 Target Duplicator value 4 23 Target Duplicator value 6 So for example if you are connecting two 15 Target Duplicators then you would set this value to 8 If you were connecting 2x 23...
Page 47: ...on to change this option Partition Full Copy is enabled The duplicator will make a Disk Copy of an assigned partition after Brief Copy is completed Partition Full Copy is disabled default The duplicat...
Page 48: ...sabled default 6 2 24 Sector Size 4K The Sector Size 4K setting is used when the source drive is simulating 4K sector size If your source drive uses a special bridge chip to make the drive act like it...
Page 49: ...pacity between the Master and Target drives is any different then the system will execute a Resize Copy 10 If the capacity difference between the Master and Target drives is between 0 and 10 then the...
Page 50: ...Source s file system before duplication If the Source s file system is recognized as a Storage Center then the duplicator will ask you to choose an image name to copy Enabled The system will analyze t...
Page 51: ...ly selected Tap the UP DOWN buttons to increase decrease the digit by one 3 Tap the ENT button to select the next digit to the right Tap the UP DOWN buttons to increase decrease the digit by one 4 Rep...
Page 52: ...ology is a monitoring system included in HDDs and SSDs that detects and reports on various indicators of drive reliability with the intent of enabling the anticipation of hardware failures SET WRITE T...
Page 53: ...508 376 4245 to receive a firmware update file 2 Format a SATA drive or USB flash drive as FAT32 3 Copy the firmware file to the drive you just formatted 4 Connect the hard drive to the duplicator s...
Page 54: ...he Format USB Drive option allows you to format a connected USB drive in a supported FAT32 file system This USB drive can then be used to load firmware updates to the duplicator 6 5 5 System Informati...
Page 55: ...pacity Q Can drives with different RPM speeds be cloned together A Yes the machine will adjust to hard drives with different RPMs Q How does the duplicator handle multiple partitions on the Master dri...
Page 56: ...rely Make sure that no hard drive connection cables are loose The hard drive jumpers are not set in the correct position Make sure that all the hard drive jumpers are set to the Master or Cable Select...
Page 57: ...laims for loss or damage must be made to carrier directly Claims for shipping errors should be reported to Kanguru Solutions within three 3 working days of receipt of merchandise Please refer to the R...
Page 58: ...d or physically damaged STEP ONE Call for a RMA Number 508 376 4245 Duplicators will not be accepted for repair without a valid RMA number RMA numbers are valid for 30 days upon assignment Any return...
Page 59: ...her using the provided Daisy Chain cable referred to as DC Cable The Daisy Chain cable should have been provided with your duplicator and has a SATA connector on one end and an e SATA connector on the...
Page 60: ...dent standalone systems 1 Connect the Master disk to the Source port on Duplicator 1 2 Connect Target disks to any remaining ports on any of the duplicators Note A Target disk can be connected to the...
Page 61: ...gal terms and conditions available at www kanguru com Please review and agree before use Thank you Kanguru Solutions 1360 Main Street Millis MA 02054 www kanguru com 07 19 17 v1 5 2017 Kanguru Solutio...