background image

From 

the 

library 

of: 

Diamond 

Needle 

Corp

Summary of Contents for DFB-1012PS

Page 1: ...DPB PartsList Instruction Manual DFB 1412PS DFB 1012PS DFB 1412P S M DFB 1012P S M From the library of Diamond Needle Corp ...

Page 2: ... or 3M Spun thread 50 60 Looper thread Spun thread 50 60 Ornament thread Rayon and synthetic thread Rayon and synthetic thread DFB 1412P DFB 1412P SM 1 Needle bar s height adjustment Needle bar height length of needle bar from needle plate of this unit is 13 3 13 5mm Adjust as follows 1 Turn the pully to lift the needle her to the highest position and loosen the screw B in Fig 2 fixing needle bar ...

Page 3: ...tric ball 3 Setting retainer excentric ball toward the operator increases the speed of looper movement while setting it opposite to the operator slows the speed When the best timing is obtained by turning the pulley tighten screw 8 in Fig 4 4 Needle guide Installation Looper instal lation Adjust the clearance between the needle guide and needle to 0 0 1mm as shown in Fig 7 1 Install loopers and ne...

Page 4: ... temporarily 2 Rotate the pulley and adjust the looper retainer Turn the retainer eccentric I in Fig 13 to increase looper retainer speed and clockwise to decrease speed 3 For fine adjustment loosen screw G in Fig 13 and then move the retainer thread eyelet up and down 12 Adjustment of feed gear rack A Height of feed gear rack The proper height of the feed gear rack from the needle plate top is 0 ...

Page 5: ...Increase spring compression with the adjusting screw for thick cloth 3 Looper This sewing machine uses Organ needles DVK 20 21 1 8mm DVK 20 18 2 0mm Install looper holder and hand tighten screws for lo opers Lower the needle clamp to the lowest point and adjust the clearance between the loopers and needles after the end of backward movement to 1 8 mm At this time check for the parallelism between ...

Page 6: ...nter are on a center line 6 Rear puller timing Adjust rear puller timing so that the center of puller driving eccentric set screws meets the center of crankshaft when the need bar is at its lowest position Note that puller roller reaches its extreme end when needle just enters the needle plate hole Fig 6 Front view Fig 7 Normal rotation Looper end Slide view Reverse rotation Set screw Puller drivi...

Page 7: ... sure to use the No B cam for the Inner cam 2 Inner cam replacement To replace the cams remove the hex head screw tightening the connection link on the upper orna ment connection lever A and shift the upper ornament connection lever to the right Next remove screw 8 Note that this screw has a left handed thread Then remove the outer cam C The collar D is exposed Remove three tightening screws and t...

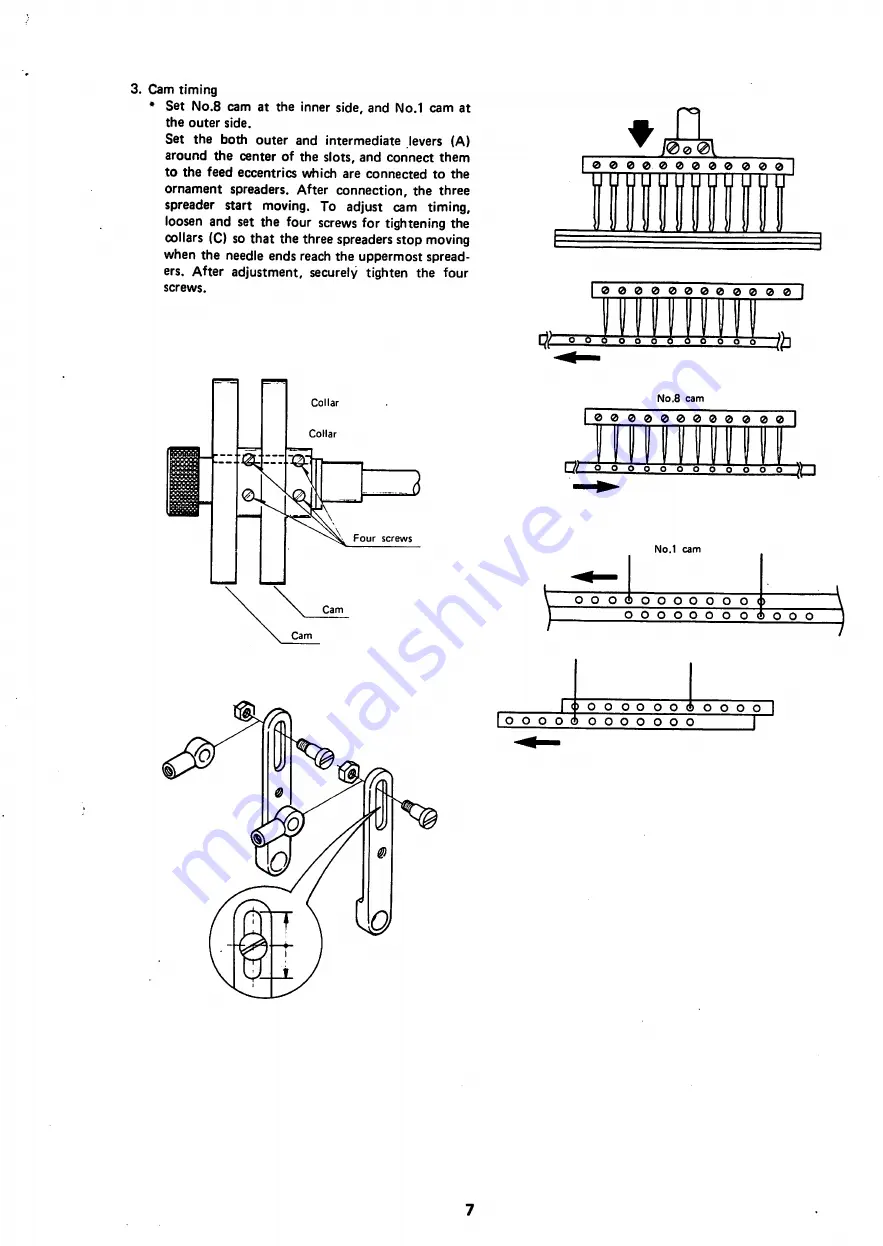
Page 8: ...der start moving To adjust cam timing loosen and set the four screws for tightening the collars C so that the three spreaders stop moving when the needle ends reach the uppermost spread ers After adjustment securely tighten the four screws Collar Collar Four screws 0 0 0 0 000000000 J J JU i 000000000000 No 8 cam 0 0 0 0000000 00 r OOOOQOOOQOO No l cam O O O 0 O O O O O O O OOOOOOOO o o o oooooooo...

Page 9: ...ween the spreader and needles should be 1 0 1 2mm When the spreader is not parallel to the twelve needles loosen screws D slightly and correct the spreader so that it is parallel to the needles and then retighten the screws D Next install spreader B in the same way asspreader C while eliminating the clearance between spreaders 8 and C Care should be used to prevent the spreaders from coming too cl...

Page 10: ...3 16 15499 15 500 19496 19 497 18496 18497 DFB 1412PQSM Optional 14499 1 4 14 500 3 16 15 499 15 500 19496 19497 18496 18 497 DFB 1012PS SM 17 046 3 16 14 046 3 16 15 046 19497 18497 Single chain looper 19 112 Double chain looper 19 431 Thread collector looper 19 437 excluding Models DFB 1412 DFB 1406 Rubber thread collector looper 19 439 for Models DFB 1412PS DFB 1406PS Needle guid 19 416 for 25 ...

Page 11: ...9 3 16 17 498 1 4 Adjust the presser liner in the back and forth direction so that needles drop to stitch bottoms When stitch feed pitch issmall Needle Put liner close to needles Liner When stitch feed pitch is large Needle Stitch feed _ t0r i0r 0 Or Needledrop P tch Needle drop Needle drop Detach liner from needles Liner With claws Lrumr With claws Uwir 2 sets 0 0 0 17 046 3 16 Ex 01016 3 16 17 0...

Page 12: ...12 40 Tension post collar 8 12 41 Bracket B 1 42 Screw 2 43 Eyelet pin 2 44 Thread eyelet 1 45 Screw 2 46 Bracket 1 47 Thread eyelet 1 48 Screw 1 49 Thread guide 1 50 Mount bracket 2 51 Screw 2 11 Part No 86 411 84 761 41 349 41 105 84 763 71 460 71 459 69 321 81 141 04 328 84 179 04 414 84 361 04 15 75 455 84 612 04 416 04 417 84 521 84 364 04 418 04 419 04 420 75 453 45 137 Part Name Q ty Nut 2 ...

Page 13: ...ut Cam 1 Cam 2 Cam 3 Cam 4 Cam 5 Cam 6 Cam 7 Cam 8 Cam 9 Cam collar pin 12 Ref No 29 30 31 32 33 34 35 36 37 38 39 40 41 42 43 44 45 46 47 48 49 50 51 52 53 54 55 56 57 58 59 60 61 62 63 34 3 Part No 71 529 85 627 04 411 04 342 85 627 75 452 84 521 67 431 75 433 75 152 84 521 84 607 75 260 84 605 75 257 75 389 86 311 67 432 84 606 86 311 21 488 66 433 75 455 84 579 21 489 75 455 84 566 65 346 65 3...

Reviews: