background image

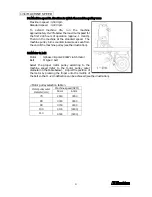
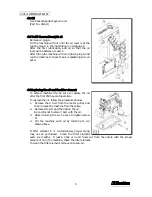
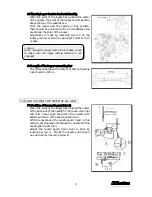
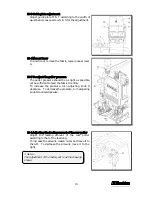
11-2 Position of the needle thread eyelet 

Secure needle thread eyelet C at the bottom end of 
the slot. 


< Note > 

Adjust the needle thread eyelet according to the 

thread to be used.  To tighten the needle thread, 

raise the needle thread eyelet. 


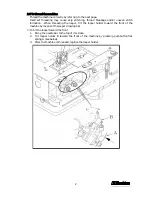
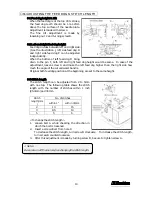
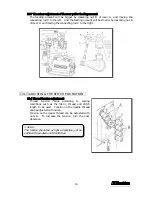
11-3 Adjusting the needle thread guard 

With the needle bar at the bottom of its stroke, the 
top surface of needle thread guard A should be level 
and parallel with the centers of the eyes on needle 
bar eyelet B. 


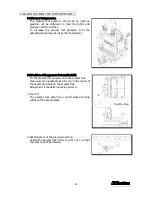
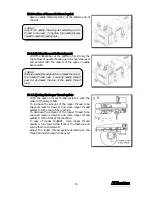
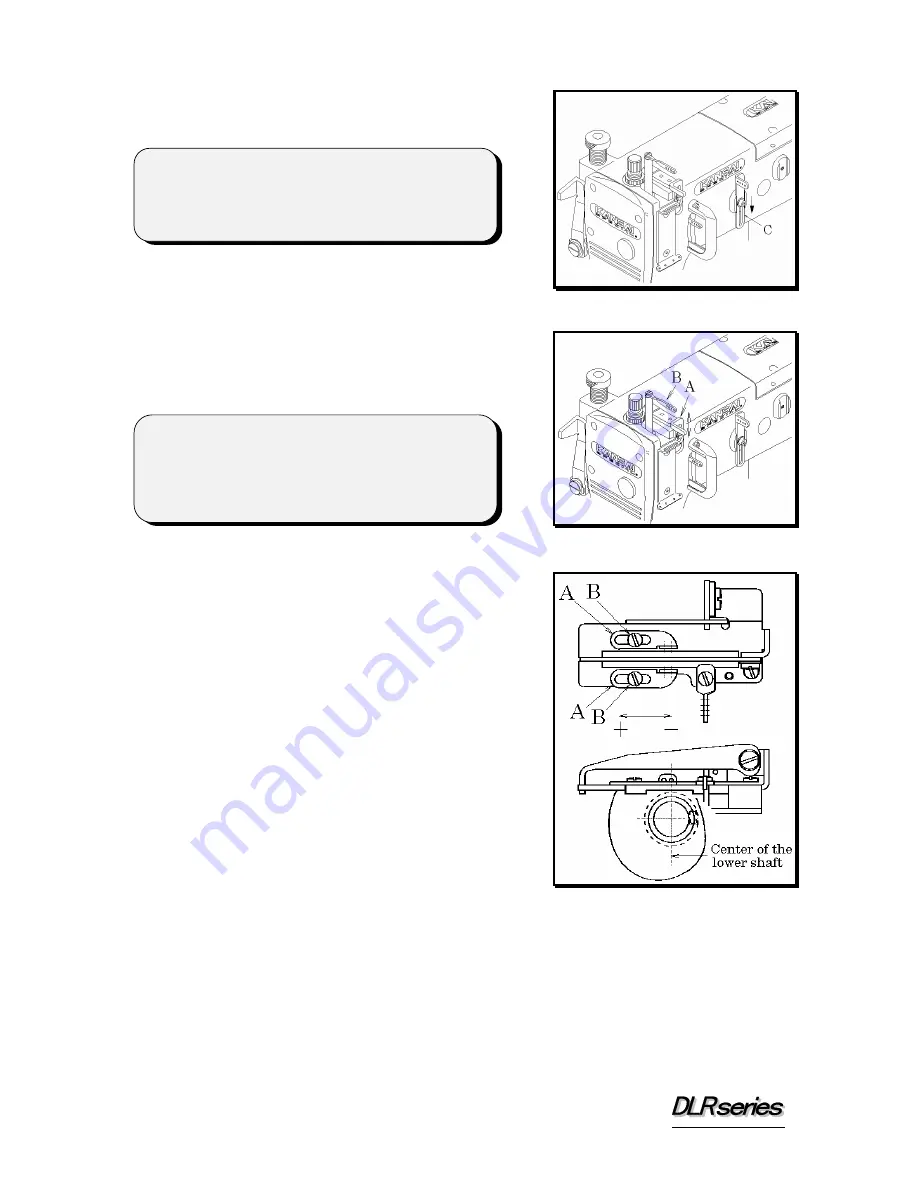
11-4 Adjusting the looper thread eyelets 

Align the eyes on looper thread eyelets A with the 
center of the lower shaft. 
To increase the amount of the looper thread to be 
supplied, loosen screws B and move looper thread 
eyelets A to the rear of the machine. 
To decrease the amount of the looper thread to be 
supplied, loosen screws B and move looper thread 
eyelets A to the front of the machine. 
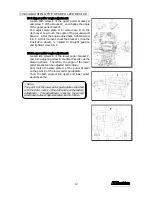
In case of model 1508SPF, move looper thread 
eyelets A fully toward the front of the machine and 
secure them with screws B. 
Adjust the looper thread eyelets according to the 
thread and stitch length to be used. 

< Note > 

Raising needle thread guard A increases the size of 

the needle thread loop.  Lowering needle thread 

guard A decreases the size of the needle thread 

loop. 


15

Summary of Contents for DLR-1501SPF

Page 1: ...INSTRUCTION Industrial Sewing Machines First published August 2005 No 050072 ...

Page 2: ...heck to make sure the pulley cover safety cover etc are secured 3 Before adjusting cleaning threading the machine or replacing the needle be sure to turn off the power 4 Never start the machine with no oil in the reservoir 5 Refer to the parts list as well as this instruction manual before performing preventive maintenance 6 The contents described in this instruction manual are subject to change w...

Page 3: ...7 ADJUSTING THE NEEDLE GUARD 7 1 Position of the needle guard rear 9 8 ADJUSTINGTHEFEEDDOG STITCHLENGTH 8 1 Feed dog height tilt 10 8 2 Left and right feed dog height 10 8 3 Stitch length 10 9 ADJUSTING THE PRESSER FOOT 9 1 Presser foot pressure 11 9 2 Position of the presser foot and foot lift 11 10 ADJUSTING THE REAR PULLER DEVICE 10 1 Upper puller angle adjustment 12 10 2 Lower puller angle adj...

Page 4: ...edles UY 128GAS TV 5 of Schmetz or Organ Select the proper needle for the fabric and thread Needle count comparison table Schmetz Nm90 Nm95 Nm100 Nm105 Nm110 Nm120 Nm125 Nm130 Organ 14 15 16 17 18 19 20 21 2 2 Replacing the needle When replacing the needle check the needle carefully to see that the scarf is turned to the rear of the machine see the illustration Note When replacing the needle be su...

Page 5: ...ormation When threading the looper tilt the looper holder toward the front of the machine by means of the looper drawing bar To tilt the looper toward the front 1 Bring the needle bar to the top of its stroke 2 Tilt looper holder B toward the front of the machine by pressing pushbutton flat spring A see below 3 After the machine is threaded replace the looper holder 2 ...

Page 6: ... A B C D Needle threads E F G H Looper threads 3 ...

Page 7: ...n from the end of the machine pulley see the illustration 3 2 Motor belt Motor 3 phase 2 pole 400W clutch motor Belt M type V belt Select the proper motor pulley according to the machine speed refer to the motor pulley outer diameter on the table below Adjust the position of the motor by pressing the finger onto the middle of the belt so that 1 2cm deflection can be achieved see the illustration M...

Page 8: ...e life be sure to replace the oil after the first 250 hours of operation To replace the oil follow the procedures below 1 Remove the V belt from the motor pulley and then remove the machine from the table 2 Remove screw D and then drain the oil Be careful not to stain V belt with the oil 3 After draining the oil be sure to tighten screw D 4 Fill the machine with oil by referring to 4 2 shown above...

Page 9: ... 5 SEWING MACHINE INSTALLATION 5 1 Cutting the machine able 6 ...

Page 10: ...side of the table board see the illustration below Fit the rubber cushions onto the brackets Mount the machine head on the rubber cushions 6 TIMING OF THE LOOPER TO THE NEEDLE 6 1 To install the looper Insert the looper to the proper depth and tighten screw A 7 ...

Page 11: ...r to the center of the needle see the table below Model Looper setting Distance A 1508 3mm Adjustment is made by loosening screw C on lever B 6 4 Needle height When the point of the looper has reached the center of the back side of the needle with the machine pulley turning in the operating direction the point of the looper should be 2mm above the top of the needle s eye see 6 2 When the needle ba...

Page 12: ...n the centers of both connecting rods should be 87mm 7 ADJUSTING THE NEEDLE GUARD 7 1 Position of the needle guard rear When the point of the looper has reached the center of the back side of the needle from the extreme right end of its travel align the point of the needle with bottom surface C of the needle guard rear With the needle and the needle guard rear in this position set clearance D betw...

Page 13: ...d make the left feed dog higher than the right side how much the angle of the curved waist band is Original both feed dog position at the beginning are set to the same height 8 3 Stitch length The stitch length can be adjusted from 2 to 5mm with no step The following table shows the stitch length with the number of stitches within 1 inch 25 4mm and 30mm No of stitches Stitch length mm within 1 wit...

Page 14: ...he illustration 9 2 Position of the presser foot and foot lift Fit the presser foot properly onto the presser bar Make sure the needle drops correctly to the center of the needle drop hole on the presser foot Adjustment is made by loosening screw A Foot lift The presser foot should be 7 9mm above the top surface of the needle plate Set stopper B at the required position Fasten the presser foot lif...

Page 15: ...t position and tighten screw E F 10 2 Lower puller angle adjustment Loosen two screws A of the lower puller bracket P and turn adjusting screw B counter clockwise as the drawing shows Therefore the angle of the lower puller bracket can be adjusted horizontally And match the scale plate H of the puller bracket on the point K of the lower puller guide plate Then the both angle of the upper and lower...

Page 16: ...ossible yet be sufficient to feed the fabric smoothly To increase the pressure turn adjusting knob D clockwise To decrease the pressure turn adjusting knob D counterclockwise 10 6 Adjusting the feeding amount of the rear puller Adjust the feeding amount of the rear puller according to that of the feed dog To increase the amount loosen nut G and move it to the left To decrease the amount move it to...

Page 17: ...ecting rod C to the right 11 ADJUSTING THE STITCH FORMATION 11 1 Thread tension adjustment Thread tension varies according to sewing conditions such as the fabric thread and stitch length to be used Tension on the needle thread can be adjusted with nuts A Tension on the looper thread can be adjusted with nuts B To increase the tension turn the nuts clockwise Note The tension should be as light as ...

Page 18: ... on looper thread eyelets A with the center of the lower shaft To increase the amount of the looper thread to be supplied loosen screws B and move looper thread eyelets A to the rear of the machine To decrease the amount of the looper thread to be supplied loosen screws B and move looper thread eyelets A to the front of the machine In case of model 1508SPF move looper thread eyelets A fully toward...

Page 19: ...dle has reached bottom surface B of the looper blade while the looper is moving to the right from the extreme left end of its travel the looper thread should be removed from point A on the looper thread take up Adjustment is made by loosening screw C 12 CLEANING THE MACHINE At the end of each day remove the presser foot and the needle plate and then clean the slots of the needle plate and the area...

Reviews: