background image

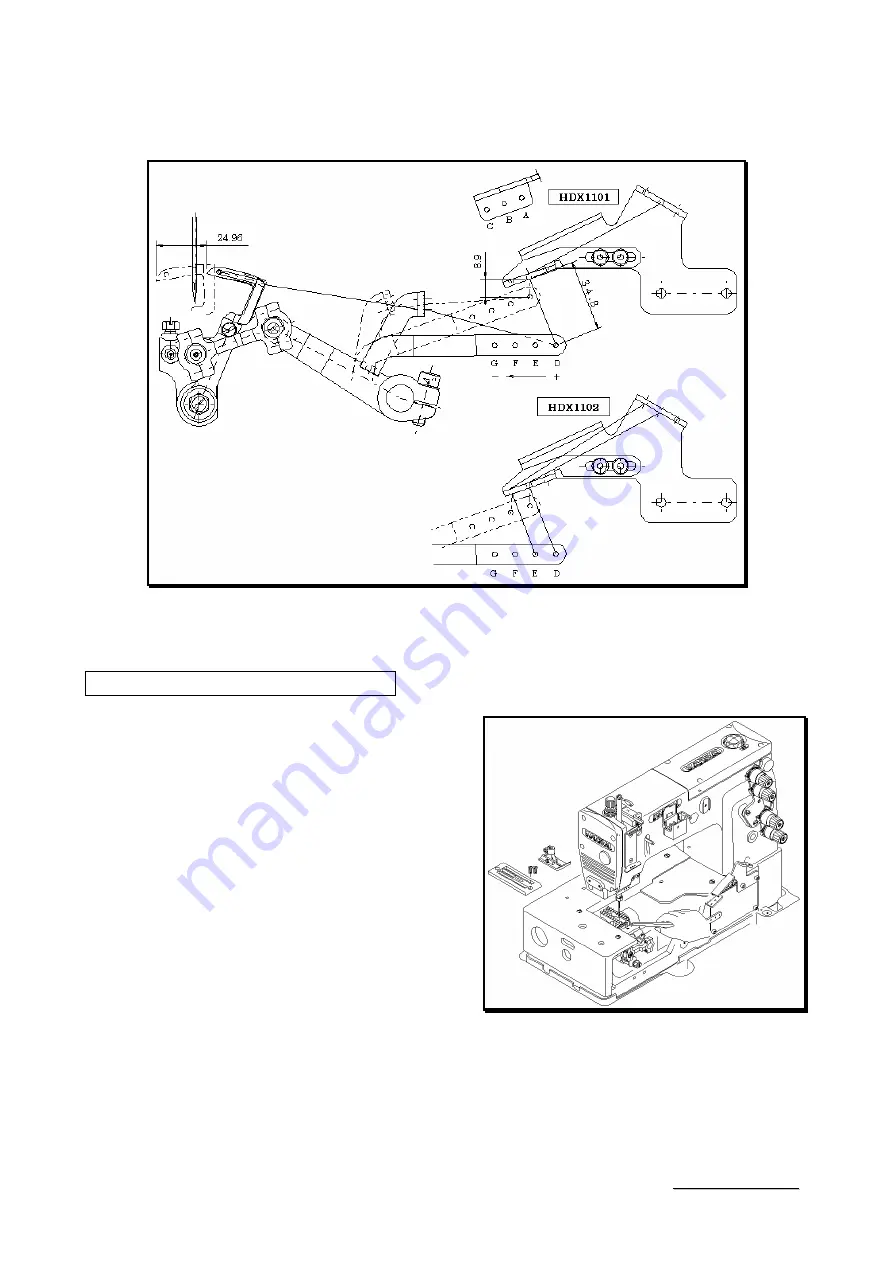
9-2 The position of take-up thread eyelet 

Refer to the below illustration for threading by threading in direction of D to G of thread 
eyelet hole, the amount of under thread are decreased. 


10

CLEANING THE MACHINE   


At the end of each day, remove the presser 
foot and the needle plate and then clean the 
slots of the needle plate and the area 
around the feed dogs.   


10

H

H

D

D

X

X

s

s

e

e

r

r

i

i

e

e

s

s


Summary of Contents for HDX Series

Page 1: ...INSTRUCTION Industrial Sewing Machines HDX1101 HDX1102 First published October 2003 No 030183 ...

Page 2: ...ne 2 Before starting the machine check to make sure the pulley cover safety cover etc are secured 3 Before adjusting cleaning threading the machine or replacing the needle be sure to turn off the power 4 Never start the machine with no oil in the reservoir 5 Refer to the parts list as well as this instruction manual before perfoming preventive maintenance 6 The contents described in this instructi...

Page 3: ...ght for installing the looper 5 5 2 Looper left to right movement 6 5 3 Looper setting distance 6 5 4 Needle bar height 6 5 5 Needle looper front to back relationship 7 6 ADJUSTING THE NEEDLE GUARDS 6 1 Position of the needle guard rear 7 6 2 Position of the needle guard front 7 7 ADJUSTING THE FEED DOG STITCH LENGTH 7 1 Feed dog height tilt 8 7 2 Stitch length 8 8 ADJUSTING THE PRESSER FOOT 8 1 P...

Page 4: ... Then install the needle correctly Note Before replacing the needle be sure to turn off the machine A clutch motor continues running for a while after the machine is turned off Therefore keep on pressing the pedal until the machine stops 1 3 Threading the machine Thread the machine correctly by referring to the illustration below Threading the machine incorrectly may cause skip stitching thread br...

Page 5: ...or belt Motor 3 phase 2 pole 400W clutch motor Belt M type V belt Select the proper motor pulley according to the machine speed refer to the motor pulley outer diameter on the table below Adjust where to position the motor by pressing the finger onto the middle of the belt so that 1 2cm deflection can be obtained see the illustration on the right Machine speed Type Maximum speed Standard speed HDX...

Page 6: ...d machine life be sure to replace the oil after the first 250 hours of operation To replace the oil follow the procedures below 1 Remove the V belt from the motor pulley and then remove the machine from the table 2 Remove screw D and then drain the oil Be careful not to stain V belt with the oil 3 After draining the oil be sure to tighten screw D 4 Fill the machine with oil by referring to 3 2 sho...

Page 7: ... 4 SEWING MACHINE INSTALLATION 4 1 Cutting the machine table 4 H HD DX Xs se er ri ie es s ...

Page 8: ...THE LOOPER TO THE NEEDLES 5 1 Angle and height for installing the looper To obtain the proper angle and height insert the looper fully into looper holder A and then tighten screw B The proper angle for the looper on HDX is 5 Distance at 20mm from the point of the looper between the bottom of the looper blade and the extension line from the point of the looper Approximately 1 75mm 5 H HD DX Xs se e...

Page 9: ...extreme right end of its travel adjust distance 5mm from the point of the looper to the right side of the needle Adjustment is made by loosening screw B 5 4 Needle bar height When the point of the looper has reached the center of the needle with the machine pulley turned in the operating direction adjust distance 2 5mm from the top of the needle s eye to the point of the looper on the back side of...

Page 10: ...THE NEEDLE GUARDS 6 1 Position of the needle guard rear The position of needle guard rear is when the point of looper located in behind center of needle the clearance should be 0 0 1mm is adjusted by screw A 6 2 Position of the needle guard front The height of needle guard front is when the point of looper located in behind canter of needle the distance should be 1 9mm from top of needle eye till ...

Page 11: ... of the needle plate Adjustment is made by loosening screw B and turning screw C 7 2 Stitch length Loosen bolt A right hand thread with a 9 5mm T wrench Then turn screw B To increase the stitch length turn screw B counterclockwise To decrease the stitch length turn screw B clockwise 8 ADJUSTING THE PRESSER FOOT 8 1 Presser foot pressure The presser foot pressure should be as light as possible yet ...

Page 12: ... of the needle plate Set stopper B at the required position Fasten the presser foot lift lever with nut C so that the lever cannot be lowered 9 ADJUSTING THE STITCH FORMATION 9 1 Position of the thread support When the needle bar is at the bottom of its stroke the centers of the eyes on thread eyelet A should be level with the top surface of thread support B and A should be parallel with B Height ...

Page 13: ...reading in direction of D to G of thread eyelet hole the amount of under thread are decreased 10 CLEANING THE MACHINE At the end of each day remove the presser foot and the needle plate and then clean the slots of the needle plate and the area around the feed dogs 10 H HD DX Xs se er ri ie es s ...

Reviews: