
8
S
S
S
S
S
S
S
S
P
P
P
P
P
P
P
P
X
X
X
X
X
X
X
X
ssss
ssss
eeee
eeee
rrrr
rrrr
iiii
iiii
eeee
eeee
ssss
ssss
【
6
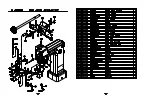
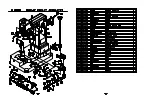
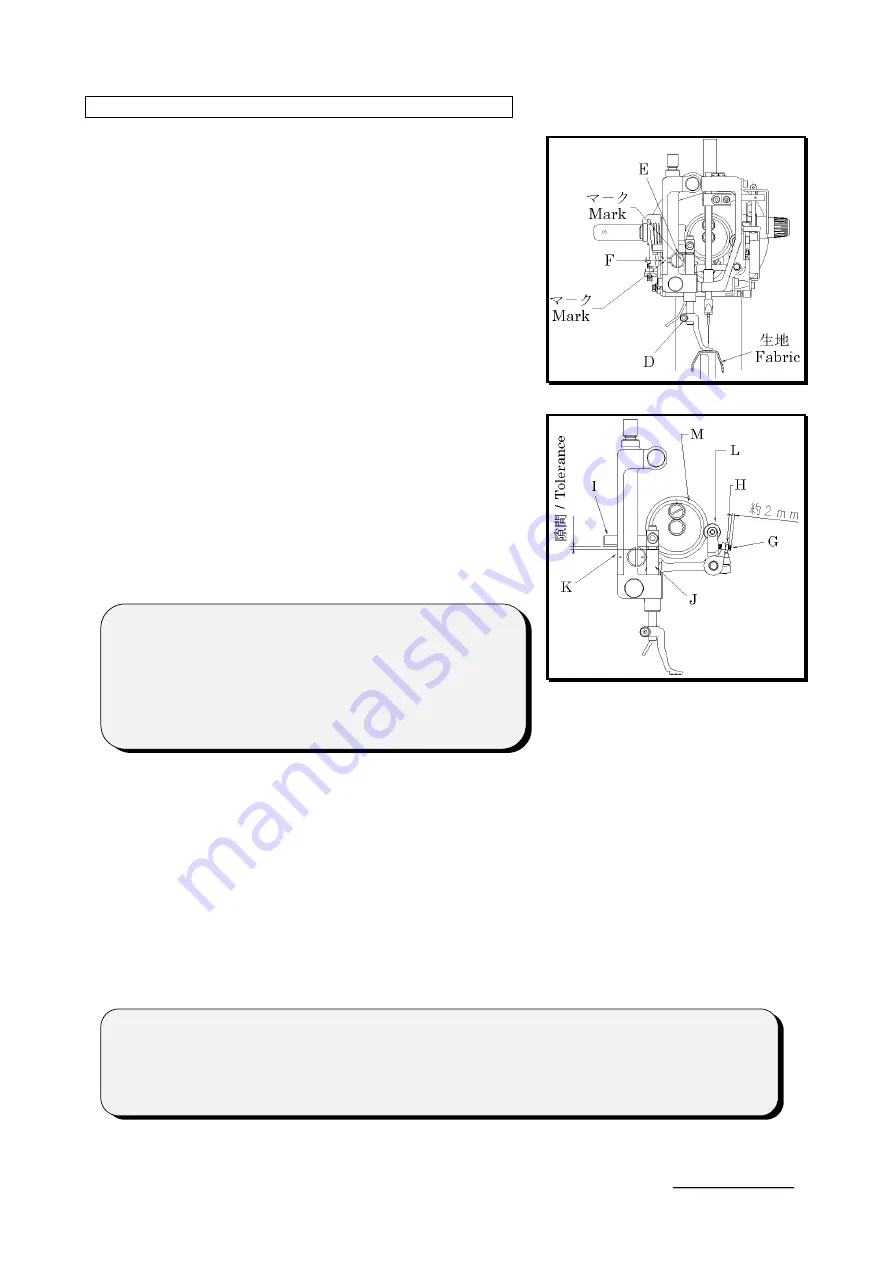
】上送り歯の調整
/ ADJUSTING UPPER FEED DOG
6666----1
1
1
1
送り歯の高さ
送り歯の高さ
送り歯の高さ
送り歯の高さ
/ H
/ H
/ H
/ Height
eight
eight
eight
送り歯の高さ調節は、ネジ
D
を緩めて行って下さい。
下げすぎるとパッカリングが起きやすく、上げすぎる
と生地を送りません。製品の厚み分を目安にして下さ
い。
(出荷時は、約
1.8mm
になっています。)
To make the adjustment of height, loosen screw D.
Too much down may cause puckering, too much up
may cause no-feeding of the fabric.
The height of upper feed dog should be adjusted
with the thickness of products (goods)
approximately.
Factory standards of the height of upper feed dog is
adjusted with 1.8mm.
6666----2
2
2
2
送り歯の前後位置
送り歯の前後位置
送り歯の前後位置
送り歯の前後位置
/ F
/ F
/ F
/ Front
ront
ront
ront to back position
to back position
to back position
to back position
ネジ
F
を緩め、軸
E
を回転させることで、送り歯の前
後位置を変更できます。送り歯と針が当たらない様に
注意して下さい。
Turn the shaft E after loosening of screw F, so that
the front to back position of feed dog is changeable.
Be careful not to touch feed dog and needle.
6666----3
3
3
3
送り歯の上下運動
送り歯の上下運動
送り歯の上下運動
送り歯の上下運動
/ Up to down movement
/ Up to down movement
/ Up to down movement
/ Up to down movement
ネジ
G
の調整で、送り歯の上下運動の高さを変更することができます。
ナット
H
とネジ
G
の端までが約
2
mmになるのが基準で、この時、カム
M
を一回転させると
カムフロアー
L
は、常にカム
M
と接します。調整を行った後は、上送り棒抱き
I
と上送り土
台
K
ブッシュ
J
との間に隙間がある事を確認して下さい。
Adjust the screw G, so that the height for up to down movement of feed dog is changeable.
2 mm distance between nut H and screw G is a standard setting.
At this condition, cam floor L always comes in contact with cam M when one turning of
cam M. After adjusting, confirm there are some tolerance in properly between feed dog
connecting link I and feed dog plate K / bush J.
<
注
/ Note >
TYPE-1
の送り歯(
GP-178
)使用時、軸
E
のマ−クは右側
になっています。(工場出荷時)
In case of the type 1 of the feed dog (GP-178), the
marking of shaft E would be right side.
(Standard position)
<
注
/ Note >
TYPE-1
の送り歯(
GP-178
)を使用する時、送り量の最大は
3mm
となります。
In case of the type-1 (GP-178) of the feed dog, the feeding amount would be 3mm in the
maximum.