Scanning the server for viruses
47
events to be logged. This can be done on the
Event log
tab (for more de-
tails please refer to section
B.2.3 on page 100).
•
Set the notification mode to alert the administrator and network users
about detected viruses via the Novell NetWare messaging tools, and
specify the messages to be sent on the
NW-Notification
tab (for more
details please refer to section
B.2.4 on page 104).
•
Set the notification mode to alert the administrator and network users
about detected viruses via the mail server (by e-mail) using the mail sys-
tem installed in the network, and specify the messages to be sent on the
E-mail Notification
tab (for more details please refer to section
B.2.5 on
page 106).
•
Schedule unattended starts of the task and specify how long they will run.
This can be done on the
Schedule
tab (for more details please refer to
section
B.2.6 on page 108).
•
View the task execution statistics, start the task and view the scanning re-
sults log. This can be done on the
Statistics
tab (for more details please
refer to section
B.2.7 on page 112).
To make your settings come into force you need to apply them using the
Apply
button located in the lower part of the dialog window
On-Demand Scan
(<Server name>):<Task name>
/
Real-Time Protection
(<Server
name>):<Task name>
or save the changes and close the window using the
OK
button. To close the window without saving, click on
Cancel
.
The task settings can also be made in the application setup window
Kaspersky
Anti-Virus on <Server name>
.
To set up the task in the application setup window, do the following:
1. Select the required server in the
Kaspersky Anti-Virus 5.0
name
space in the console tree. Call the context menu and select the
Properties…
item.
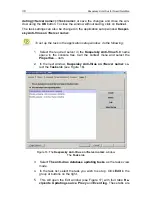
2. In the next window,
Kaspersky Anti-Virus on <Server name>,
se-
lect the
Tasks
tab (see Figure 16).
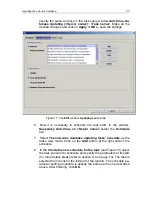
3. Select the mode for reviewing the Real-Time Protection and On-
demand Scan tasks –
The on-demand scan and the real-time
protection tasks
.
4. In the list of tasks created for the server select the one you wish to
set up. Click on the
Edit
button located in the group of buttons on
the right.


