18
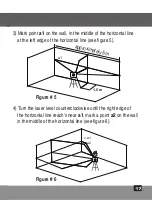
5) The distance between
a1
and
a2
, should not be more than
1.5mm otherwise to send the laser level to a qualified
technician for repairs.
Checking the Accuracy of the Vertical line.
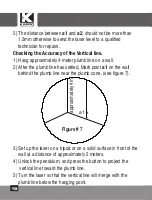
1) Hang approximately 4 meter plumb line on a wall.
2) After the plumb line has settled, Mark point
a1
on the wall
behind the plumb line near the plumb cone. (see figure 7).
3) Set up the laser on a tripod or on a solid surface in front of the
wall at a distance of approximately 2 meters.
4) Unlock the pendulum, and press the button to project the
vertical line toward the plumb line.
5) Turn the laser so that the vertical line will merge with the
plumb line below the hanging point.
a1 x
approximately
4m
Figure # 7
Summary of Contents for Prolaser 852G
Page 1: ...User Manual Manual del usuario Manuel d utilisation Prolaser Cross Line Laser Model No 852G...
Page 62: ...62 Kapro 852G Prolaser Cross Line Laser 852G Prolaser Cross Line Laser GREEN RU...
Page 63: ...63 64 65 66 67 68 69 70 72 73 74 79 80 81...
Page 64: ...64 40 130 1 4...
Page 65: ...65 II EN 60825 1 25249 6 65...
Page 66: ...66 10 C 45 C...
Page 67: ...67 1 2 3 3 1 2 3 4 5 USB Type C...
Page 68: ...68 1 2 3 4 5 6 7...
Page 69: ...69 1 2 a b c 3 4 5...
Page 70: ...70 3 1 2 1 ON 3 H V 4 3 5 1 OFF...
Page 71: ...71 1 M 2 H V 3 4 M 5 1...
Page 72: ...72 40 1 2 P 3 4 P...
Page 73: ...73...
Page 74: ...74 B A a1 0 5 m x Kapro 1 5 2 0 5 3 4 a1 1 5 0 5 1...
Page 75: ...75 B A a1 b2 x b1 x x 0 5 m B A a1 b1 x x 180 5 180 B b1 2 6 0 5 B 7 b2 3 2 3 0 5...
Page 76: ...76 8 180 2 4 9 a a2 a1 b b1 b2 10 a b 3 1 1 5 5 2 4 B A a1 b1 x b2 x x a2x 180...
Page 77: ...77 1 5 m a1 x 3 a1 5 4 a1 2 6 1 5 5 5 6 x a1 x a2...
Page 78: ...78 5 a1 a2 1 5 1 4 2 a1 7 3 2 4 5 7 4 a1 x...
Page 79: ...79 2 m a1 a2 x x x 6 2 a1 8 7 a1 a2 1 5 2 8...
Page 82: ...82...
Page 83: ...83...

