background image

Prolaser

®

 Cross

Model No. 862

User Manual

Manual del usuario 

Manuel d'utilisation 

Руководство по эксплуатации

2AA

20m/65'

INCLUDED

Summary of Contents for Prolaser 862

Page 1: ...Prolaser Cross Model No 862 User Manual Manual del usuario Manuel d utilisation 2AA 20m 65 INCLUDED...

Page 2: ...evel with 2 red diodes The laser is innovatively designed for a very broad range of professional and DIY jobs including Aligning tiles marble cabinets borders moldings and trimmings Marking lay out fo...

Page 3: ...3 CONTENTS Features 4 Safety instructions 5 6 Battery installation Safety 7 8 Overview 9 Operating instructions 10 11 Maintenance 12 Field calibration test 13 18 Specifications 19 Warranty 20...

Page 4: ...eveling range blinking Manual mode allows angular layout marking Locking mechanism to protect the pendulum during transportation Hanging hole for screw or nail in the back side of the laser Slot at th...

Page 5: ...e the laser level Do not look into a laser beam using magnifying optical devices such as binoculars or a telescope as this will increase the level of eye injury WARNING This product contains lead in s...

Page 6: ...above 45 C 14 F 113 F Do not operate the laser in explosive atmospheres such as flammable liquids gases or dust Sparks from the tool can cause ignition When not in use turn off the power engage the pe...

Page 7: ...batteries of the same brand according to the polarity diagram on the inside of the battery compartment 3 Hook and push the battery cover in place AA x 2 BATTERY INSTALLATION SAFETY NOTE If the laser...

Page 8: ...battery terminals 2 Do not charge Alkaline batteries 3 Do not mix old and new batteries 4 Do not dispose of batteries into household waste 5 Do not dispose batteries in fire 6 Defective or dead batte...

Page 9: ...Locking Switch 2 Laser output window 3 Operation push button a Automatic Mode b Manual Mode 4 Operation LED indicator 5 Battery cover 6 Tying Slot 7 Hanging hole 8 Magnet 9 Tripod mount 10 Battery co...

Page 10: ...the locking switch 1 forward to the ON position The laser level will generate the crossed horizontal and vertical lines and the green LED will light up 3 Choose the beams that you want to work with b...

Page 11: ...LED will light up 2 Choose the beams that you want to work with by pushing shortly the V H operation push button 3 Tilt the laser to the desirable slope 4 To turn the manual mode OFF press again the V...

Page 12: ...aser level with a clean soft cloth Do not use solvents Although the laser level is dust and dirt resistant to a certain degree do not store in dusty places as a long term exposure may damage internal...

Page 13: ...ly check the leveling accuracy of the vertical line Checking the Height Accuracy of the Horizontal Line Up and down deviation 1 Set up the laser on a tripod or on a solid surface between two walls A a...

Page 14: ...e center of the cross lines as b1 see figure 2 6 Move the laser level towards wall B and position it approximately 0 5 meter from wall B 7 Mark on wall B the center of the cross lines as b2 see figure...

Page 15: ...erwise to send the laser level to a qualified technician for repairs Checking the Level Accuracy of Horizontal Line Side to side inclination 1 Set up the laser on a tripod or on a solid surface at a d...

Page 16: ...ft edge of the horizontal line see figure 5 4 Turn the laser level counterclockwise until the right edge of the horizontal line reach s near a1 mark a point a2 on the wall in the middle of the horizon...

Page 17: ...plumb line has settled Mark point a1 on the wall behind the plumb line near the plumb cone see figure 7 3 Set up the laser on a tripod or on a solid surface in front of the wall at a distance of appr...

Page 18: ...n the middle of the vertical line at the same height of a1 see figure 8 7 The distance between a1 and a2 should not be more than 1mm otherwise to send the laser level to a qualified technician for rep...

Page 19: ...f leveling range 3 Laser line width 2 mm 0 5mm 5m 0 10 0 02 at 20 Wavelength 635 5nm Laser Class II Power supply 2 AA batteries included Battery life 20 hours of continuous operation Operating temp 10...

Page 20: ...cover products that are used improperly altered or repaired without Kapro approval In the event of a problem with the laser level you have purchased please return the product to the place of purchase...

Page 21: ...21...

Page 22: ...se ado de manera innovadora para una gama muy amplia de trabajos profesionales y de bricolaje DIY incluyendo Alineaci n de azulejos m rmol armarios bordes molduras y ribetes Marcaci n de colocaci n de...

Page 23: ...sticas 24 Instrucciones de seguridad 25 26 Instalaci n de bater as y Seguridad 27 28 Visi n general 29 Instrucciones de operaci n 30 31 Mantenimiento 32 Prueba de calibraci n de campo 33 38 Especifica...

Page 24: ...go de nivelaci n parpadeo El modo Manual permite el trazado marcaci n angular Mecanismo de bloqueo para proteger el p ndulo durante el transporte Orificio para colgar para tornillo o clavo en la parte...

Page 25: ...ilizar el nivel l ser No mire a un rayo l ser utilizando equipos pticos de aumento tal como prism ticos o telescopio ya que esto aumentar el nivel de lesi n ocular ADVERTENCIA Este producto contiene p...

Page 26: ...4 F 113 F No opere el l ser en atm sferas explosivas tales como l quidos inflamables gases o polvo Las chispas de la herramienta pueden causar ignici n Cuando no est en uso apague la unidad enganche e...

Page 27: ...igual marca en el interior del compartimiento de las bater as de acuerdo con el diagrama de polaridad 3 Enganche y empuje la tapa de las bater as en su lugar INSTALACI N DE BATER AS Y SEGURIDAD NOTA...

Page 28: ...rminales de las bater as 2 No recargue las bater as alcalinas 3 No mezcle bater as viejas y nuevas 4 No deseche las bater as en la basura hogare a 5 No deseche las bater as en el fuego 6 Las bater as...

Page 29: ...ff 2 Ventana de salida del l ser 3 Bot n pulsador de operaci n a Modo autom tico b Modo manual 4 Indicador LED de operaci n 5 Tapa de las bater as 6 Ranura para sujetar 7 Orificio para colgar 8 Im n 9...

Page 30: ...oqueo 1 hacia delante a la posici n ON El nivel l ser generar las l neas horizontales y verticales cruzadas y se encender el indicador LED verde 3 Elija los haces con los que desea trabajar presionand...

Page 31: ...der elLEDrojo 2 Elija los haces con los que desea trabajar presionando brevemente el bot n pulsador de operaci n V H 3 Incline el l ser a la pendiente deseada 4 Para desactivar el modo Manual OFF puls...

Page 32: ...l ser utilizando un pa o suave y limpio No utilice disolventes Aunque el nivel l ser es resistente al polvo y la suciedad en cierta medida no lo almacene en lugares polvorientos ya que una exposici n...

Page 33: ...la precisi n de nivelaci n de la l nea vertical Comprobaci n de la precisi n de altura de la l nea horizontal desviaci n hacia abajo y hacia arriba 1 Instale el l ser sobre un tr pode o sobre una supe...

Page 34: ...ruzadas como b1 ver la figura 2 6 Mueva el nivel l ser hacia la pared B y posici nelo aproximadamente a 0 5 metros de la pared B 7 Marque en la pared B el centro de las l neas cruzadas como b2 ver la...

Page 35: ...t cnico cualificado para su reparaci n Comprobaci n de la precisi n de nivelaci n de la l nea horizontal inclinaci n de lado a lado 1 Instale el l ser sobre un tr pode o sobre una superficie s lida a...

Page 36: ...a figura 5 4 Gire el nivel l ser en sentido contrario de las manecillas del reloj hasta que el borde derecho de la l nea horizontal llegue cerca de a1 marque un punto a2 en la pared en medio de la l n...

Page 37: ...nto a1 en la pared detr s de la l nea de plomada cerca del cono de la plomada ver la figura 7 3 Instale el l ser sobre un tr pode o sobre una superficie s lidafrente a la pared a una distancia de apro...

Page 38: ...n el medio de la l nea vertical a la misma altura de a1 ver la figura 8 7 La distancia entre a1 y a2 no debe ser de m s de 1 mm si no es as env e el nivel l ser a un t cnico cualificado para su repara...

Page 39: ...Ancho de l nea l ser 2 mm 0 5mm 5m 0 10 0 02 at 20 Longitud de onda 635 5nm L ser de Clase II Fuente de alimentaci n 2 bater as AA incluidas Duraci n de la bater a continuo 20 horas de funcionamiento...

Page 40: ...e se utilicen inadecuadamente se modifiquen o se reparen sin la aprobaci n de Kapro En caso de problemas con el nivel l ser que ha adquirido por favor devuelva el producto al lugar de compra presentan...

Page 41: ...41...

Page 42: ...c deux diodes rouges De conception innovante ce niveau laser se destine de tr s nombreuses t ches professionnelles ou de bricolage notamment Alignementdecarrelage placards rives mouluresetboiseries Ma...

Page 43: ...Fonctions 44 Consignes de s curit 45 46 Installation des piles et s curit 47 48 Vue d ensemble 49 Utilisation 50 51 Entretien 52 Test d talonnage sur site 53 58 Caract ristiques 59 Garantie 60 SOMMAI...

Page 44: ...horizontale crois es Port e maximale en int rieur 20 m 65 avec lunettes rouges Auto nivellement en mode automatique lorsque le laser est plac dans sa port e d auto nivellement Alerte hors port e visu...

Page 45: ...pas regarder dans le faisceau laser avec un mat riel optique grossissant des jumelles ou un t lescope par exemple pouvant aggraver les l sions oculaires ATTENTION Ce produit contient des soudures au...

Page 46: ...45 C 14 F 113 F Ne pas utiliser en environnement inflammable tel qu en pr sence de liquides gaz ou poussi res inflammables Les tincelles de l appareil peuvent s enflammer Lorsqu il n est pas utilis t...

Page 47: ...z 2 piles AA neuves de marque identique en respectant le sch ma de polarit figurant l int rieur du compartiment de piles 3 Remettez le couvercle de piles en place INSTALLATION DES PILES ET S CURIT REM...

Page 48: ...rnes des piles 2 Ne pas recharger des piles alcalines 3 Ne pas m langer des piles neuves et anciennes 4 Ne pas jeter les piles aux ordures m nag res 5 Ne pas jeter les piles au feu 6 Les piles d fectu...

Page 49: ...e de projection laser 3 Bouton de Fonctionnement a Mode automatique b Mode manuel 4 T moin LED de fonctionnement 5 Couvercle de piles 6 Encoche pour sangle 7 Trou de suspension 8 Aimant 9 Adaptateur t...

Page 50: ...ur un tr pied 2 Poussez l interrupteur 1 vers l avant en position ON Le niveau laser g n re les lignes horizontale et verticale crois es et le LED vert s illumine 3 Choisissez les faisceaux que vous s...

Page 51: ...es clignotantes et le LED rouge s illumine 2 Choisissez les faisceaux que vous souhaitez utiliser enappuyantbri vementsurleboutondefonctionnement V H 3 Inclinez le niveau sur l inclinaison d sir e 4 P...

Page 52: ...er l aide d un chiffon doux propre N utilisez pas de solvants Bien que le niveau laser soit r sistant l eau et la poussi re ne le remisez pas en un endroit poussi reux une longue exposition tant susce...

Page 53: ...n de nivellement de la ligne verticale V rification de la pr cision de hauteur de la ligne horizontale cart haut bas 1 Posez le laser sur un tr pied ou une surface solide entre deux murs A et B distan...

Page 54: ...es crois es comme point b1 voir illustration 2 6 D placez le niveau laser face au mur B environ 50 cm du mur B 7 Marquez sur le mur B le croisement des lignes comme point b2 voir illustration 3 A B a1...

Page 55: ...ontraire le niveau laser doit tre examin par un technicien agr V rification de la pr cision de nivellement de la ligne horizontale inclinaison lat rale 1 Placez le laser sur un tr pied ou une surface...

Page 56: ...stration 5 4 Tournez le niveau laser dans le sens antihoraire jusqu ce que l extr mit droite de la ligne horizontale atteigne a1 et marquez un le point a2 sur le mur au milieu de la ligne horizontale...

Page 57: ...re marquez le point a1 sur le mur derri re le fil plomb c t du plomb voir illustration 7 3 Placez le laser sur un tr pied ou une surface solide face au mur une distance d environ 2 m tres 4 D verrouil...

Page 58: ...lieu de la ligne verticale et la m me hauteur que a1 voir illustration 8 7 La distance entre a1 et a2 ne doit pas exc der 1 mm Dans le cas contraire le niveau laser doit tre examin par un technicien a...

Page 59: ...to nivellement 3 Largeur de ligne laser 2 mm 0 5mm 5m 0 10 0 02 at 20 Longueur d onde 635 5nm Laser de classe 2 Alimentation 2 piles AA fournies Autonomie 20 heures de fonctionnement continu Temp ratu...

Page 60: ...garantie ne couvre pas les produits utilis s de fa on inappropri e modifi s ou r par s sans l autorisation de Kapro En cas de probl me avec votre niveau laser veuillez ramener le produit au lieu d ach...

Page 61: ...61...

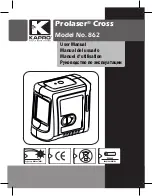
Page 62: ...62 Kapro 862 Prolaser Cross 862 Prolaser 2AA 20m 65 RU...

Page 63: ...63 64 65 66 67 68 69 70 71 72 73 78 79 80...

Page 64: ...64 20 65ft 1 4...

Page 65: ...65 II EN 60825 1 25249 6 65...

Page 66: ...66 10 C 45 C...

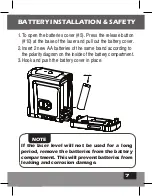
Page 67: ...67 AA x 2 1 5 10 2 2 3...

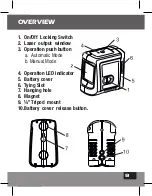
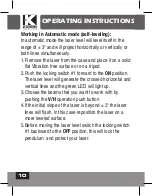
Page 68: ...68 1 2 3 4 5 6 7...

Page 69: ...69 1 2 3 a b 4 5 6 7 8 9 10...

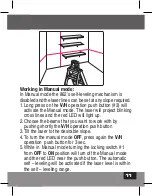
Page 70: ...70 3 1 2 1 ON 3 4 3 5 1 OFF...

Page 71: ...71 1 3 4 2 3 3 4 3 5 1 ON 4...

Page 72: ...72...

Page 73: ...73 Kapro 1 5 2 0 5 3 4 a1 1 5 0 5 1...

Page 74: ...74 5 180 B b1 2 6 0 5 B 7 b2 3 A B a1 180 X Figure 2 Xb1 2 A B a1 b1 b2 Figure 3 0 5m X X X 3 0 5...

Page 75: ...75 2 2 B 1 5m 8 180 2 4 9 a a2 a1 b b1 b2 10 a b 2 1 1 5 5 2 x a2 x a1 x b1 b2 x A B 180 Figure 4 4...

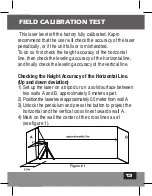
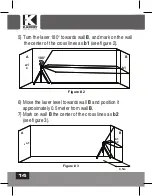
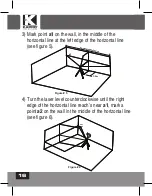
Page 76: ...76 3 a1 5 4 a1 2 6 a1 approximately 5m 1 5m Figure 5 X 1 5 5 5 x a1 x a2 Figure 6 6...

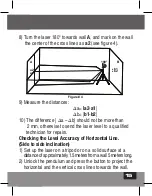
Page 77: ...77 6 5 a1 a2 1 1 4 2 a1 7 3 2 4 5 approximately 4m Figure 7 a1X 7 4...

Page 78: ...78 6 2 a1 8 7 a1 a2 1 a1 X 2m X a2 X Figure 8 2 8...

Page 79: ...79 a1 20 65ft 0 3 120 5 3 2 0 5 5 635 5 II 2 AA 20 10 C 45 C 20 C 60 C IP54 9 x 5 5 x9 2 330 10...

Page 80: ...80 862...

Page 81: ...81...

Page 82: ...82 10 2016 Kapro Industries Ltd...

Reviews: