background image

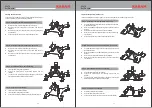
CABLE TERMINATION & SHOCK ABSORBER
Ref. PN 4000 

Cable\ Extrimit

Poke\ Pi

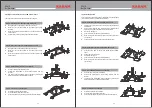
STEP 1

STEP 2

STEP 3

STEP 4

è

Insert the cable into the swage tube

è

The swage tube has markings to identify exact positions of crimping

è

Place the swage tube on the hex loc die of a hydraulic crimping 
tool(130kN capacity).

è

Ensure that the mark on the swage tube is in the  center of the die.

è

Operate the machine to start the swaging operation until the green 
light is on.

è

Repeat the process for all markings

13

20

Step 2A : Cable Extremity 

è

Insert the cable in to the housing of the cable extremity.

è

Open the strands of the wire.

è

Insert the core of the cable in the poke pin. The strand which is 
Straight is the core, the other strands are twisted.

è

With a hollow Centre punch hammer the poke pin deep inside the 
housing of the cable extremity.

è

Tighten the connector of the extremity to the housing of the cable 
extremity 

è

Connect the cable extremity to the universal end extremity Plate 
PN 4000 (09) by a locking pin.

è

Insert the pin ring in to the locking pin to lock.

Step 2B : Cable Swaging

è

Insert the connector to the  universal extremity plate, PN 4000 (09)

è

Connect the other connector to the tensioner PN4000(03)

è

Apply tension to the cable until the L tension indicator plate touches 
the spring

è

Take  the  shock  absorber  out  of  service  when  the  spring  is 
elongated due to an impact from a fall of the user.

Step 3: Shock Absorber: Ref. PN 4000MU(02)

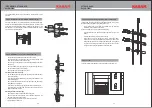
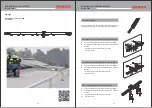
TENSIONER &  INTERMEDIATE
Ref. PN 4000 

è

Open the threads of the tensioner from both ends. Ensure 75% of 
the thread is open.

è

Insert the  locking pin so as to pass a the eye of the tensioner and 
the Shock Absorber, PN 4000 (07).

è

Insert a pin ring in the locking pin to lock it.

21

è

Insert the cable through the intermediate

è

Connect  the  intermediate  to  the  receiving  structure  with  the 
fastener.

è

The angle of the Intermediate may be changed by inserting the 
plastic intermediate fastener to different holes provided.

Step 6 : Intermediate; Ref. PN 4000(10)

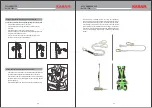
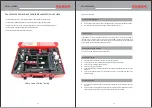
Step 4 : Mounting the tensioner on the system

è

Hold the tensioner eye

è

Insert the tensioning tool in the housing of the tensioner and rotate 
the  tensioner  in  clock  wise  direction.  Rotate  it  until  reasonable 
tension is achieved in the cable and the green indicator rod is visible 
in he shock absorber. Stop applying tension when the red indicator 
begins to appear in shock absorber

è

Tighten both the chuck nuts


Step 5 : Applying Tension To the line

UPWARD PULL FOR
TENSION

Summary of Contents for Horizon PN 4000

Page 1: ...ex PN 7000 Vertex PN 8000 Vertex PN 9000 Horizontal Life Line Systems Horizon PN 4000 Horizon PN 5000 FIXED LINE SYSTEMS www karam in For further details on all our products contact below C 35A Phase...

Page 2: ...ker workinginsomeofthe mosthazardousindustrialconditions OperationsatKARAMareunderconstantvigilancetoprovidethefinestinQualityofproductandservice FALL PROTECTION EQUIPMENT MANUFACTURING 01 Congratulat...

Page 3: ...channel grips and fastened on the same with the help of the given fasteners The drawings below illustrate thepositionofthechannelgripsfordifferentsections COMPATIBLE SUPPORT SECTION PROCESS Recommend...

Page 4: ...ble Extrimit Poke Pi STEP 1 STEP 2 STEP 3 STEP 4 05 04 STEP 3C Cable Swaging Insertthecableintotheswagetube Theswagetubehasmarkingstoidentifyexactpositionsofcrimping Place the swage tube on the hex lo...

Page 5: ...ble due to wind pressure TheTensionerisinstalledatthelowerendofthesystem Open the threads of the extension rod of the tensioner from both ends Ensurethat75 ofthethreadisopen Insert the eye of the tens...

Page 6: ...cted and buckles are securedandtheharnesshasbeenadjustedtogiveitasnugfit Connect the Rope Grab to the front attachment point of the full body harness with the help of the Karabiner of the connecting l...

Page 7: ...000 10 CableExtremity Ref PN7000 03 7 STRANDS OF 19 WIRES Roof Top Anchor Port Extremity Ref PN07 A Roof Top Anchor Port Intermediate Ref PN07 B 11 Ref HORIZON PN 4000 Over the Head Wire Rope Ref PN 9...

Page 8: ...ackets on the base plates using nutsandbolts Step C Intermediate Bracket Ref PN 4000 10 Insertthecablethroughtheintermediate Connect the intermediate to the receiving structure with the fastener The a...

Page 9: ...Sheets These Posts are suitable for a variety of trapezoidal roof sheet designs It has multiple holes to suit different peak distances 15 Step A Roof Top Anchor Post Extremity Ref SA 07G Stick the bas...

Page 10: ...POSTS Ref PN 4000 Trapezoidal Roof Sheets Blank Posts These are blank posts on which holes may be punched to match the roof Profile on trapezoidal roof 17 Step A Roof Top Anchor Post Extremity Ref SA...

Page 11: ...aseofanIBeam Insertthestuds Tightenthenutsonthetopandbottomoftheposts Placetheuniversalextremityplateonthetopflange Tightenthenutsandboltstosecuretheuniversalextremityplateto thepost Step B Intermedia...

Page 12: ...09 ConnecttheotherconnectortothetensionerPN4000 03 Apply tension to the cable until the Ltension indicator plate touches thespring Take the shock absorber out of service when the spring is elongatedd...

Page 13: ...s along the length of the line with the user who is connected to it by using a karabiner followed by a Connecting element connected to the full body harness of the user Thecarriagemaybeattachedordetac...

Page 14: ...u Rail extremity Press the termination of theextremityandpassthe trolleyoverthetermination After the trolley slides on theAlu Rail the termination cones back to its original position ensuring that the...

Page 15: ...t to the end of the Alurail Extensionusingamountingnut For trapezoidal roof sheets use blind rivits to install the Alurail Extension support to the roof for standing seam fasten the bracket usingnutbo...

Page 16: ...with Recess Ref PN 5000 05 Connectthebrackettothemountingnutasshowninthedrawing To install the mounting bracket in concrete use 12 mm Chemical fasteners OptionalAccessory ChemicalFastenerSA12 04 Conc...

Page 17: ...intermediate and curvedalurailfixboththeplatesby4setsoffasteners Ensure that the gap between the two rails is not greater than 1 5 mm 30 TROLLEY RECOMMENDED PPE Ref PN 5000 Step 4A Trolley For Wall R...

Page 18: ...ll concerned personnel on the subject of Pre Use Inspection of the System as per a defined guideline afterthesystemhasbeeninstalledbyKARAMpersonnel Post Installation Inspection Pre Use Checks Donotuse...

Page 19: ...ireadditionalprecautionstolimitthepossibility ofinjurytotheuserordamagetotheequipment Hazardsmayincludebutarenotlimitedto extreme temperatures caustic chemicals corrosive environments high voltage pow...

Page 20: ...nch Size Socket Size 6 8 10 12 16 10 13 16 19 24 10 13 16 19 24 Allen Bolt Size Allen Key Size Allen Grub Screw Key Size 6 8 10 12 4 6 8 10 3 4 5 6 WRENCH SIZE ALLEN KEY SIZE TORQUE CHART Bolt size Re...

Page 21: ...sing out of faulty or defective materialsorworkmanshipforaperiodofONEYEARfromthedateofpurchase in case of any defect develop in this equipment during the period of warranty KARAM undertakes the respon...

Page 22: ...Easytoinstallatsite Tailormadesolutionsarealsoavailable Indigenouslymade Fireretardant Corrosionandmoistureresistantmaterial Longlifespan It can be used along with horizontal life line systems designe...

Reviews: