-
5
1 Driving
Driving to the Place of Use.
Side brush and roller brush are raised.
2 Sweeping with sweep roller
Roller brush is lowered.
3 Sweeping using roller brush and
side brushes
Roller brush and side brushes are low-
ered.
Note:
The machine is equipped with a seat
contact switch If the driver's seat is vacat-
ed, the machine is switched off.
Note:
If the seat contact switch has
switched off the machine, then turn the ig-
nition key to "0" to prevent battery dis-
charge.
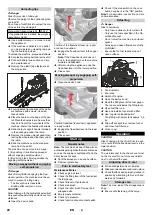
Open the device hood.
Check, if the stop switch on the com-
bustion engine is in the "ON" position.
Open the fuel supply.
Close cover.
Sit on the driver's seat.
Do NOT press the accelerator pedal.
Set programme switch to step 1 (driv-
ing).
Only when is very cold or raining: Pull
choke lever upwards. Once the engine
is running, pressl choke lever down
again.
Turn ignition key past position 1.
If the machine starts, release the igni-
tion key.
Note:
Never operate the starter motor for
longer than 10 seconds. Wait at least 10
seconds before operating the starter motor
again.
CAUTION
Always press the accelerator pedal careful-
ly and slowly. Do not jerkily change from re-
verse to forward drive or vice versa.
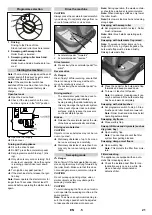
1 Accelerator pedal, "forwards"
2 Accelerator pedal, "reverse"
Press slowly the accelerator pedal "for-
ward".
Danger
Risk of injury! While reversing, ensure that
there is nobody in the way, ask them to
move if somebody is around.
Press slowly the accelerator pedal "re-
verse".
– The accelerator pedal can be used to
vary the driving speed infinitely.
– Avoid pressing the pedal suddenly as
this may damage the hydraulic system.
– In the event of power loss on inclined
surfaces, slightly reduce the pressure
on the accelerator pedal.
Release the accelerator pedal, the ma-
chine brakes automatically and stops.
CAUTION
Objects or loose obstacles may not be run
over or pushed.
Stationary obstacles of up to 5 cm can
be run over slowly and carefully.
Stationary obstacles of more than 5 cm
may only be run over using a suitable
ramp.
Danger
Risk of injury! If the bulk waste flap is open,
stones or gravel may be flung forwards by
the roller brush. Make sure that this does
not endanger persons, animals or objects.
CAUTION
Do not sweep up packing strips, wire or
similar objects as this may damage the
sweeping mechanism.
CAUTION
To avoid damaging the floor, do not contin-
ue to operate the sweeping machine in the
same position.
Note:
To achieve an optimum cleaning re-
sult, the driving speed should be adjusted
to take specific situations into account.
Note:
During operation, the waste contain-
er should be emptied at regular intervals.
Note:
When cleaning surfaces, only lower
the roller brush.
Note:
Also lower side brush when cleaning
along edges.
Set programme switch to step 2. Roller
brush is lowered.
Note:
Roller brush starts operating auto-
matically.
Note:
To sweep up larger items up to a
height of 50 mm, e.g. cigarette packs, the
bulk waste flap must be raised briefly.
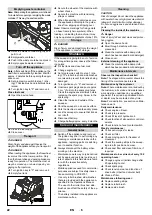
Raising bulk waste flap:
Press the pedal for the bulk waste flap
forwards and keep pressed down.
To lower it, take foot off pedal.
Note:
An optimum cleaning result can
only be achieved if the bulk waste flap
has been lowered completely.
Set programme switch to step 3. Side
brushes and roller brush are lowered.
Note:
Roller brush and side brush start
operating automatically.
Close wet/dry flap
Open wet/dry flap.
Note:
You can thus prevent the filter
system from getting blocked.
Open wet/dry flap.
Note:
This protects the filter from mois-
ture.
The appliance is equipped with an auto-
matic filter cleaning system.
Check the installed dust filter for con-
tamination every once in a while. Re-
place a heavily contaminated or
defective filter.
Programme selection
Starting the machine
Open fuel cock
Turning on the Appliance
Drive the machine
Drive forward
Reverse drive
Driving method
Brakes
Driving over obstacles
Sweeping mode
2
1
Sweeping with sweep roller
Sweeping with bulk waste flap raised
Sweeping with side brushes
Sweeping dry floors
Sweep in fibrous and dry waste (such as
dry grass, hay)
Sweeping damp or wet floors
Filter dedusting
2
1
21
EN
Summary of Contents for 1.047-310.0
Page 2: ...2...
Page 167: ...2 18 18 3 4 166 EL...
Page 168: ...3 3 4 5 2 1 167 EL...
Page 170: ...5 2 1 2 1 2 3 265 kg 169 EL...
Page 171: ...6 5 20 kg 1 2 3 0 1 1 10 10 1 2 5 cm 5 cm 2 2 1 170 EL...
Page 172: ...7 50 mm 3 1 2 1 0 0 18 1 0 3 cm3 2 2 1 171 EL...
Page 173: ...8 VDE 0701 K rcher 100 20 K rcher 20 100 200 300 3 4 0 1 2 2 6 172 EL...
Page 174: ...9 1 2 91 157 173 EL...
Page 175: ...10 1 1 2 3 4 1 2 3 1 2 5 1 2 MIN MAX MIN MAX 6 491 538 5 1 5 1 2 3 1 2 3 Z Nm 56 Nm 174 EL...
Page 176: ...11 1 2 MAX 3 MIN Max Min 40 50 mm 1 0 1 2 1 0 1 50 70 mm 1 0 1 2 1 175 EL...
Page 177: ...12 1 2 3 1 2 1 0 1 10 15 mm 2 5 10 mm 3 1 3 mm 0 176 EL...
Page 178: ...13 0 3 4 1 2 1 2 3 3 4 4 5 5 6 7 6 177 EL...
Page 179: ...14 K rcher K rcher K rcher 3 K rcher K rcher K rcher T K rcher 2 3 K rcher 0 178 EL...
Page 197: ...2 18 18 196 RU...
Page 198: ...3 3 4 3 4 5 2 1 197 RU...
Page 199: ...4 1 2 3 4 5 6 7 8 9 10 11 12 13 14 15 16 17 18 19 20 21 22 23 24 25 26 27 1 2 3 4 5 6 198 RU...
Page 200: ...5 1 2 ON 1 2 3 265 kg 199 RU...
Page 201: ...6 Normal 92 5 20 1 2 3 0 ON 1 1 10 10 1 2 5 5 2 2 1 200 RU...
Page 202: ...7 50 3 1 2 1 0 0 18 1 0 3 3 2 1 201 RU...
Page 203: ...8 VDE 0701 K rcher 100 20 K rcher 20 100 200 300 3 4 0 1 2 2 6 202 RU...
Page 204: ...9 1 2 91 157 EWG 1 203 RU...
Page 205: ...10 1 2 3 4 1 2 3 1 2 5 1 2 MIN MAX MIN MAX 6 491 538 5 1 5 1 2 3 1 2 3 56 Nm 204 RU...
Page 206: ...11 1 2 3 40 50 1 0 1 2 1 0 1 50 70 1 0 1 2 1 205 RU...
Page 207: ...12 1 2 3 1 2 1 0 1 10 15 2 5 10 3 1 3 0 206 RU...
Page 208: ...13 0 3 4 1 2 1 2 3 3 4 4 5 5 6 7 6 207 RU...
Page 209: ...14 ON K rcher K rcher K rcher 3 K rcher K rcher K rcher K rcher 2 3 K rcher 0 208 RU...
Page 328: ...2 e 18 18 3 4 327 BG...
Page 329: ...3 3 4 5 2 1 328 BG...
Page 331: ...5 1 2 ON 1 2 3 265 kg 330 BG...
Page 332: ...6 5 20 1 2 3 0 ON 1 Choke Choke 1 10 10 1 2 5 c 5 c 2 2 1 331 BG...
Page 333: ...7 50 mm 3 1 2 1 0 0 18 1 0 3 3 2 2 1 332 BG...
Page 334: ...8 VDE 0701 K rcher 100 20 Karcher 20 100 200 300 3 4 0 1 2 2 6 1 2 333 BG...
Page 335: ...9 91 157 1 1 2 3 4 334 BG...
Page 336: ...10 1 2 3 1 2 5 1 2 MA 6 491 538 5 1 5 1 2 3 1 2 3 1 2 MAX 3 MIN Max Min Nm 56 Nm 335 BG...
Page 337: ...11 40 50 1 0 1 2 1 0 1 50 70 mm 1 0 1 2 1 1 2 3 1 2 336 BG...
Page 338: ...12 1 0 1 10 15 2 5 10 3 1 3 0 0 3 4 1 2 1 2 337 BG...
Page 339: ...13 3 3 4 4 5 5 6 7 6 338 BG...
Page 340: ...14 ON K rcher K rcher K rcher 3 K rcher K rcher K rcher K rcher 2 3 K rcher 0 339 BG...
Page 386: ...2 385 UK...
Page 387: ...3 18 18 3 4 3 4 2 1 386 UK...
Page 388: ...4 1 2 3 4 5 6 7 8 9 10 11 12 13 14 15 16 17 18 19 20 21 22 23 24 25 26 27 1 2 3 4 5 6 387 UK...
Page 389: ...5 1 2 ON 1 2 3 265 kg 388 UK...
Page 390: ...6 Normal 92 5 20 1 2 3 0 ON i 1 1 10 10 1 2 5 5 2 1 389 UK...
Page 391: ...7 i 2 50 i 3 1 2 i 1 0 0 18 i 1 0 3 3 2 1 390 UK...
Page 392: ...8 VDE 0701 K rcher 100 20 K rcher 20 100 200 300 3 4 0 1 2 2 6 391 UK...
Page 393: ...9 1 2 91 157 EWG 1 392 UK...
Page 394: ...10 1 2 3 4 1 2 3 1 2 5 1 2 M N MAX M N MAX 6 491 538 5 1 5 1 2 3 1 2 3 56 Nm 393 UK...
Page 395: ...11 1 2 3 40 50 i 1 0 1 2 i 1 0 i 1 50 70 i 1 0 1 2 1 394 UK...
Page 396: ...12 1 2 3 1 2 i 1 0 1 10 15 2 5 10 3 1 3 0 395 UK...
Page 397: ...13 0 3 4 1 2 1 2 3 3 4 4 5 5 6 7 6 396 UK...
Page 398: ...14 ON Karcher Karcher Karcher 3 Karcher Karcher Karcher Karcher 2 3 Karcher 0 397 UK...
Page 401: ......


