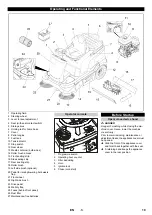
-
6
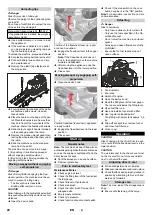
Note:
After parking the appliance, wait at least
1 minute before opening or emptying the waste
container. This way the dust can settle.
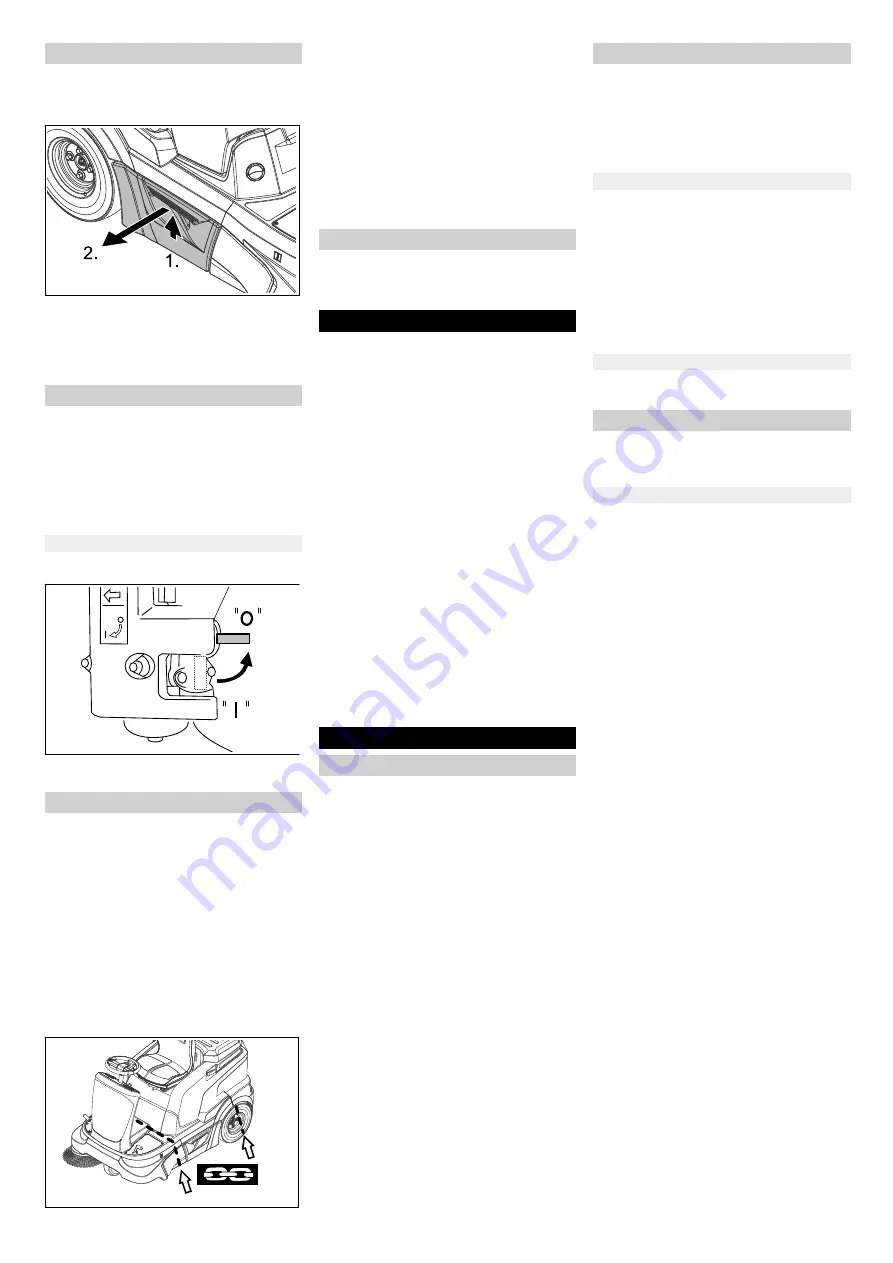
Raise the waste container slightly and
pull it out.
Empty waste container.
Push in the waste container and lock it.
Empty opposite waste container.
Note:
After switching off the appliance, the
dust filter is automatically cleaned. Wait for
approx. 2 minutes before opening the appli-
ance cover.
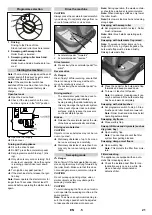
Set programme switch to step 1 (driv-
ing). The side brush and roller brush are
raised.
Turn ignition key to "0" and remove it.
Open the device hood.
Close the fuel supply.
Close cover.
DANGER
Risk of injury and damage! Observe the
weight of the appliance when you transport it.
DANGER
When loading the appliance, the freewheel
lever must be in the lower position. Only
then the travel drive and parking brake are
ready for operation. The machine must al-
ways be moved up or down slopes by en-
gaging self-propulsion.
Turn ignition key to "0" and remove it.
Empty fuel tank.
Secure the wheels of the machine with
wheel chocks.
Secure the machine with tensioning
straps or cables.
When transporting in vehicles, secure
the appliance according to the guide-
lines from slipping and tipping over.
Note:
Observe markings for fixing points
on base frame (chain symbols). When
loading or unloading the machine, it may
only be operated on gradients of max. 18%.
DANGER
Risk of injury and damage! Note the weight
of the appliance in case of storage.
If the sweeper is going to be out of service
for a longer time period, observe the follow-
ing points:
Fill fuel tank and close fuel cock.
Change engine oil.
Set programme switch to step 1 (driv-
ing). The roller brush and side brushes
are raised to prevent the bristles being
damaged.
Turn ignition key to "0" and remove it.
Unscrew spark plugs and pour approx.
3 cm
3
of oil into the spark plug holes.
Crank the engine several times before
replacing the spark plug. Screw in the
spark plug.
Clean the inside and outside of the
sweeper.
Park the sweeper on an even surface.
Park the machine in a safe and dry place.
Lock the sweeper to ensure that it does
not roll off.
Disconnect battery.
Charge battery approx. every 2 months.
Switch off the appliance and remove
the ignition key prior to performing any
cleaning or maintenance tasks on the
appliance, replacing parts or switching
over to another function.
Always disconnect the battery when
working on the electrics.
– Maintenance work may only be carried
out by approved customer service out-
lets or experts in this field who are famil-
iar with the respective safety
regulations.
– Mobile appliances used for commercial
purposes are subject to safety inspec-
tions according to VDE 0701.
– Use only roller brushes/ side-brushes
that are provided with the appliance or
specified in the Operations Manual.
The use of other roller brushes/ side-
brushes can affect the safety of the ap-
pliance.
– The battery installed in the appliance is
maintenance-free.
CAUTION
Risk of damage! Do not clean the appliance
with a water hose or high-pressure water jet
(danger of short circuits or other damage).
Do not use aggressive and abrasive deter-
gents.
Danger
Risk of injury! Wear dust mask and protec-
tive goggles.
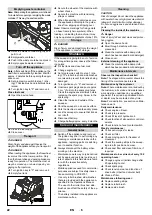
Open the device hood.
Blow through machine with com-
pressed air.
Clean the machine with a damp cloth
which has been soaked in mild detergent.
Close cover.
Clean the machine with a damp cloth
which has been soaked in mild detergent.
Observe the inspection checklist!
Note:
The elapsed-time counter shows the
timing of the maintenance intervals.
Note:
Where maintenance is carried out by
the customer, all service and maintenance
work must be undertaken by a qualified
specialist. If required, a specialised Kärch-
er dealer may be contacted at any time.
Note:
For description, see section on Main-
tenance work.
Daily maintenance:
Check engine oil level.
Check tyre pressure.
Check fill level of hydraulic oil.
Check function of all operator control el-
ements.
Check function of seat contact switch.
Weekly maintenance:
Check petrol pipes for leaks.
Check air filter.
Check moving parts for freedom of
movement.
Check the sealing strips in the sweep-
ing area for position and wear.
Check dust filter and clean filter box, if
required.
Maintenance to be carried out every 100
operating hours:
Change engine oil (initial change after
20 operating hours).
Check spark plug.
Check tension, wear and function of
drive belts (V-belt and circular belt).
Clean air filter.
Maintenance following wear:
Replace sealing strips.
Replace roller brush.
Replace side brush.
Emptying waste container
Turn off the appliance
Close fuel cock
Transport
Storage
Shutdown
Care and maintenance
General notes
Cleaning
Cleaning the inside of the machine
External cleaning of the appliance
Maintenance intervals
Maintenance by the customer
22
EN
Summary of Contents for 1.047-310.0
Page 2: ...2...
Page 167: ...2 18 18 3 4 166 EL...
Page 168: ...3 3 4 5 2 1 167 EL...
Page 170: ...5 2 1 2 1 2 3 265 kg 169 EL...
Page 171: ...6 5 20 kg 1 2 3 0 1 1 10 10 1 2 5 cm 5 cm 2 2 1 170 EL...
Page 172: ...7 50 mm 3 1 2 1 0 0 18 1 0 3 cm3 2 2 1 171 EL...
Page 173: ...8 VDE 0701 K rcher 100 20 K rcher 20 100 200 300 3 4 0 1 2 2 6 172 EL...
Page 174: ...9 1 2 91 157 173 EL...
Page 175: ...10 1 1 2 3 4 1 2 3 1 2 5 1 2 MIN MAX MIN MAX 6 491 538 5 1 5 1 2 3 1 2 3 Z Nm 56 Nm 174 EL...
Page 176: ...11 1 2 MAX 3 MIN Max Min 40 50 mm 1 0 1 2 1 0 1 50 70 mm 1 0 1 2 1 175 EL...
Page 177: ...12 1 2 3 1 2 1 0 1 10 15 mm 2 5 10 mm 3 1 3 mm 0 176 EL...
Page 178: ...13 0 3 4 1 2 1 2 3 3 4 4 5 5 6 7 6 177 EL...
Page 179: ...14 K rcher K rcher K rcher 3 K rcher K rcher K rcher T K rcher 2 3 K rcher 0 178 EL...
Page 197: ...2 18 18 196 RU...
Page 198: ...3 3 4 3 4 5 2 1 197 RU...
Page 199: ...4 1 2 3 4 5 6 7 8 9 10 11 12 13 14 15 16 17 18 19 20 21 22 23 24 25 26 27 1 2 3 4 5 6 198 RU...
Page 200: ...5 1 2 ON 1 2 3 265 kg 199 RU...
Page 201: ...6 Normal 92 5 20 1 2 3 0 ON 1 1 10 10 1 2 5 5 2 2 1 200 RU...
Page 202: ...7 50 3 1 2 1 0 0 18 1 0 3 3 2 1 201 RU...
Page 203: ...8 VDE 0701 K rcher 100 20 K rcher 20 100 200 300 3 4 0 1 2 2 6 202 RU...
Page 204: ...9 1 2 91 157 EWG 1 203 RU...
Page 205: ...10 1 2 3 4 1 2 3 1 2 5 1 2 MIN MAX MIN MAX 6 491 538 5 1 5 1 2 3 1 2 3 56 Nm 204 RU...
Page 206: ...11 1 2 3 40 50 1 0 1 2 1 0 1 50 70 1 0 1 2 1 205 RU...
Page 207: ...12 1 2 3 1 2 1 0 1 10 15 2 5 10 3 1 3 0 206 RU...
Page 208: ...13 0 3 4 1 2 1 2 3 3 4 4 5 5 6 7 6 207 RU...
Page 209: ...14 ON K rcher K rcher K rcher 3 K rcher K rcher K rcher K rcher 2 3 K rcher 0 208 RU...
Page 328: ...2 e 18 18 3 4 327 BG...
Page 329: ...3 3 4 5 2 1 328 BG...
Page 331: ...5 1 2 ON 1 2 3 265 kg 330 BG...
Page 332: ...6 5 20 1 2 3 0 ON 1 Choke Choke 1 10 10 1 2 5 c 5 c 2 2 1 331 BG...
Page 333: ...7 50 mm 3 1 2 1 0 0 18 1 0 3 3 2 2 1 332 BG...
Page 334: ...8 VDE 0701 K rcher 100 20 Karcher 20 100 200 300 3 4 0 1 2 2 6 1 2 333 BG...
Page 335: ...9 91 157 1 1 2 3 4 334 BG...
Page 336: ...10 1 2 3 1 2 5 1 2 MA 6 491 538 5 1 5 1 2 3 1 2 3 1 2 MAX 3 MIN Max Min Nm 56 Nm 335 BG...
Page 337: ...11 40 50 1 0 1 2 1 0 1 50 70 mm 1 0 1 2 1 1 2 3 1 2 336 BG...
Page 338: ...12 1 0 1 10 15 2 5 10 3 1 3 0 0 3 4 1 2 1 2 337 BG...
Page 339: ...13 3 3 4 4 5 5 6 7 6 338 BG...
Page 340: ...14 ON K rcher K rcher K rcher 3 K rcher K rcher K rcher K rcher 2 3 K rcher 0 339 BG...
Page 386: ...2 385 UK...
Page 387: ...3 18 18 3 4 3 4 2 1 386 UK...
Page 388: ...4 1 2 3 4 5 6 7 8 9 10 11 12 13 14 15 16 17 18 19 20 21 22 23 24 25 26 27 1 2 3 4 5 6 387 UK...
Page 389: ...5 1 2 ON 1 2 3 265 kg 388 UK...
Page 390: ...6 Normal 92 5 20 1 2 3 0 ON i 1 1 10 10 1 2 5 5 2 1 389 UK...
Page 391: ...7 i 2 50 i 3 1 2 i 1 0 0 18 i 1 0 3 3 2 1 390 UK...
Page 392: ...8 VDE 0701 K rcher 100 20 K rcher 20 100 200 300 3 4 0 1 2 2 6 391 UK...
Page 393: ...9 1 2 91 157 EWG 1 392 UK...
Page 394: ...10 1 2 3 4 1 2 3 1 2 5 1 2 M N MAX M N MAX 6 491 538 5 1 5 1 2 3 1 2 3 56 Nm 393 UK...
Page 395: ...11 1 2 3 40 50 i 1 0 1 2 i 1 0 i 1 50 70 i 1 0 1 2 1 394 UK...
Page 396: ...12 1 2 3 1 2 i 1 0 1 10 15 2 5 10 3 1 3 0 395 UK...
Page 397: ...13 0 3 4 1 2 1 2 3 3 4 4 5 5 6 7 6 396 UK...
Page 398: ...14 ON Karcher Karcher Karcher 3 Karcher Karcher Karcher Karcher 2 3 Karcher 0 397 UK...
Page 401: ......


