English
17
Device description
The maximum amount of equipment is described in
these operating instructions. Depending on the model
used, there are differences in the scope of delivery (see
packaging).
See graphics page for illustrations
Illustration A
1
Shrub blade blade guard
2
Shrub blade cutting blade
3
Grass shears blade guard
4
Grass shears cutting blade
5
Trigger lockout button
6
Handle
7
Battery pack unlocking button
8
Trigger
9
Cutting blade mounting button
10
Cutting blade mount
11
*Charger
12
*Rechargeable battery pack
* optional
Rechargeable battery pack
The device can be operated with a 18V Kärcher Battery
Power battery pack.
Installation
Installing the cutting blade
몇
CAUTION
Risk of injury from sharp blades
Wear safety goggles and protective gloves when work-
ing on the device.
Illustration D
1. Install the cutting blade.
a Undo the cutting blade mounting button.
b Take off the cutting blade mounting button.
c Put the cutting blade of the grass or shrub shears
onto the cutting blade mount.
d Put on the cutting blade mounting button.
e Tighten the cutting blade mounting button.
Installing the blade guard
몇
CAUTION
Risk of injury from sharp blades
Wear safety goggles and protective gloves when work-
ing on the device.
Illustration B
1. Slide the blade guard over the blade.
Installing the battery pack
1. Push the battery pack into the mounting on the de-
vice.
Illustration E
Operation
Trimming the grass with the grass shears
몇
CAUTION
Risk of injury from sharp blades
Wear safety goggles and protective gloves when work-
ing on the device.
몇
CAUTION
Obstacles in the mowing area
Risk of injury and damage
Before starting mowing, check the work area for objects
that may be flung away, e.g. wires, stones, cords or
glass.
1. Remove the blade guard.
2. Switch the device on.
Illustration F
a Pull the trigger lockout button backward to the
end.
b Press the trigger.
The device starts up.
3. Guide the cutting blade parallel to the ground.
Illustration G
Trimming hedges / shrubs with the shrub
shears
몇
CAUTION
Risk of injury from sharp blades
Wear safety goggles and protective gloves when work-
ing on the device.
몇
CAUTION
Obstacles in the mowing area
Risk of injury and damage
Before starting mowing, check the work area for objects
that may be flung away, e.g. wires, stones, cords or
glass.
1. Switch the device on.
Illustration F
a Pull the trigger lockout button backward to the
end.
b Press the trigger.
The device starts up.
2. Guide the cutting blade parallel to the hedge.
Illustration H
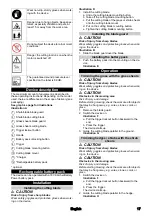
Wear non-slip, sturdy gloves when work-
ing with the device.
Danger due to flung objects. Keep spec-
tators, especially children and pets, at
least 15 m away from the work area.
Do not subject the device to rain or moist
conditions.
Danger; the cutting tool runs on when the
motor is switched off.
The guaranteed sound pressure level
specified on the label is 89 dB.
89
Summary of Contents for GSH 18-20 Battery
Page 2: ...A...
Page 3: ...B C D E F G H I...
Page 4: ...J K L M...
Page 88: ...88 c 2 a b c d e f RCD RCD 3 a b c d e f g h 4 a b c d e...
Page 89: ...89 f g h 5 a b c d e f 130 C g 6 a b...
Page 90: ...90 OFF 10 C 38 C 0 C 40 C 0 C 40 C 0 C 40 C 0 C 40 C...
Page 91: ...91 REACH www kaercher de REACH www kaercher com...
Page 104: ...104 b c d e f g h 4 a b c d e f g h 5 a b...
Page 105: ...105 c d e f 130 C g 6 a b a e...
Page 106: ...106 10 C 38 C 0 C 40 C 0 C 40 C 0 C 40 C 0 C 40 C...
Page 107: ...107...
Page 110: ...110 1 2 B 3 L 1 2 3 4 M 1 2...
Page 172: ...172 c d e f 3 a b c d e f g h 4 a b c d e f...
Page 173: ...173 g h 5 a b c d e f 130 C g 6 a b a b c d e f g h...
Page 174: ...174 10 C 38 C 0 C 40 C 0 C 40 C 0 C 40 C 0 C 40 C...
Page 175: ...175...
Page 178: ...178 d e 4 1 2 B 3 L 1 2 3 4 M 1 2 GSH 18 20 V 18 min 1050 10 mm 120...
Page 202: ...202 1 a b c 2 a b c d e f 3 a b c d e f g...
Page 203: ...203 h 4 a b c d e f g h 5 a b c d e f 130 C g 6 a b...
Page 204: ...204 a 10 C 38 C 0 C 40 C 0 C 40 C...
Page 205: ...205 0 C 40 C 0 C 40 C...
Page 206: ...206 REACH www kaercher de REACH www kaercher com B C 1 2...
Page 208: ...208 c d e f 1 2 3 J 1 2 1 2 B 3 K a b c d e 4 1 2 B 3 L 1 2 3 4 M 1 2...
Page 211: ...211 3 a b c d e f g h 4 a b c d e f g h 5 a b c...
Page 212: ...212 d e f 130 C g 6 a b a b c d e f g h...
Page 213: ...213 10 C 38 C 0 C 40 C 0 C 40 C 0 C 40 C 0 C 40 C...
Page 214: ...214 REACH www kaercher de REACH www kaercher com B...
Page 215: ...215 C 1 2 A 1 2 3 4 5 6 7 8 9 10 11 12 18 K rcher D 1 a b c d e B 1 1 E 15 89 89...
Page 216: ...216 1 2 F a b 3 G 1 F a b 2 H 1 2 B 3 I a b c d e f 1 2 3 J 1 2 1 2 B 3 K a b c d e 4 1 2 B 3...
Page 219: ...219 1 a b c 2 a b c d e f RCD 3 a b c d e f g h 4 a b c d e f g h 5...
Page 220: ...220 a b c d e f 130 g 6 a b a b c d e f g h 1...
Page 221: ...221 10 38 0 40 0 40 1 0 C 40 C 0 40...
Page 222: ...222 www kaercher com jp B C 1 2 A 1 2 3 4 5 6 7 8 9 10 15 m 89 dB 89...
Page 224: ...224 1 2 B 3 Nehmen Sie den L 1 2 3 4 M 1 2...
Page 229: ...228 10 38 0 40 0 40 0 40 0 40...


