

6
English
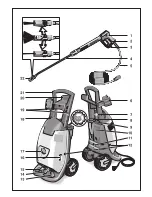
4. Operating the cleaner
Danger! Observe the relative safety
regulations when using the cleaner at filling
stations or other high-risk areas.
Caution! Only clean engines in places which
have appropriate oil separators (protection of
the environment).
Caution! Only wash animals with the low-
pressure fan jet (see “Selecting the type of
spray”).
Operating with high pressure
The cleaner is equipped with a pressure switch.
The motor only starts up when the lever (2) is
retracted.
• Press safety switch (3) and retract lever (2).
• Set unit switch (17) to “I”.
• Adjust operating pressure and flow rate (+/–)
by rotating the pressure/flow control (13)
(infinitely variable).
Read off operating pressure on pressure gauge.
Selecting the type of spray
The handgun must be closed.
• Rotate the housing of the nozzle (22) until the
desired symbol corresponds with the marking:
High-pressure pencil jet for
particularly stubborn accumulation
of grime
Low-pressure fan jet for operating
with detergent or cleaning with
negligible pressure
High-pressure fan jet for dirt
accumulation over a large surface
Operating with detergent
Caution! Unsuitable detergents can harm the
cleaner and the object which is to be cleaned.
Use only detergents which are released by
Kärcher. Proportions of detergent to be used
and accompanying instructions should be
noted carefully. Use detergents sparingly out
of consideration for the environment.
Kärcher cleaning agents guarantee trouble-free
operation. Please seek advice or ask for our
catalogue of information sheets on cleaning
agents.
– Active cleaner
RM 31 ASF
– Universal cleaner
RM 55 ASF
– Active wash
RM 81 ASF
• Fill detergent reservoir (10).
• Set nozzle (22) to
.
• Set detergent metering valve (8) to the centre
position. Adjust dosage with + or – as required.
Recommended cleaning methods
1. Spray detergent sparingly over the dry surface
to be cleaned and let it take effect but not dry
out.
2. Spray off (rinse off) the loosened dirt using the
high-pressure spray.
• When you have finished the operation, set
detergent metering valve (8) to “0” and switch
the cleaner on for about 1 minute and rinse it
clear of detergent.
Interrupting the operation
• Release lever (2), the cleaner switches off.
Retract lever again and the cleaner switches on
again.
Switching the cleaner off
• Set unit switch (17) to “0” and pull out power
plug.
• Close water inlet.
• Retract lever (2) until the cleaner is without
pressure.
• Press safety switch (3) to secure lever against
being activated unintentionally.
Transporting the cleaner
• To transport the cleaner over relatively long
stretches, take hold of it by the handle (21) and
pull it along behind you.
• To transport it up steps or over ledges pick it up
by the handle.
• Empty the detergent reservoir (10) before
transporting it horizontally.
Storing the cleaner
• Place the handgun (1) in the support (6).
• Reel in the high-pressure hose (5) and hang it
over the hose rest (18).
• Coil the connecting cable round the cable/hose
rest (20).


