

7
English
4. Operating the cleaner
Protection from sub-zero temperatures
Caution! Water which has frozen in the cleaner
can destroy parts of it. At best store the cleaner
in a heated room during the winter or empty it or
rinse it thoroughly with antifreeze.
• Empty the cleaner
– Unscrew supply hose and high-pressure hose
from the cleaner.
– Leave the cleaner running until the pump and
lines have emptied (max. 1 minute).
• Putting in antifreeze
For longer intervals between operations,
pumping antifreeze through the cleaner is to be
recommended. By this means also you obtain
a sure protection against corrosion.
5. Care and maintenance
Every week
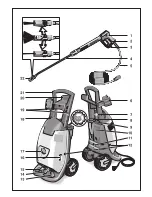
• Check oil level in oil reservoir (16): if the oil is
milky (water in oil), seek the help of Customer
Service immediately.
• Clean the strainer at the water outlet.
• Clean the filter at the suction hose for detergent.
Annually or after 500 operating hours
• Change the oil
– For oil quantity and type see Technical
Specifications.
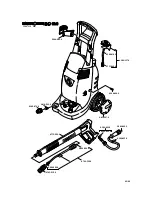
– Undo fastening screws (12), remove unit
cover, remove cover of oil reservoir.
– Lay cleaner on its side and drain oil into
a suitable container.
– Fill slowly with fresh oil; air bubbles have
to escape.
Danger! Before undertaking any care or
maintenance work on the cleaner, pull out the
power plug.
Caution! When changing the oil, dispose of any
waste oil only at authorised collection points.
Safety inspection/maintenance contract
You can arrange with your dealer to have
a regular safety inspection carried out or to have
a maintenance contract. Please seek advice on
this.
Each time before operating the cleaner
• Check connecting cable for damage (risk of
getting an electric shock), have a damaged
connecting cable replaced without delay by
authorised Customer Service personnel or an
electrician.
• Check high-pressure hose for damage
(danger of explosion), replace a damaged high-
pressure hose without delay.
• Check cleaner (pump) for any leaks. Three
drops per minute are allowable and can appear
on the underside of the cleaner. Seek the help
of Customer Service if leaks are more serious.


