


4
English
When unpacking the product, make sure
that no accessories are missing and that
none of the package contents have been
damaged. If you detect any transport dam-
ages please contact your dealer.
Note: Please refer to page 2 for figures of
the appliance and the operation.
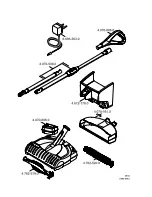
Illustration
1
Joint at the appliance
2
ON/OFF foot switch
3
Rechargeable battery, detachable
4
Unlocking button, battery
5
Charging box
6
Charging display
7
Dirt container, detachable
8
Unlocking the lid of dirt container
9
Casing
10 Brush roller, changeable
11 Brush roller with cleaning cover (animal
hair brush), can be interchanged
12 Unlocking button for the changeable
brush
13 Telescopic strut, adjustable height
14 Turning handle
15 Handle
16 Charger with charging cable
17 Wall mount with fasteners
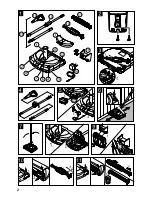
Illustration
The wall mount is to be used for storing the
appliance and the charger.
Fix the enclosed wall mount at an easily
accessible point near to a socket - the
fastener is enclosed.
Illustration
The brush roller has not yet been inserted in
the appliance at the time of delivery. Please
insert the brush roller before starting the ap-
pliance.
Turn the casing.
Insert the brush roller in the side-intake.
Press in the holder of the brush roller into
the intake and check that it is sitting
properly.
Illustration
The telescopic strut consists of 3 parts.
While assembling it, make sure that the
parts lock into each other.
Insert the handle on the longer strut with
turning handle.
Insert together the longer and shorter
struts; while assembling it, press the
locking button.
Insert the entire strut with the locking but-
ton into the joint on the appliance.
Loosen the handle and pull out the strut
to the desired working height; turn the
handle to the correct position and tighten
using the turning handle.
Illustration
The battery has not yet been inserted in the
appliance at the time of delivery. Please in-
sert the battery before commissioning the
appliance.
Remove the rechargeable battery from
its packing.
Insert the battery into the intake until it
locks.
Charge the battery: The battery can be
charged when it is in the appliance or re-
moved from it.
Note
: The following sec-
tion describes the charging process
when the battery is in the appliance.
Insert the charger delivered with the ap-
pliance into a proper socket.
Important note for charging
: Always
switch off the appliance otherwise the
battery will not get charged.
Insert the charging cable in the charging
box at the battery.
When the operating display glows, it
means the charging process has started.
Start up
Description of the Appliance
Installing the wall unit
Insert the brush roller
Installing the telescopic handle and
the handle and adjusting the height
Inserting and charging the battery


