background image

English

 7

Î

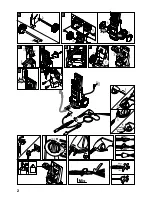
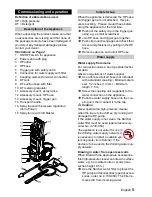
Disconnect the appliance from the water 
supply.

Î

Detach spray lance from the trigger gun. 

Î

Briefly switch the appliance on ("I/ON“), 
press the trigger gun lever until no further 
water is discharged (approx. 1 min).

Î

Switch the appliance switch to "0/OFF“.

Î

Use the safety catch to secure the trigger 
gun lever.

Î

Pull out the mains plug.

Î

Store the power cord, the HP hose and the 
accessories on the appliance.

Special accessories expand the possibilities 
of using your appliance. Please contact your 
Kärcher dealer for further information.

To ensure a trouble-free operation of the ap-
pliance and to match the individual cleaning 
task, we recommend our Kärcher detergent 
and maintenance agents. Please ask for our 
advice, or request information on the prod-
ucts.

Risk of injury

Always switch off the appliance and pull out 
the mains plug before care and maintenance 
work.

Prior to longer periods of storage, e.g. in the 
winter:

Î

Remove filter from suction hose for deter-
gent and clean with running water.

Î

Pull out filter in water connection using 
flat-nose pliers and clean with running wa-
ter.

The appliance is maintenance-free.

The appliance and its accessories can get de-
stroyed through frost if there are any water 
residues in them. To avoid damage to them:

Î

Store the appliance and the entire acces-
sories in a frost-safe room.

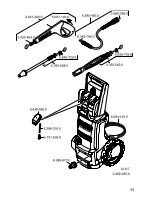
Only use original Kärcher spare parts. You will 
find a list of spare parts at the end of this doc-
ument.

You can rectify minor faults yourself with the 
help of the following overview. 
If in doubt, please consult the authorized cus-
tomer service.

Risk of injury

Always switch off the appliance and pull out 
the mains plug before care and maintenance 
work.

Warning

Repair works may only be performed by the 
authorized customer service.

Appliance does not start

Î

Check whether the voltage indicated on 
the type plate corresponds to the voltage 
of the socket.

Î

Check the power cable for damage.

Pressure does not build up in the appli-
ance

Î

Check the setting at the spray lance.

Î

Evacuate air from the appliance: Switch 
on the appliance when the HP hose is not 
connected and allow it to run until the wa-
ter which discharges from the HP outlet is 
free of bubbles.   Then connect the HP 
hose again.

Î

Clean the filter in the water supply connec-
tion: This can be easily removed using 
flat-nose pliers.

Î

Check all supply lines to the HP pump for 
leaks or blockages.

Strong pressure fluctuations

Î

Clean the high-pressure nozzle: Remove 
dirt and debris from the nozzle bore with a 
needle and rinse through with water to-
wards the front. 

Î

Check the volume of incoming water. 

HP pump leaking

Î

Slight leakage from the HP pump is nor-
mal. If the leakage increases contact the 
authorized customer service.

Special accessories

Detergents

Maintenance and care

Cleaning

Maintenance

Frost protection

Spare Parts

Troubleshooting

Summary of Contents for KB 6060

Page 1: ...Operating Instructions Before first use of the unit Please read these Operating Instruc tions and act in ac cordance with them KB 6060 5 962 095 0 01 07 ...

Page 2: ...2 ...

Page 3: ...e appliance must not be used if the power cable or important parts of the ap pliance e g safety devices high pressure hoses spray guns are damaged The appliance may not be used in areas where a risk of explosion is present If the appliance is used in hazardous are as e g filling stations the corresponding safety provisions must be observed Check the power cord with mains plug for damage before eve...

Page 4: ...use of other detergents or chemicals may compromise the safety of the appliance Make sure that the power cable or exten sion cables are not damaged by running over pinching dragging or similar Protect the power cable from heat oil and sharp edges The connection between the power cable and extension cable must not lie in water All current conducting parts in the working area must be protected again...

Page 5: ...HP hose Î Remove cable tie and unroll HP hose For connection values see type plate techni cal data Observe regulations of water supplier Î Use a fibre reinforced hose not included with a standard coupling Minimum diam eter 1 2 inches 13 mm Minimum length 7 5 m Î Screw the coupling unit supplied to the water connection on the appliance Î Push the water supply hose onto the cou pling unit then conne...

Page 6: ...ed for use with detergents Î Use spray lance with pressure regulation Vario Power Î Turn the spray lance to Mix position low pressure Î During low pressure operation detergent is automatically drawn in from the filled de tergent tank Î Fill the detergent reservoir with detergent tablet and water or detergent concentrate and water observe metering recommen dations on the packaging label of the de t...

Page 7: ...rost safe room Only use original Kärcher spare parts You will find a list of spare parts at the end of this doc ument You can rectify minor faults yourself with the help of the following overview If in doubt please consult the authorized cus tomer service Risk of injury Always switch off the appliance and pull out the mains plug before care and maintenance work Warning Repair works may only be per...

Page 8: ...ction Voltage 1 50 Hz 240 V Connected load 2 0 kW Mains fuse slow blow 13 A Protective class I Water connection Max feed temperature 40 C Min feed volume 10 l min Max feed pressure 0 2 1 2 MPa Performance data Working pressure 12 MPa Max permissible pressure 13 MPa Water flow rate 7 5 l min Detergent flow rate 0 0 3 l min Recoil force of trigger gun 20 N Hand arm vibration ISO 5349 1 29 m s2 Sound...

Page 9: ...circumstances we would ask that you try to contact us again later in the day The help line number is 0906 6800632 from 8 30am to 5 00pm Monday Friday calls to this number are charged at 25p per minute It helps us if you have the model number and data plate details to hand before making your call as there are very many different models of Karcher Pressure Washers in use Alternatively you may write ...

Page 10: ...10 ...

Page 11: ...11 ...

Page 12: ......

Reviews: