-
7
Pull the motor speed adjustment all the
way to the back.
Press brake pedal and keep it de-
pressed.
Lock parking brake.
Turn ignition key to "0" and remove it.
DANGER
Transport damage!
Observe the net weight (transport
weight) of the device during transport
on trailers or vehicles.
When transporting in vehicles, secure
the appliance according to the guide-
lines from slipping and tipping over.
Turn ignition key to "0" and remove it.
Lock parking brake.
Secure the appliance at the lashing
points (4x) using tension belts, ropes or
chains.
Secure the wheels of the machine with
wheel chocks.
Disconnect the battery of the sweeper
during transport.
DANGER
Risk of injury and damage! Note the weight
of the appliance in case of storage.
Park the sweeper on a level surface in
a dry, frost protected area. Protect it
against dust by means of covering ma-
terial.
Raise the roller brush and the side-
brushes to prevent the bristles from be-
ing damaged.
Close the container flap.
Turn ignition key to "0" and remove it.
Lock parking brake.
Lock the sweeper to ensure that it does
not roll off.
Additionally observe the following points if
the sweeper is not used over a longer peri-
od of time:
Change engine oil.
Drain off the cooling water if frost is ex-
pected and check whether there is ade-
quate anti-frosting agent.
Clean the inside and outside of the
sweeper.
Disconnect battery.
Charge battery and recharge it approx.
every 2 months.
ATTENTION
Risk of damage!
Do not rinse out the dust filter.
Maintenance work may only be carried
out by approved customer service out-
lets or experts in this field who are famil-
iar with the respective safety regula-
tions.
Mobile appliances used for commercial
purposes are subject to safety inspec-
tions according to VDE 0701.
Park the sweeper on an even surface.
Turn ignition key to "0" and remove it.
Lock parking brake.
CAUTION
Risk of damage!
Do not clean the appliance with a water
hose or high-pressure water jet (danger
of short circuits or other damage).
DANGER
Risk of injury!
Wear dust mask and protective gog-
gles.
Clean machine with a cloth.
Blow through machine with com-
pressed air.
Clean the machine with a damp cloth
which has been soaked in mild deter-
gent.
Note:
Do not use aggressive cleaning
agents.
Note:
The elapsed-time counter shows the
timing of the maintenance intervals.
Note:
Where maintenance is carried out by
the customer, all service and maintenance
work must be undertaken by a qualified
specialist. If required, a specialised Kärch-
er dealer may be contacted at any time.
Daily maintenance:
Check fill level of fuel tank.
Check engine oil level.
Check the filling level in the coolant ex-
pansion tank.
Check the sweeping roller and the side
brush for wear and wrapped belts.
Check fuel filter.
Check the centrifugal separator and the
air filter, clean if required.
Check function of all operator control el-
ements.
Check appliance for damages.
Weekly maintenance:
Clean the water cooler.
Clean the hydraulic oil cooler.
Check hydraulic unit.
Check the hydraulic oil level.
Check brake fluid status.
Check the pad for wear, replace if re-
quired.
Check the container lid and lubricate it.
Maintenance to be carried out every 50
operating hours:
Drain the water from the diesel/water
separator.
Maintenance following wear:
Replace sealing strips.
Readjust the side seals or replace
them.
Replace roller brush.
Replace side brush.
Note:
For description, see section on Main-
tenance work.
Note:
In order to safeguard warranty
claims, all service and maintenance work
during the warranty period must be carried
out by the authorised Kärcher Customer
Service in accordance with the mainte-
nance booklet.
Maintenance to be carried out after 50
operating hours:
Have the first maintenance performed
by the customer service in accordance
with the inspection check list.
Maintenance after 250/500/1000/1500/
2000 operating hours:
Have the maintenance performed by
the customer service in accordance
with the inspection check list.
Preparation:
Park the sweeper on an even surface.
Turn ignition key to "0" and remove it.
Lock parking brake.
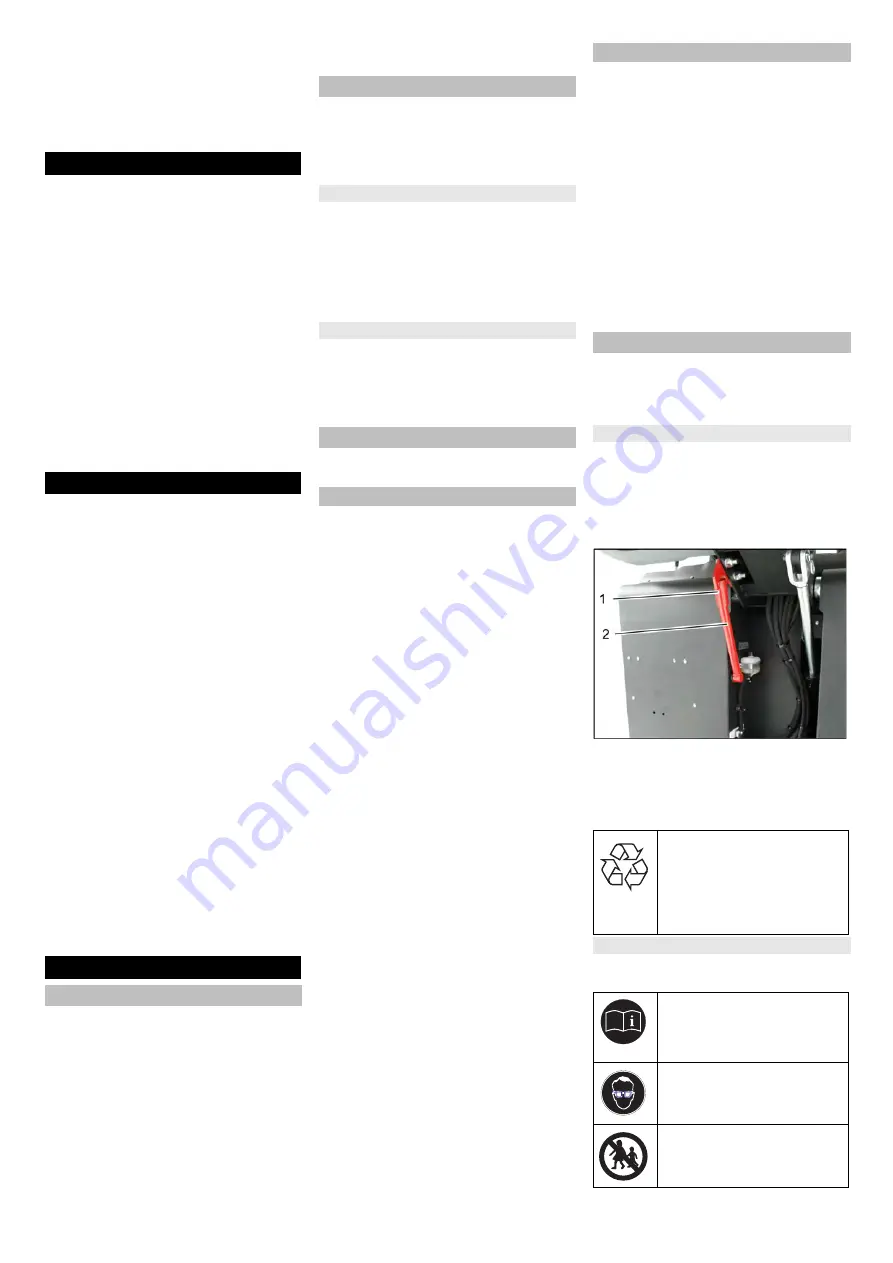
DANGER
Risk of injury!
Always apply the safety rod when the
waste container is raised.
Perform the safeguarding only from
outside the hazard zone.
1 Holder of safety rod
2 Safety rod
Fold the safety rod for the high empty-
ing up and insert it into the holder (se-
cured).
Please observe the following warning notes
when handling batteries:
Transport
Storage/decommissioning
Care and maintenance
General notes
Cleaning
Cleaning the inside of the machine
External cleaning of the appliance
Maintenance intervals
Maintenance by the customer
Maintenance by Customer Service
Maintenance Works
General notes on safety
Please do not release engine
oil, fuel oil, diesel and petrol
into the environment. Protect
the ground and dispose of used
oil in an environmentally-clean
manner.
Safety notes regarding the batteries
Observe the directions on the
battery, in the instructions for
use and in the vehicle operat-
ing instructions!
Wear an eye shield!
Keep away children from acid
and batteries!
24
EN
Summary of Contents for KM 120/250 R D
Page 2: ...2...
Page 165: ...2 PVC 0 C K rcher 18 10 1200 m 3 4 165 EL...
Page 166: ...3 K rcher 70mm 2 2 880 kg 166 EL...
Page 167: ...4 1 2 3 4 5 6 7 8 9 10 11 12 13 14 15 16 17 18 1 2 3 4 5 6 7 8 9 0 1 2 10 11 12 1 2 1 2 167 EL...
Page 168: ...5 3 4 5 6 7 8 9 10 11 12 13 14 10 km h 1 2 1 2 3 1 2 1 2 1 3 168 EL...
Page 169: ...6 II 10 10 1 2 3 M 70 mm 70 mm 1 2 3 4 1 1 2 2 3 3 4 4 1 3 4 1 3 1 3 4 1 3 169 EL...
Page 170: ...7 1 3 4 2 4 4 2 1 3 4 0 0 4x 0 VDE 0701 0 K rcher 170 EL...
Page 171: ...8 50 K rcher 50 250 500 1000 1500 2000 0 1 2 1 2 3 171 EL...
Page 172: ...9 20 C 1 28 kg l 1 00 1 28 kg l 1 2 3 Min Max DOT 5 1 2 MIN MAX MIN MAX 5 6 172 EL...
Page 173: ...10 1 2 25 Nm 10 1 2 1 2 20Nm 1 2 3 1 2 MIN MAX MIN K rcher 1 MIN MAX 20 173 EL...
Page 174: ...11 1 2 1 2 3 80 mm 1 3 10 1 3 80 85 mm 12 10 40 50 mm 174 EL...
Page 175: ...12 1 2 6 3 SW 13 1 3 mm 1 2 3 1 2x 2 1 2 K rcher 10 kg 7 9 mm 1 2 1 2 1 2 FU 01 2 1 175 EL...
Page 196: ...2 7 0 C K rcher 18 196 RU...
Page 197: ...3 18 10 1200 3 4 K rcher 70 2 2 880 197 RU...
Page 198: ...4 1 2 3 4 5 6 7 8 9 10 11 12 13 14 15 16 17 18 1 2 3 4 5 6 7 8 9 0 1 2 10 11 12 1 2 198 RU...
Page 199: ...5 1 2 3 4 5 6 7 8 9 10 11 12 13 14 10 1 2 1 2 3 1 2 199 RU...
Page 200: ...6 1 2 1 3 II 10 10 1 2 3 70 70 1 2 3 4 1 1 2 2 3 3 4 4 1 3 4 1 3 200 RU...
Page 201: ...7 1 3 4 1 3 1 3 4 2 4 4 2 1 3 4 0 0 4 0 VDE 0701 0 201 RU...
Page 202: ...8 K rcher 50 K rcher 50 250 500 1000 1500 2000 0 1 2 202 RU...
Page 203: ...9 1 2 3 1 28 20 C 1 00 1 28 1 2 3 MIN MAX DOT 5 1 2 203 RU...
Page 205: ...11 1 MIN MAX 20 1 2 1 2 3 80 1 3 10 1 3 80 85 12 205 RU...
Page 206: ...12 10 40 50 1 2 6 3 SW 13 1 3 1 2 3 1 2x 2 1 2 K rcher 10 7 9 1 2 2 1 206 RU...
Page 332: ...2 e PVC 0 C K rcher 18 10 1200 m 332 BG...
Page 333: ...3 3 4 K rcher 70 2 2 880 kg 333 BG...
Page 334: ...4 1 2 3 4 5 6 7 8 9 10 11 12 13 14 15 16 17 18 1 2 3 4 5 6 7 8 9 0 1 2 10 11 12 1 2 334 BG...
Page 335: ...5 1 2 3 4 5 6 7 8 9 10 11 12 13 14 10 1 2 1 2 3 1 2 1 2 1 3 335 BG...
Page 336: ...6 II 10 10 1 2 3 70 70 1 2 3 4 1 1 2 2 3 3 4 4 1 3 4 1 3 1 3 4 1 3 336 BG...
Page 337: ...7 1 3 4 2 4 4 2 1 3 4 0 0 4 0 2 VDE 0701 0 337 BG...
Page 338: ...8 K rcher 50 Karcher 50 250 500 1000 1500 2000 0 1 2 1 2 3 338 BG...
Page 339: ...9 20 C 1 28 1 00 1 28 1 2 3 Min Max DOT 5 1 2 MA 5 6 339 BG...
Page 340: ...10 1 2 25 Nm 10 1 2 1 2 20Nm 1 2 3 1 2 K rcher 1 MIN MAX 340 BG...
Page 341: ...11 20 1 2 1 2 3 80 1 3 10 1 3 80 85 12 10 40 50 341 BG...
Page 342: ...12 1 2 6 3 SW 13 1 3 1 2 3 1 2x 2 1 2 K rcher 10 7 9 K rcher 1 2 2 1 342 BG...
Page 392: ...2 0 C K rcher 18 10 18 392 UK...
Page 393: ...3 1200 3 4 K rcher 70 2 2 880 393 UK...
Page 394: ...4 1 2 3 4 5 6 7 8 9 10 11 12 13 14 15 16 17 18 1 2 3 4 5 6 7 8 9 0 1 2 10 11 12 1 2 394 UK...
Page 395: ...5 1 2 3 4 5 6 7 8 9 10 11 12 13 14 10 1 2 1 2 3 1 2 1 2 1 3 395 UK...
Page 396: ...6 II 10 10 1 2 3 50 70 1 2 3 4 1 1 2 2 3 3 4 4 1 3 4 1 3 1 3 4 1 3 396 UK...
Page 397: ...7 1 3 4 2 4 4 2 1 3 4 0 0 4 0 VDE 0701 0 K rcher 397 UK...
Page 398: ...8 50 K rcher 50 250 500 1000 1500 2000 0 1 2 1 2 3 398 UK...
Page 399: ...9 1 28 20 C 1 00 1 28 1 2 3 MIN MAX DOT 5 1 2 M N MAX M N MAX 5 6 399 UK...
Page 400: ...10 1 2 25 Nm 10 1 2 1 2 20 1 2 3 1 2 M N MAX M N 1 MIN MAX 20 400 UK...
Page 401: ...11 1 2 1 2 3 80 1 3 10 1 3 80 85 12 10 40 50 401 UK...
Page 402: ...12 1 2 6 3 SW 13 1 3 1 2 3 1 2x 2 1 2 K rcher 10 7 9 1 2 1 2 1 2 FU 01 2 1 402 UK...
Page 408: ...2 PVC 0 C K rcher 18 10 1200 3 4 K rcher 70mm 2 2 880 kg 408 ZH...
Page 410: ...4 10km h 1 2 1 2 3 1 2 1 2 1 3 II 10 10 1 2 3 70mm 70mm 1 410 ZH...
Page 412: ...6 50 K rcher 50 250 500 1000 1500 2000 0 1 2 1 2 3 20 C 1 28kg l 1 00 1 28kg l 412 ZH...
Page 413: ...7 1 2 3 DOT 5 1 2 MAX MIN MIN MAX 5 6 1 2 25 Nm 10 1 2 1 2 20Nm 1 2 3 1 2 MAX MIN MIN 413 ZH...
Page 414: ...8 K rcher 1 20 1 2 1 2 3 80 mm 1 3 10 1 3 80 85 mm 12 10 40 50mm 414 ZH...
Page 421: ...12 421 AR...
Page 423: ...10 1 2 1 2 3 80 1 3 10 3 80 85 12 10 40 50 1 2 SW 13 1 3 423 AR...
Page 424: ...9 6 1 2 25 10 1 2 1 2 20 1 2 3 1 2 MIN MAX MIN 1 MIN MAX 20 424 AR...
Page 425: ...8 1 2 3 20 1 28 1 1 28 1 2 3 DOT 1 2 MIN MAX MIN MAX 425 AR...
Page 426: ...7 0 4X 0 VDE 0701 0 50 50 250 500 1000 1500 2000 0 1 2 426 AR...
Page 427: ...6 70 70 1 2 3 4 1 1 2 2 3 3 4 4 1 3 4 1 3 1 3 4 1 3 1 3 4 2 4 4 2 1 3 4 0 427 AR...
Page 428: ...5 10 1 2 1 2 3 1 2 1 2 II 10 10 1 2 3 428 AR...
Page 430: ...3 70 2 880 430 AR...
Page 431: ...2 0 K rcher 18 10 1200 3 4 K rcher 431 AR...
Page 433: ......


