-
5
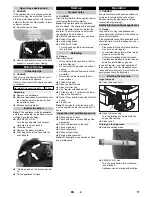
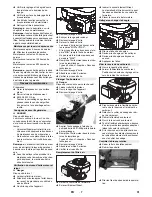
Slide the multifunctional lever into the
center position "Operation speed"; if the
weather is cold or wet, move it to the
"Choke“ position.
Note:
The appliance works best while in
the operating position.
Start the motor.
In order to start the device with the
starter rope, turn the key switch to posi-
tion "1".
Pull the starter rope slowly until a resist-
ance can be felt.
Pull starter rope swiftly.
Once the motor runs, release the starter
rope. Move the multifunctional lever
from the "Choke" into the "Operating
speed" position.
Note:
The roller brush and the side brush
will rotate.
KM 85/50 W G Adv
DANGER
The appliance can drive forward and in re-
verse at the same speed. Therefore gently
pull back the push handle when travelling in
reverse.
Turn the push handle lock counter-
clockwise; lock is unlocked.
Drive forward
Push the pushing handle to the front.
Reverse drive
Pull the push handle backwards.
KM 85/50 W G
Drive forward
Push the pushing handle to the front.
Driving over fixed obstacles which are 30
mm high or less:
Raise bulk waste flap.
Drive forwards slowly and carefully.
Driving over fixed obstacles which are
more than 30 mm high:
Only drive over these obstacles using a
suitable ramp.
Danger
Risk of injury! If the bulk waste flap is open,
stones or gravel may be flung forwards by
the roller brush. Make sure that this does
not endanger persons, animals or objects.
CAUTION
Do not sweep up packing strips, wire or
similar objects as this may damage the
sweeping mechanism.
Note:
To achieve an optimum cleaning re-
sult, the driving speed should be adjusted
to take specific situations into account.
Note:
The bulk waste flap must be raised
briefly to sweep up larger items (up to 50
mm high), e.g. soft drink cans.
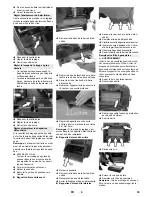
Raising bulk waste flap:
Pull the lever for raising the bulk waste
flap.
Lowering the bulk waste flap:
Release the lever for raising the bulk
waste flap.
Note:
An optimum cleaning result can only
be achieved if the bulk waste flap has been
lowered completely.
Loosen the lever lock. The side-brush-
es will be lowered.
(only Adv model)
Release locking device. Roller brush is
lowered.
Note:
During operation, the waste contain-
er should be emptied at regular intervals.
Note:
During operation, the dust filter
should be shaken off and cleaned at regu-
lar intervals.
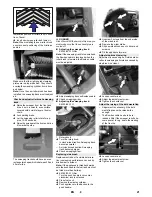
Open the waste container lock and let it
hang in.
The waste container will open by approx. 8
cm.
Note:
This protects the filter from moisture.
Move the handle of the filter dedusting
back and forth a few times.
Shake off dust filter.
Open the waste container lock.
Hang out the lock.
Pull out the waste container.
Empty waste container.
Push in the waste container.
Hang in the waste container lock.
Close the lock.
Note:
The waste container is equipped with
transport rollers.
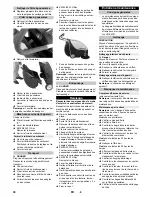
Switch off engine.
Push the multifunctional lever into "0"
position.
The side-brushes lift up.
KM 85/50 W G Adv
Raise roller brush.
Lock parking brake.
Drive the machine
Driving over obstacles
Sweeping mode
Sweeping with bulk waste flap raised
Sweeping with side brushes
Lower roller brush
Sweeping dry floors
Sweeping damp or wet floors
Cleaning the dust filter
Emptying waste container
Turn off the appliance
18
EN
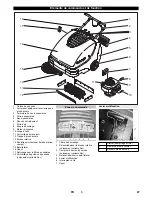
Summary of Contents for KM 85/50 W G Adv
Page 2: ...2...
Page 126: ...2 www kaercher com 2 Adv 2 640 301 0 18 2 Adv 2 640 301 0 18 3 4 0 0 126 EL...
Page 128: ...4 KM 85 50 W G Adv KM 85 50 W G Adv 1 cm 1 5 126 kg 128 EL...
Page 129: ...5 KM 85 50 W G Adv 1 KM 85 50 W G Adv KM 85 50 W G 30 mm 30 mm 50 mm Adv 8 cm 129 EL...
Page 132: ...8 KM 85 50 W G Adv 15 30 30 40 mm KM 85 50 W G Adv 132 EL...
Page 133: ...9 KM 85 50 W G 1 KM 85 50 W G Adv 3 KM 85 50 W G Adv 10 15 mm 133 EL...
Page 134: ...10 1 2 mm 134 EL...
Page 150: ...3 0 0 150 RU...
Page 152: ...5 KM 85 50 W G Adv KM 85 50 W G Adv Normal 92 1 1 5 126 kg 152 RU...
Page 153: ...6 KM 85 50 W G Adv 1 KM 85 50 W G Adv KM 85 50 W G 30 30 50 Adv 8 153 RU...
Page 156: ...9 KM 85 50 W G Adv 15 30 30 40 KM 85 50 W G Adv KM 85 50 W G 156 RU...
Page 157: ...10 1 KM 85 50 W G Adv 3 KM 85 50 W G Adv 10 15 157 RU...
Page 158: ...11 1 2 158 RU...
Page 251: ...2 www kaercher com 2 Adv 2 640 301 0 18 2 Adv 2 640 301 0 18 3 4 0 0 251 BG...
Page 253: ...4 KM 85 50 W G Adv KM 85 50 W G Adv 1 1 5 126 kg 253 BG...
Page 254: ...5 KM 85 50 W G Adv 1 KM 85 50 W G Adv KM 85 50 W G 30 30 50 mm Adv 254 BG...
Page 256: ...7 Adv 5 25 50 K rcher 5 50 100 500 Karcher KM 85 50 W G Adv 3 4 5 MA 5 6 491 538 5 256 BG...
Page 257: ...8 KM 85 50 W G Adv 15 30 30 40 mm KM 85 50 W G Adv 257 BG...
Page 258: ...9 KM 85 50 W G 1 KM 85 50 W G Adv 3 KM 85 50 W G Adv 10 15 258 BG...
Page 259: ...10 1 2 mm 259 BG...
Page 260: ...11 1 K rcher Adv K rcher K rcher K rcher K rcher K rcher 260 BG...
Page 297: ...2 www kaercher com 2 Adv 2 640 301 0 18 2 Adv 2 640 301 0 18 3 4 0 0 297 UK...
Page 299: ...4 KM 85 50 W G Adv KM 85 50 W G Adv Normal 92 1 1 5 KM 85 50 W G Adv 126 kg 299 UK...
Page 302: ...7 K rcher 5 50 100 500 K rcher KM 85 50 W G Adv 3 4 5 M N MAX M N MAX 5 6491 538 5 302 UK...
Page 303: ...8 KM 85 50 W G Adv 15 30 30 40 KM 85 50 W G Adv KM 85 50 W G 1 303 UK...
Page 304: ...9 KM 85 50 W G Adv 3 KM 85 50 W G Adv 10 15 304 UK...
Page 305: ...10 1 2 305 UK...
Page 308: ......
Page 309: ......
Page 310: ......
Page 311: ......
Page 312: ...http www kaercher com dealersearch...


