16
English
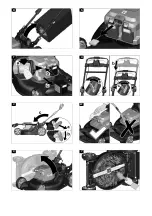
a Pull up the handle of the mulch plug.
Illustration G
The mulch plug is unlocked.
b Remove the mulch plug from the ejection chute
2. Hook the grass bag to the ejection chute.
Illustration H
Mounting the side ejector
The side ejector is used when the grass clippings are to
be ejected sideways.
1. Remove the mulch plug if necessary.
a Pull up the handle of the mulch plug.
Illustration G
The mulch plug is unlocked.
b Remove the mulch plug from the ejection chute
2. Hook in the side ejector on the ejection chute.
Illustration I
Mount the battery pack
1. Push the battery pack into the mounting in the de-
vice until it audibly latches into place.
Illustration J
Insert the security key
1. Use the security key.
Illustration K
The mark on the security key indicates which battery
pack is used during operation.
Operation
General information on handling the
lawnmower
The run time of the battery depends on several factors:
●
The condition, length and density of the grass
●
The cutting height setting
Maximum surface performance depending on the state
of the grass: approx. 2500 m
2
.
The results of the mowing process can be optimised as
follows:
●
Cut at a maximum of one third of the grass height.
●
When mowing tall grass, reduce the speed at which
the device is pushed or moves forward when the
push-assist function is activated.
Note
Do not mow wet grass. Wet grass sticks to the under-
side of the lawnmower and prevents correct collection of
the grass in the grass bag or ejection of the grass.
Mowing lawns
몇
WARNING
Lifting or tipping the lawnmower during operation
Incision injuries
The blade of the lawnmower rotates approximately par-
allel to the ground over which it moves. Take care to en-
sure that all four wheels touch the ground when
mowing.
1. Install the grass bag, the side ejector or mulch plug
(see Chapter
2. Set the cutting height using the cutting height adjust-
ment lever.
Illustration L
Choose the cutting height according to the condi-
tion, length and density of the grass (see Chapter
General information on handling the lawnmower
).
3. Press the lever ON/OFF.
Illustration M
4. Press the start button. Keep the lever ON/OFF
pressed.
The device starts.
Empty the grass bag regularly when using the grass
catcher, otherwise the ejection chute can become
clogged with cut grass (see Chapter
).
Push Assist function
The Push Assist function activates the device’s self-
driving function.
The ON/OFF lever is pressed.
1. Press the Push Assist lever.
Illustration N
The Push Assist function is activated. The device
moves forwards without having to be pushed by the
operator.
2. Set the speed at which the device should move for-
ward on the speed control slider.
Illustration O
3. Release the Push Assist lever.
Illustration P
The Push Assist function is deactivated. The device
continues to mow, however it must be pushed by the
operator.
Interrupting operation
1. Release the ON/OFF lever.
Illustration Q
The motor stops.
Emptying the grass bag
1. Remove the grass bag.
Illustration R
Take care to ensure that the motor control cable re-
mains in the cable holder when removing the grass
bag.
2. Empty the grass bag.
Remove the security key
Before removing the battery packs, the safety key must
be removed.
1. Pull the security key out of the device.
Illustration S
Removing the battery pack
Note
During longer work breaks, remove the battery pack
from the device and secure it against unauthorised use.
1. Pull the battery pack unlocking button in the direc-
tion of the battery pack.
Illustration T
2. Press the battery pack unlocking button to unlock
the battery pack.
3. Remove the battery pack from the device.
Ending operation
1. Remove the battery pack from the device (see
Chapter
).
2. Clean the device (see Chapter
).
Transport
몇
WARNING
Sharp blade
Incision injuries
Be careful when tipping or lifting the device.
Keep all parts of your body away from the cutting blade.
1. Switch the device off (see Chapter
).
2. Ensure that the blade is no longer rotating.
Summary of Contents for LM 530/36 Bp
Page 2: ...A ...
Page 3: ...B C D E F G H I ...
Page 4: ...J K L M N O P Q ...
Page 5: ...R S T U V W X Y ...
Page 6: ...Z AA AB AC ...
Page 182: ......
Page 183: ......

