English
71
1
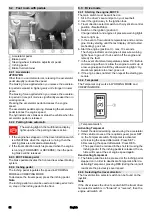
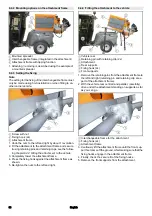
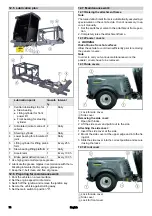
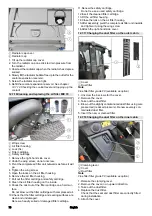
Towing eye
2
Retaining pin
3
Locking pin
4
Locking pin for bolt
5
Bolt
1. Take the towing eye out of the driver cabin.
1
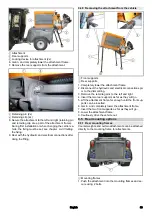
Retaining pin with locking pin
2
Towing eye
3
Vehicle chassis
4
Bolt
5
Locking pin
2. Attach the towing eye at the front of the vehicle chassis
on the right-hand side.
3. Insert the retaining pin into the towing eye and secure
with the locking pin.
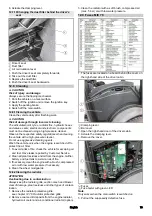
10.2.2Releasing the hydraulic brake cylinder
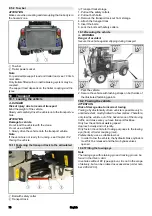
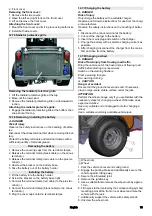
The nuts for releasing the brake cylinders are located to
the left and right of the articulated joint.
1
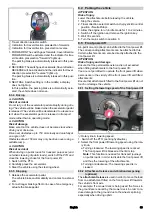
Hydraulic brake cylinder
1. Release the nut on the hydraulic brake cylinder to the
left and right.
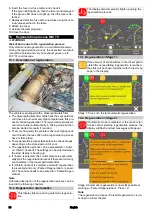
10.2.3Opening the bypass valves
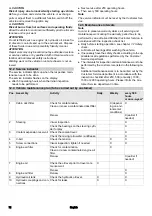
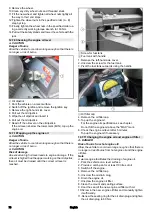
The bypass valves are located on the bottom side, in the
front area of the rear end.
1
Bypass valve
1. Unscrew the bypass valves 3 revolutions (width across
flats 24 mm).
2. Fasten the tow rope on the towing eye at the front or
rear.
3. Pull the vehicle slowly onto the transporting vehicle.
4. After towing, tighten the nuts on the brake cylinder again
(tightening torque 70 Nm) and close the bypass valves.
11
Storage
몇
WARNING
Risk of injury and damage
Note the weight of the device.
1. Change the engine oil and engine oil filter.
2. If there is a danger of frost, check whether there is
enough antifreeze in the coolant.
3. Clean the vehicle inside and out.
4. Place the vehicle in a dry, protected place on an even
surface.
5. Turn the ignition key to the "Stop" position and remove it.
6. Switch off the main switch.
7. Jack up the vehicle when storing over one month.
8. Disconnect the battery.
9. Charge the battery every 2 months.
12
Care and maintenance
12.1 General safety instructions
몇
WARNING
Risk of fatal injury from moving traffic
Prior to maintenance or repair work, get the vehicle out of
the hazard zone of the moving traffic, and wear a warning
vest.
DANGER
Crush hazard
When working under raised attachments, ensure these are
always mechanically locked (shimming).
몇
WARNING
Risk of injury and damage
Keep away from the drive area. Be aware of the engine af-
ter-running time after switching off (3-4 seconds).
Disconnect the battery before working on the electrical
system.
Summary of Contents for MIC 70
Page 2: ......
Page 302: ...302 K RCHER K RCHER 2 1 2 2 1 2 3 4 5 6 7 3 REACH www kaercher com REACH 3 1 3 2 4 4 1...
Page 303: ...303 4 2 4 3 4 4 3 4 4 5 DPF 600 C 13 MIC 70 4 6 4 7 4 8...
Page 304: ...304 4 9 10...
Page 305: ...305 4 10 F2 DOT 4 Main fuse 70A F2 3A F2 3A...
Page 310: ...310 1 6 6 4 1 2 3 6 6 5 1 2 0 on 1 on 3 0 1 2 4 5 6 7 8 6 6 6 6 6 7 1 2 3 4 5 6 7 8...
Page 316: ...316 1 Off 2 On 3 6 10 4 1 1 2 a b 6 10 5 1 1 2 a b 7...
Page 318: ...318 7 4 Comfort 1 2 3 4 5 6 7 8 9 10 11 12 13 1 2 3 4 a 7 5 1 2 1 2 3 4 5 7 6 1 2 3 4 8 14...
Page 324: ...324 9 3 9 3 1 3 H 3 2 1 3 2 3 4 5 1 2 9 3 2 3 1 2 3 2 4 1 2 3 1 9 3 3 4 H 4 2 1 4 2 3 4 5 1...
Page 326: ...326 9 4 2 1 2 3 1 9 4 3 1 2 2x 3 1 1 2 9 4 4 3 4 5 9 4 4 1 2 2x 3 4 5 2x 6 1 2 1 2 2x 3 3 4 5...
Page 327: ...327 1 2 3 2x 6 7 1 2x 2 2x 8 9 4 3 9 9 4 5 1 2 1 2 3 4 5 6 7 8 9 9 5 9 5 1 1 1 2...
Page 328: ...328 9 5 2 1 2 16 10 10 1 1 10 2 10 1 1 1 2 3 1 2 3 4 5 6 10 1 2 1 2 10 2...
Page 342: ...342 14 1 MIC 70 14 2 14 3 V2403 CR T EW03 V P0217 5 P0217 Joystick...

