English
11
Troubleshooting guide
Malfunctions often have simple causes that you can
remedy yourself using the following overview. When in
doubt, or in the case of malfunctions not mentioned
here, please contact your authorised Customer Service.
Disassembly
Removing the cable management system
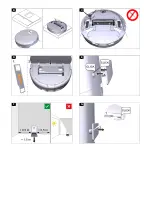
Illustration G
1. Insert a flat screwdriver into the side opening of the
cable management system and release the hook.
2. Take the cable management system off the device.
Warranty
The warranty conditions issued by our sales company
responsible apply in all countries. We shall remedy pos-
sible malfunctions on your device within the warranty
period free of cost, provided that a material or manufac-
turing defect is the cause. In a warranty case, please
contact your dealer (with the purchase receipt) or the
next authorised customer service site.
(See overleaf for the address)
EU Declaration of Conformity
Alfred Kärcher GmbH & Co. KG hereby declares that
the radio device type Robo Cleaner complies with the
2014/53/EU directive. The full text of the EU Declaration
of Conformity can be found at
www.kaercher.com/
RCV5base
.
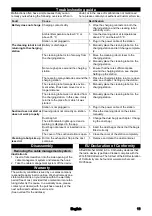
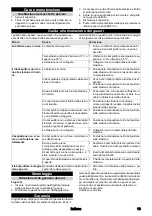
Fault
Cause
Rectification
Battery does not charge
Charging contacts dirty.
1. Wipe the charging contacts on both the
charging station and the cleaning robot
with a dry cloth.
Ambient temperature below 0 °C or
above 35 °C.
1. Use the cleaning robot at temperatures
above 0 °C and below 35 °C.
Station is not plugged in.
1. Plug in the power cable of the station.
The cleaning robot is not
returning to the charging
station
Battery is discharged.
1. Manually place the cleaning robot on the
charging station and let it charge complete-
ly.
The cleaning robot is too far away from
the charging station.
1. Move the cleaning robot closer to the
charging station.
2. Manually place the cleaning robot on the
charging station.
Not enough space around the charging
station.
1. Ensure that there is sufficient space
around the charging station, see chapter
There are too many obstacles around the
charging station.
1. Place the charging station in a more open
area, see chapter
.
The cleaning robot remaps its environ-
ment when it has been moved over a
longer distance.
1. Manually place the cleaning robot on the
charging station.
The cleaning robot was not started from
the charging station. In this case, it only
returns to the place from which it was
started.
1. Manually place the cleaning robot on the
charging station.
Station is not plugged in.
1. Plug in the power cable of the station.
Suction does not start or
does not work properly
Cleaning robot not correctly on station.
1. Place the cleaning robot on the station
manually.
Dust bag full.
The LED indicator lights up red and a
warning is displayed in the app.
1. Change the dust bag (see chapter
Dust bag not present or inserted incor-
rectly.
1. Insert the dust bag or check that the bag is
fitted correctly.
The cover of the suction station is open. 1. Close the cover of the station completely.
Cleaning robot picks up
less dirt
Dirt on the exhaust air flap in the dust
container.
1. Remove and clean the dust container.
Summary of Contents for RCV 5 Base
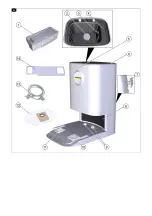
Page 2: ...A...
Page 3: ...B C D E F G...
Page 58: ...58 1 2 RCV 5 3 B 4 C 5 6 7 D 8 RCV 5 E 1 0 5 1 5 1 F 2 3 4 1 1 2 3 1...
Page 59: ...59 1 2 3 4 5 6 RCV 5 G 1 2 1 0 C 35 C 1 0 C 35 C 1 1 1 2 1 1 1 1 1 1 1 1 1 1...
Page 94: ...94 1 2 RCV 5 LiDAR 3 B 4 C 5 6 7 D 8 RCV 5 E 1 0 5 1 5 1 F 2 3 4 1 1 2 3 1 2 3 4 5 6 RCV 5...
Page 110: ...110 1 2 RCV 5 3 B 4 C 5 6 7 D 8 RCV 5 E 1 0 5 1 5 1 F 2 3 4 1 1 2 3 1 2 3 4 5 6 RCV 5...
Page 114: ...114 1 2 RCV 5 LiDARS 3 B 4 C 5 6 7 D 8 RCV 5 E 1 0 5 1 5 1 F 2 3 4 1 1 2 3 1...
Page 115: ...115 1 2 3 4 5 6 RCV 5 G 1 0 C 35 C 1 0 C 35 C 1 1 1 2 1 1 1 1 1 1 1 1 1 1...
Page 118: ...119 3 4 1 1 2 3 1 2 3 4 5 6 RCV 5 1 0 35 1 0 35 1 1 1 2 1 1 1 1 1 1 LED 1 1 1 1...
Page 121: ......
Page 122: ......
Page 123: ......


