457462_a
59
GB
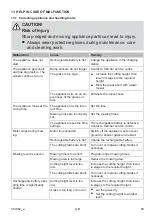
13 HELP IN CASE OF MALFUNCTION
13.1 Correcting appliance and handling faults
CAUTION!
Risk of injury
Sharp-edged and moving appliance parts can lead to injury.
■ Always wear protective gloves during maintenance, care
and cleaning work.
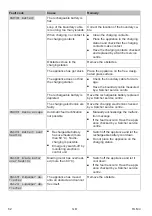
Malfunction
Cause
Remedy
The appliance does not
start.
Rechargeable battery is flat.
Charge the appliance in the charging
station.
The appliance gets stuck
and has dug itself in. The
wheels continue to turn.
Bump sensors do not trigger.
Contact a Kärcher service centre.
The grass is too high.
■
Increase the cutting height, then
lower in stages to the required
height.
■
Mow the grass short with a lawn
mower.
The appliance sits on an un-
evenness of the grass sur-
face.
Eliminate the unevenness.
The appliance mows at the
wrong time.
The appliance has the incor-
rect time.
Set the time.
Mowing times are incorrectly
set.
Set the mowing times.
The appliance loses the time
settings.
The rechargeable battery is defective.
Contact a Kärcher service centre.
Motor stops during mow-
ing.
Motor is overloaded.
Switch off the appliance, set on level
ground or shorter grass and restart.
Rechargeable battery is flat.
Charge the rechargeable battery.
The cutting blades are blunt.
Turn over or replace cutting blades if
necessary.
Mowing result is uneven.
Mowing time is too short.
Program longer mowing times.
Mowing area is too large.
Reduce the mowing area.
Cutting height level is too
low.
Increase the cutting height, then lower
in stages to the required height.
The cutting blades are blunt.
Turn over or replace cutting blades if
necessary.
Rechargeable battery oper-
ating time is significantly
shorter.
Cutting height level is too
low.
Increase the cutting height, then lower
in stages to the required height.
Grass is too long or too wet.
■
Let the grass dry.
■
Set the cutting height to a higher
level.
Summary of Contents for RLM 4
Page 427: ...457462_a 427 RU 1 1 1...
Page 433: ...457462_a 433 RU 2 9 0 3 3 1 CE 500 2 45 24 45 24 0 45 C 0 55 C 3 2...
Page 434: ...434 RLM 4 RU 3 3 3 3 1 PIN PUK PIN PIN PIN 3 PUK 24 PIN PUK PIN PUK 3 3 2...
Page 435: ...457462_a 435 RU 24 45 EGMF 3 4 3 4 1 16 3 4 2...
Page 436: ...436 RLM 4 RU 3 4 3 3 4 4...
Page 448: ...448 RLM 4 RU 9 3 K rcher 1 ON OFF 2 3 4 5 180 6 180 K rcher 10 1 START STOP 2 ON OFF 3...
Page 449: ...457462_a 449 RU 11 11 1 30 1 5 1 08 441 2 9 1 447 3 11 2 1 2 3 4 1 2 3 4 08 4 5 11 3 1 12...
Page 450: ...450 RLM 4 RU 2012 19 EC Hg Cd Pb Hg 0 0005 Cd 0 002 Pb 0 004 2006 66 EC 1 2 3 1 1 2 2 3 3 4...
Page 451: ...457462_a 451 RU 13 13 1 K rcher K rcher...
Page 452: ...452 RLM 4 RU K rcher K rcher K rcher K rcher 13 2 CN001 Tilt sensor CN002 Lift sensor...
Page 459: ...457462_a 459 UA 1 1 1...
Page 466: ...466 RLM 4 UA 24 PIN PUK PIN PUK 3 3 2 24 45 EGMF...
Page 467: ...457462_a 467 UA 3 4 3 4 1 16 3 4 2 3 4 3 3 4 4...
Page 468: ...468 RLM 4 UA 3 4 5 4 4 1 1 2 K rcher 3 p 2 1 460 4 2 01 01 1 01 01 h n 01 01 HF 01 NF...
Page 480: ...480 RLM 4 UA 11 2 1 2 3 4 1 2 3 4 08 4 5 11 3 1 12 ElektroG 2012 19 C...
Page 481: ...457462_a 481 UA BattG Hg Cd Pb Hg 0 0005 Cd 0 002 Pb 0 004 2006 66 C 1 2 3 1 1 2 2 3 3 4...

