457462_a
39
GB
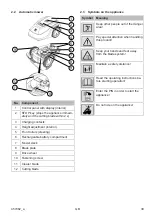
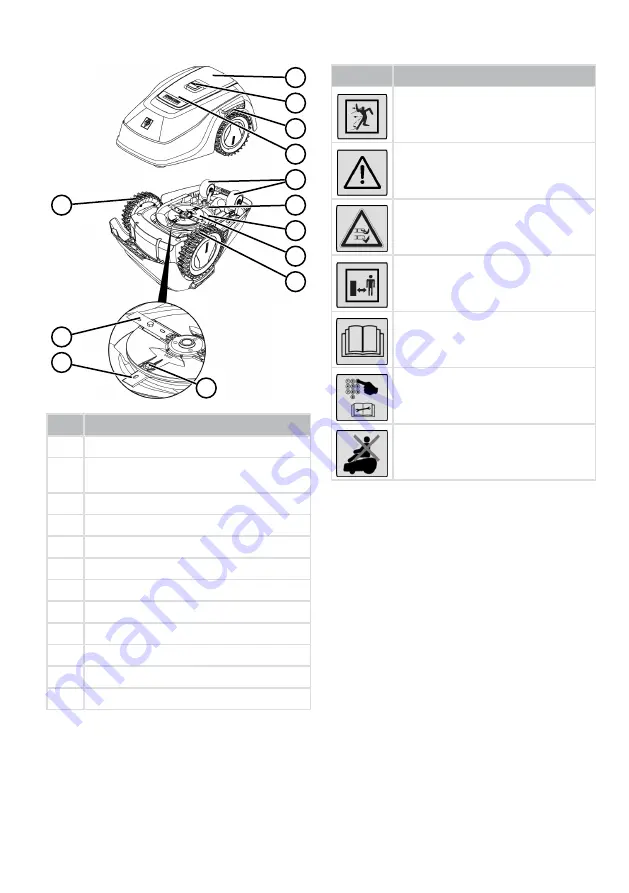
2.2
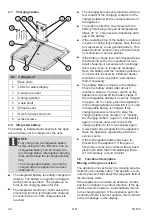
Automatic mower
4
1
2
3
5
7
8
9
9
10
11
6
12
No.
Component
1
Control panel with display (interior)
2
STOP key (stops the appliance immedi-
ately and the cutting blade within 2 s)
3
Charging contacts
4
Height adjustment (interior)
5
Front rollers (steering)
6
Rechargeable battery compartment
7
Mower deck
8
Blade plate
9
Drive wheel
10
Fastening screw
11
Clearer blade
12
Cutting blade
2.3
Symbols on the appliance
Symbol
Meaning
Keep other people out of the danger
area!
Pay special attention when handling
this product!
Keep your hands and feet away
from the blade system!
Maintain a safety distance!
Read the operating instructions be-
fore starting operation!
Enter the PIN in order to start the
appliance!
Do not ride on the appliance!
Summary of Contents for RLM 4
Page 427: ...457462_a 427 RU 1 1 1...
Page 433: ...457462_a 433 RU 2 9 0 3 3 1 CE 500 2 45 24 45 24 0 45 C 0 55 C 3 2...
Page 434: ...434 RLM 4 RU 3 3 3 3 1 PIN PUK PIN PIN PIN 3 PUK 24 PIN PUK PIN PUK 3 3 2...
Page 435: ...457462_a 435 RU 24 45 EGMF 3 4 3 4 1 16 3 4 2...
Page 436: ...436 RLM 4 RU 3 4 3 3 4 4...
Page 448: ...448 RLM 4 RU 9 3 K rcher 1 ON OFF 2 3 4 5 180 6 180 K rcher 10 1 START STOP 2 ON OFF 3...
Page 449: ...457462_a 449 RU 11 11 1 30 1 5 1 08 441 2 9 1 447 3 11 2 1 2 3 4 1 2 3 4 08 4 5 11 3 1 12...
Page 450: ...450 RLM 4 RU 2012 19 EC Hg Cd Pb Hg 0 0005 Cd 0 002 Pb 0 004 2006 66 EC 1 2 3 1 1 2 2 3 3 4...
Page 451: ...457462_a 451 RU 13 13 1 K rcher K rcher...
Page 452: ...452 RLM 4 RU K rcher K rcher K rcher K rcher 13 2 CN001 Tilt sensor CN002 Lift sensor...
Page 459: ...457462_a 459 UA 1 1 1...
Page 466: ...466 RLM 4 UA 24 PIN PUK PIN PUK 3 3 2 24 45 EGMF...
Page 467: ...457462_a 467 UA 3 4 3 4 1 16 3 4 2 3 4 3 3 4 4...
Page 468: ...468 RLM 4 UA 3 4 5 4 4 1 1 2 K rcher 3 p 2 1 460 4 2 01 01 1 01 01 h n 01 01 HF 01 NF...
Page 480: ...480 RLM 4 UA 11 2 1 2 3 4 1 2 3 4 08 4 5 11 3 1 12 ElektroG 2012 19 C...
Page 481: ...457462_a 481 UA BattG Hg Cd Pb Hg 0 0005 Cd 0 002 Pb 0 004 2006 66 C 1 2 3 1 1 2 2 3 3 4...


