42
RLM 4
GB
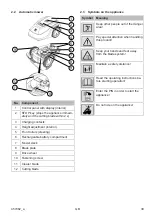
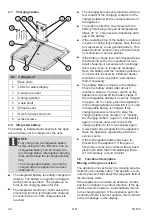
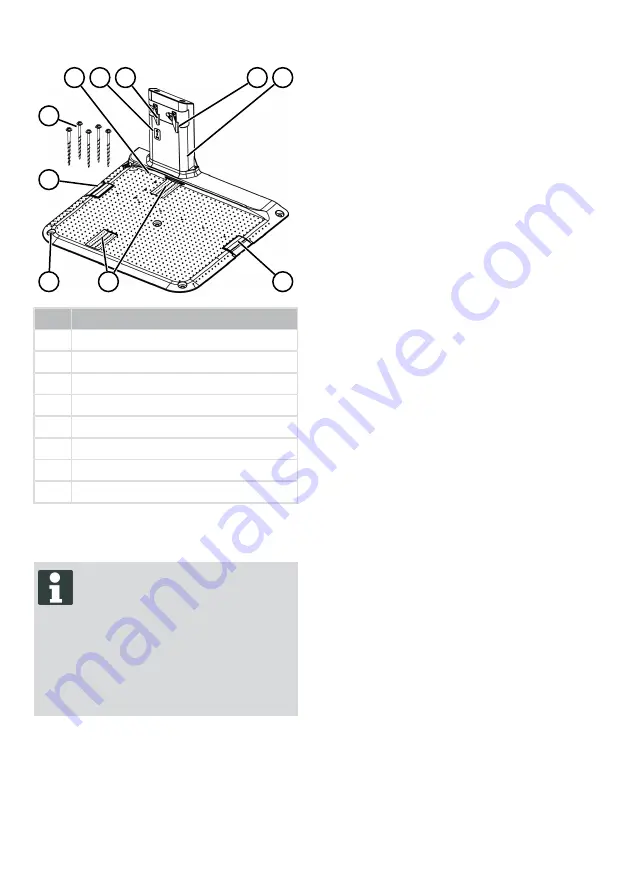
2.7
Charging station
5
3
3
1
2
7
4
6
5
8
No.
Component
1
Base plate
2
LEDs for status display
3
Charging contact
4
Charging station
5
Cable shaft
6
Wheel recess
7
Hole for grass screws (8)
8
Grass screws
2.8
Integrated battery
The battery is installed permanently in the appli-
ance and may not be changed by the user.
NOTE
Fully charge the rechargeable battery
before using it for the first time. The re-
chargeable battery can be charged in
any charge status. Interrupting charging
does not damage the rechargeable bat-
tery.
The rechargeable battery can only be
charged after the appliance has been
switched on.
■
The integrated battery is partially charged on
delivery. The battery is regularly recharged
during normal operation. The appliance re-
turns to the charging station for this.
■
The integrated electronic control unit with a
monitoring function terminates the charging
procedure when a 100% charge status is
reached.
■
The charging process only functions with per-
fect contact of the charging contacts on the
charging station with the contact surfaces of
the appliance.
■
The built-in protection circuit prevents the
battery from being charged at temperatures
above 45 °C. This prevents irreparable dam-
age to the battery.
■
If the operating time of the battery is reduced
in spite of it being fully charged, have the bat-
tery replaced by a new genuine battery. This
task should be carried out by a Kärcher deal-
er, technician or service partner.
■
If the battery charge level has dropped below
the threshold set by the manufacturer as a
result of ageing or excessively long storage,
this means it can no longer be recharged.
Have the battery and the monitoring electron-
ic control unit checked by a Kärcher dealer,
technician or service partner, and replace
them if necessary.
■
The battery status is shown on the display.
Check the battery status after about 3
months in storage. To do so, switch on the
appliance and read off the battery status. If
the rechargeable battery is now only charged
to approx. 30 % or less, place the appliance
in the charging station and switch it on so the
rechargeable battery is charged. If the
charging pole was removed to store the
charging station (see
the charging station", page 57
), first install it
again in reverse order and connect the
charging station to the mains supply again.
■
If electrolyte has escaped into the appliance:
Have the appliance repaired by a Kärcher
service centre.
■
If the rechargeable battery has been re-
moved from the appliance: If the eyes or
hands have come into contact with escaped
electrolyte, flush them immediately with wa-
ter. Immediately consult a doctor.
2.9
Functional description
Moving on the grass surface
The appliance moves freely in a mowing area de-
limited by a boundary cable. The appliance is ori-
ented by sensors that detect the magnetic field of
the boundary cable.
If the appliance encounters an obstacle, it stops
and then continues in another direction. If the ap-
pliance detects moisture, it automatically returns
to the charging station. If the appliance gets into
a situation where it cannot operate, this is indicat-
ed by a message on the display.
Summary of Contents for RLM 4
Page 427: ...457462_a 427 RU 1 1 1...
Page 433: ...457462_a 433 RU 2 9 0 3 3 1 CE 500 2 45 24 45 24 0 45 C 0 55 C 3 2...
Page 434: ...434 RLM 4 RU 3 3 3 3 1 PIN PUK PIN PIN PIN 3 PUK 24 PIN PUK PIN PUK 3 3 2...
Page 435: ...457462_a 435 RU 24 45 EGMF 3 4 3 4 1 16 3 4 2...
Page 436: ...436 RLM 4 RU 3 4 3 3 4 4...
Page 448: ...448 RLM 4 RU 9 3 K rcher 1 ON OFF 2 3 4 5 180 6 180 K rcher 10 1 START STOP 2 ON OFF 3...
Page 449: ...457462_a 449 RU 11 11 1 30 1 5 1 08 441 2 9 1 447 3 11 2 1 2 3 4 1 2 3 4 08 4 5 11 3 1 12...
Page 450: ...450 RLM 4 RU 2012 19 EC Hg Cd Pb Hg 0 0005 Cd 0 002 Pb 0 004 2006 66 EC 1 2 3 1 1 2 2 3 3 4...
Page 451: ...457462_a 451 RU 13 13 1 K rcher K rcher...
Page 452: ...452 RLM 4 RU K rcher K rcher K rcher K rcher 13 2 CN001 Tilt sensor CN002 Lift sensor...
Page 459: ...457462_a 459 UA 1 1 1...
Page 466: ...466 RLM 4 UA 24 PIN PUK PIN PUK 3 3 2 24 45 EGMF...
Page 467: ...457462_a 467 UA 3 4 3 4 1 16 3 4 2 3 4 3 3 4 4...
Page 468: ...468 RLM 4 UA 3 4 5 4 4 1 1 2 K rcher 3 p 2 1 460 4 2 01 01 1 01 01 h n 01 01 HF 01 NF...
Page 480: ...480 RLM 4 UA 11 2 1 2 3 4 1 2 3 4 08 4 5 11 3 1 12 ElektroG 2012 19 C...
Page 481: ...457462_a 481 UA BattG Hg Cd Pb Hg 0 0005 Cd 0 002 Pb 0 004 2006 66 C 1 2 3 1 1 2 2 3 3 4...

