– 10
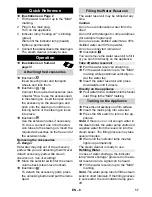
You can use the steam gun without any ad-
ditional accessories, e.g.:
–
to remove odours and wrinkles from
hanging clothes by steaming them at a
distance of 10 to 20 cm.
–
to remove dust from plants. Here, keep
a distance of 20-40 cm.
–
for moist dusting, by briefly steaming
the cloth and wiping the furniture with it.
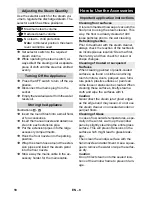
The closer this nozzle is to the contaminat-
ed area, the higher the cleaning effect, as
the temperature and the steam are highest
at the nozzle output. Especially suited for
cleaning difficult access locations, joints,
fittings, drains, sinks, toilets, blinds and
heaters. Heavy lime scale can be drenched
in vinegar prior to steam-cleaning. Let the
vinegar penetrate for about 5 minutes.
The round brush can be installed onto the
detail nozzle as an accessory. Attached
brushes can therefore be used to remove
heavy soiling.
Caution
Not suited for the cleaning of sensitive sur-
faces.
Illustration
Attach the round brush to the detail nozzle.
Pull the terry cloth cover over the hand noz-
zle. Especially well-suited for small washa-
ble areas, shower stalls and mirrors.
Suited for all washable walls and floor cov-
erings, e.g. stone floors, tiles and PVC
floors. Work slowly on very dirty surfaces to
allow the steam to act on the dirt for a long-
er period of time.
Note:
Detergent residue or care emulsions
that are still present on the surfaces to be
cleaned, can lead to smears when steam
cleaned. However, these will disappear
with repeated cleaning procedures.
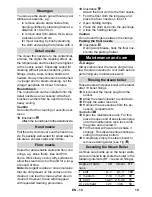
Illustration
Attach the floor cloth to the floor nozzle.
1 Fold the floor cloth the long way and
place the floor nozzle on top of it.
2 Open holding clamps.
3 Place the cloth ends into the openings.
4 Close the holding clamps.
Caution
Do not insert fingers between the clamps.
Illustration
During work breaks, hook the floor noz-
zle into the parking holder.
Danger
Always disconnect the mains plug and al-
low the steam cleaner to cool down before
performing any maintenance work.
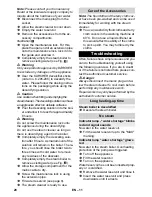
Rinse the steam cleaner boiler at the latest
after 10 boiler fillings.
Disconnect the mains plug from the
socket.
Allow the steam cleaner to cool down.
Empty the water reservoir.
Remove the accessories from the ac-
cessory compartments.
Illustration
Open the maintenance lock. For this,
place the open end of an extension pipe
onto the maintenance lock, lock it into
the guide and unscrew it.
Fill the boiler with water and shake it
strongly. This dissolves lime scaling re-
siding on the boiler bottom.
Completely empty the steam boiler to
remove existing water (see Fig. ).
As limes cale builds up on the boiler walls,
we recommend to de scale the boiler in the
following intervals (RF = reservoir fillings):
Steam gun
Detail nozzle
Round brush
Hand nozzle
Floor nozzle
Parking the floor nozzle
Maintenance and care
Rinsing the steam boiler
Descaling the Steam Boiler
Degree of hard-
ness
° dH
mmol/l
RF
I
soft
0- 7
0-1,3
100
II medium
7-14
1,3-2,5
90
III hard
14-21 2,5-3,8
75
IV very hard
>21
>3,8
50
19
EN
Summary of Contents for SC 2.500 C
Page 2: ...2...
Page 3: ...3...
Page 4: ...4...
Page 101: ...6 IEC 60364 FI 3x1 mm 8 101 EL...
Page 103: ...8 2 1 2 3 4 3 50 50 E1 2 E2 F1 F2 F3 103 EL...
Page 104: ...9 104 EL...
Page 105: ...10 10 20 cm 20 40 cm 5 PVC 1 2 3 4 10 105 EL...
Page 119: ...6 IEC 60364 FI 30190 3 0 1 9 0 30190 09 2 013 119 RU...
Page 120: ...7 3x1 8 120 RU...
Page 122: ...9 2 1 MAX 2 3 4 3 50 50 MAX MAX 122 RU...
Page 123: ...10 MAX 123 RU...
Page 124: ...11 10 20 20 40 5 1 2 3 4 124 RU...
Page 200: ...6 IEC 60364 3x1 2 8 200 BG...
Page 202: ...8 2 1 MAX 2 3 4 3 50 50 MAX MAX 202 BG...
Page 203: ...9 MAX 203 BG...
Page 204: ...10 10 20 20 40 5 PVC 1 2 3 4 10 204 BG...
Page 236: ...6 IEC 60364 F 3x1 2 8 236 UK...
Page 237: ...7 K RCHER K RCHER 4 A1 A2 A3 A4 A5 A6 A7 A8 A9 A10 A11 A12 A13 A14 2 A15 237 UK...
Page 238: ...8 2 1 MAX 2 3 4 3 50 50 MAX MAX B1 B2 B3 B4 B5 C1 C2 D1 D2 E1 2 E2 F1 F2 F3 238 UK...
Page 239: ...9 MAX 239 UK...
Page 240: ...10 10 20 20 40 5 1 2 3 4 240 UK...
Page 242: ...12 8 60 C MAX 242 UK...
Page 244: ...5 REACH www kaercher com REACH KK 5 KK 8 KK 8 KK 6 KK 8 KK 10 KK 11 KK 13 KK 13 KK 14 244 KK...
Page 245: ...6 KARCHER IEC 60364 FI 30190 09 2 013 30190 0 3 0 1 9 245 KK...
Page 246: ...7 3 1 246 KK...
Page 248: ...9 50 50 MAX MAX MAX 248 KK...
Page 249: ...10 10 20 20 40 249 KK...
Page 250: ...11 5 1 2 3 4 10 250 KK...
Page 255: ...60 220 240 V 1 50 60 Hz IPX4 I 1500 0 32 6 255 AR...
Page 257: ...5 1 2 3 4 10 257 AR...
Page 258: ...10 20 20 40 258 AR...
Page 259: ...50 50 259 AR...
Page 261: ...KAERCHER K RCHER 4 A1 A2 A3 A4 A5 261 AR...
Page 262: ...IEC 60364 FI 3 x1 8 262 AR...
Page 263: ...KARCHER 263 AR...
Page 264: ......
Page 265: ...6 435 857 0 2 884 281 0 09 01 2013 5 963 687 0...


