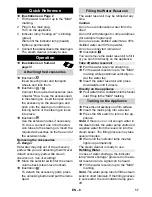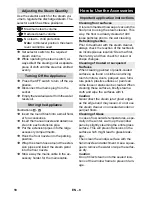
– 11
Note:
Please contact your Conservancy
Board or the local water supply company to
inquire about the hardness of your water.
Disconnect the mains plug from the
socket.
Allow the steam cleaner to cool down.
Empty the water reservoir.
Remove the accessories from the ac-
cessory compartments.
Illustration
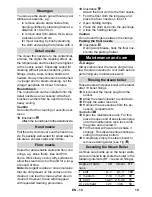
Open the maintenance lock. For this,
place the open end of an extension pipe
onto the maintenance lock, lock it into
the guide and unscrew it.
Completely empty the steam boiler to
remove existing water (see Fig. ).
몇
Warning
Only use products approved by KÄRCHER
to exclude any damages of the appliance.
User the KÄRCHER decalcifier sticks
(order no. 6.295-206) to decalcify the
water. Please follow the dosing instruc-
tions on the packaging while using the
decalcifying solution.
몇
Caution
Use caution when filling and emptying the
steam cleaner. The descaling solution can have
an aggressive effect on delicate surfaces.
Pour the descaling solution into the boil-
er and allow it to react for approximately
8 hours.
몇
Warning
Do not screw the maintenance lock onto
the appliance during the decalcifying.
Do not use the steam cleaner as long as
there is decalcifying agent in the boiler.
Completely empty the descaling solu-
tion after 8 hours. A small amount of the
solution will remain in the boiler. There-
fore, you should rinse the boiler two to
three times with cold water to remove
any residues of the descaler.
Completely empty the steam boiler to
remove existing water (see Fig. ).
Allow the storage compartment for the
mains cable to dry.
Screw the maintenance lock in using
the extension pipe.
Fill water reservoir (see page 8).
The steam cleaner is ready to use.
Note:
The floorcloth and the terry cloth cov-
er have been pre-washed and can be used
immediately for working with the steam
cleaner.
You can wash dirty floorcloths and terry
cloth covers in the washing machine at
60°C. Do not use a liquid softener as
this would affect the ability of the cloths
to pick up dirt. You may tumble dry the
cloths.
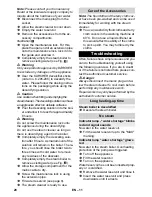
Often, failures have simple causes and you
can do the troubleshooting yourself using
the following overview. If you are in doubt
or if the failure is not listed here please con-
tact the authorized customer service.
Danger
Always disconnect the mains plug and al-
low the steam cleaner to cool down before
performing any maintenance work.
Repair works may only be performed by the
authorized customer service.
Descale the steam boiler.
No water in the water reservoir.
Fill the water reservoir up to the "MAX"
marking.
No water in the steam boiler. Overheating
protection of the pump was triggered.
Turn off the appliance.
Fill the water reservoir
Turn on the appliance.
Water reservoir has not been inserted prop-
erly or is calcified.
Remove the water reservoir and rinse it.
Insert the water reservoir and press
downwards until it arrests.
Care of the Accessories
Troubleshooting
Long heating-up time
Steam boiler is decalcified
No steam
Indicator lamp - "water shortage" blinks
red and signal sounds
Indicator lamp "water shortage" glows
red
20
EN
Summary of Contents for SC 2.500 C
Page 2: ...2...
Page 3: ...3...
Page 4: ...4...
Page 101: ...6 IEC 60364 FI 3x1 mm 8 101 EL...
Page 103: ...8 2 1 2 3 4 3 50 50 E1 2 E2 F1 F2 F3 103 EL...
Page 104: ...9 104 EL...
Page 105: ...10 10 20 cm 20 40 cm 5 PVC 1 2 3 4 10 105 EL...
Page 119: ...6 IEC 60364 FI 30190 3 0 1 9 0 30190 09 2 013 119 RU...
Page 120: ...7 3x1 8 120 RU...
Page 122: ...9 2 1 MAX 2 3 4 3 50 50 MAX MAX 122 RU...
Page 123: ...10 MAX 123 RU...
Page 124: ...11 10 20 20 40 5 1 2 3 4 124 RU...
Page 200: ...6 IEC 60364 3x1 2 8 200 BG...
Page 202: ...8 2 1 MAX 2 3 4 3 50 50 MAX MAX 202 BG...
Page 203: ...9 MAX 203 BG...
Page 204: ...10 10 20 20 40 5 PVC 1 2 3 4 10 204 BG...
Page 236: ...6 IEC 60364 F 3x1 2 8 236 UK...
Page 237: ...7 K RCHER K RCHER 4 A1 A2 A3 A4 A5 A6 A7 A8 A9 A10 A11 A12 A13 A14 2 A15 237 UK...
Page 238: ...8 2 1 MAX 2 3 4 3 50 50 MAX MAX B1 B2 B3 B4 B5 C1 C2 D1 D2 E1 2 E2 F1 F2 F3 238 UK...
Page 239: ...9 MAX 239 UK...
Page 240: ...10 10 20 20 40 5 1 2 3 4 240 UK...
Page 242: ...12 8 60 C MAX 242 UK...
Page 244: ...5 REACH www kaercher com REACH KK 5 KK 8 KK 8 KK 6 KK 8 KK 10 KK 11 KK 13 KK 13 KK 14 244 KK...
Page 245: ...6 KARCHER IEC 60364 FI 30190 09 2 013 30190 0 3 0 1 9 245 KK...
Page 246: ...7 3 1 246 KK...
Page 248: ...9 50 50 MAX MAX MAX 248 KK...
Page 249: ...10 10 20 20 40 249 KK...
Page 250: ...11 5 1 2 3 4 10 250 KK...
Page 255: ...60 220 240 V 1 50 60 Hz IPX4 I 1500 0 32 6 255 AR...
Page 257: ...5 1 2 3 4 10 257 AR...
Page 258: ...10 20 20 40 258 AR...
Page 259: ...50 50 259 AR...
Page 261: ...KAERCHER K RCHER 4 A1 A2 A3 A4 A5 261 AR...
Page 262: ...IEC 60364 FI 3 x1 8 262 AR...
Page 263: ...KARCHER 263 AR...
Page 264: ......
Page 265: ...6 435 857 0 2 884 281 0 09 01 2013 5 963 687 0...


