


16
English
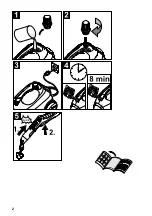
Illustrations on Page 2
Illustration
Unscrew the safety lock and fill the steam cleaner
with a max. of 1 litre of water.
Illustration
Screw in safety cap.
Illustration
Plug in the mains plug.
Illustration
The green and orange indicator lamps light up.
Wait until the orange indicator lamp goes out.
Illustration
Connect the accessories to the steam gun.
The steam cleaner is ready to use.
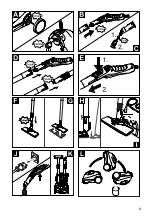
Illustration
Insert steering roller and transport wheels and lock
them.
Illustration
Connect the required accessories (see Chapter
"How to use the accessories“) to the steam gun. In-
sert the open end of the accessory on the steam
gun and push onto the steam gun until the unlock-
ing button of the steam gun locks into place.
Illustration
Use the extension tubes if necessary. To do so,
connect one or both extension tubes to the steam
gun. Insert the required accessories on the free
end of the extension tube.
Move the selector switch for the steam volume
back (steam lever locked).
Illustration
To detach the accessory parts, press the unlocking
button and pull the items apart.
Note:
If you always use usual commercial distilled water it is
not necessary to descale the boiler.
ATTENTION
Do not use condensation water from the drier!
Do not fill in detergents or other additives!
Remove the safety lock from the device.
Illustration
Completely empty the steam boiler to remove exist-
ing water.
Fill the boiler with a maximum of 1 liters of fresh tap
water.
Note:
You can cut down the heating-up time by using
warm water.
Screw the safety cap back onto the device.
Place the unit securely on a firm surface.
Insert the mains plug into a socket.
Both indicator lamps must illuminate.
The orange indicator lamp goes out after approxi-
mately 8 minutes.
The steam cleaner is ready to use.
Use the selector switch for the steam volume to regulate
the discharged steam. The selector switch has three po-
sitions:
Set selector switch to the required steam volume.
While operating the steam switch, always direct the
steam gun at a separate piece of cloth until the
steam is emitted evenly.
Note:
The heating of the steam cleaner is turned on in
regular intervals during the operation of the appli-
ance in order to maintain the pressure in the boiler
at a constant level. When the heating is turned on,
the orange indicator lamp (heater) lights up.
Water needs to be filled into the boiler, if the steam vol-
ume decreases during work and no more steam is emit-
ted in the end.
Note:
The safety lock cannot be opened as long as slight pres-
sure remains in the boiler.
Disconnect the mains plug from the socket.
Push the steam switch until steam discharge stops.
Now, the boiler of the appliance is unpressurized.
Remove the safety lock from the device.
Fill the boiler with a maximum of 1 liters of fresh tap
water.
Screw the safety cap back onto the device.
Insert the mains plug into a socket.
The orange indicator lamp goes out after approxi-
mately 8 minutes.
The steam cleaner is ready to use.
Illustration
Disconnect the mains plug from the socket.
Push the steam switch until steam discharge stops.
Now, the boiler of the appliance is unpressurized.
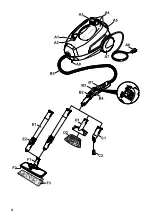
Illustration
–
Put the extension pipes into the large accessory
compartments.
–
Insert the manual nozzle and detail nozzle onto
each extension pipe.
–
Put the round brush into the medium acessory
compartments.
–
Hook the floor nozzle into the parking position.
–
Wrap the steam hose around the extension pipes
and insert the steam pistol into the floor nozzle.
Quick Reference
Operation
Attaching the Accessories
Removing the Accessories
Fill up with water
Turning on the Appliance
Adjusting the Steam Quantity
Maximum steam volume
Reduced steam volume
No steam - child protection
Note:
In this lever position, the steam lever cannot be
used.
Refilling Water
Turning Off the Appliance
Storing the Appliance
Summary of Contents for SC 2
Page 1: ...SC 2 EasyFix 59683000 07 18 5 English 12 Bahasa Indonesia 19 Vi t 27 34...
Page 2: ...2...
Page 3: ...G J K L 3...
Page 4: ...4...
Page 5: ...5 REACH www kaercher com REACH www kaercher com 5 5 8 8 8 9 10 11 11...
Page 6: ...6 IEC 60364 3x1 mm...
Page 7: ...7 0 C...
Page 8: ...8 4 K RCHER K RCHER 2 1 A1 A2 A3 A4 A5 A6 A7 2 A8 B1 B2 B3 B4 B5 C1 C2 D1 D2 E1 E2 F1 F2 F3...
Page 9: ...9 1 8 1 8...
Page 10: ...10 10 20cm 20 40cm 5 PVC 10...
Page 34: ...34 Deutsch REACH www kaercher de REACH www kaercher com 34 34 37 38 38 39 41 42 42...
Page 35: ...Deutsch 35 IEC 60364 3x1...
Page 36: ...36 Deutsch...
Page 37: ...Deutsch 37 0 C K RCHER K RCHER A1 A2 A3 A4 A5 A6...
Page 38: ...38 Deutsch 2 1 1 A7 2 A8 B1 B2 B3 B4 B5 C1 C2 D1 D2 E1 2 E2 F1 F2 F3...
Page 39: ...Deutsch 39 1...
Page 40: ...40 Deutsch 10 20 20 40 5...
Page 42: ...42 Deutsch 220 240 1 50 60 V Hz I IPX4 1500 W 0 32 MPa 8 40 100 1 0 3 1 254 380 260...
Page 43: ......
Page 44: ......
Page 45: ......