14
English
Open the water reservoir cover and fill the water res-
ervoir with max. 0.5 L tap water, directly at the de-
vice.
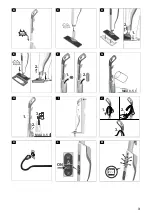
Illustration G
or
Remove the water reservoir, open the water reser-
voir cover and fill the water reservoir with max. 0.5 L
tap water, see chapter Filling water.
Illustration H
Interrupting operation
ATTENTION
Material damage due to condensate/moisture
See the chapter Storing the device to prevent material
damage during longer work breaks.
In order to save energy, we recommend that you switch
off the device for breaks in operation of longer than 20
minutes.
1. Press the OFF switch.
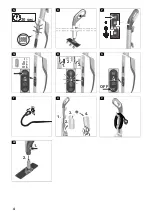
Illustration S
Switching off the device
1. Press the OFF switch.
Illustration S
The device is switched off.
2. Pull the mains plug out of the socket.
Illustration T
ATTENTION
Device damage due to water putrefaction
The water in the reservoir may putrefy if the device is
not put into operation for more than 2 months.
Drain the water reservoir before longer breaks in oper-
ation.
3. Drain the water reservoir.
Illustration U
Storing the device
ATTENTION
Material damage due to condensate/moisture
The floor covering can be damaged by moisture remain-
ing on the floor cleaning cloth or floor nozzle/device af-
ter cleaning.
Remove the floor cleaning cloth/carpet glider and dry
the floor nozzle/the device after finishing the floor clean-
ing work.
Do not place or store the device on heat-sensitive sur-
faces.
1. Remove the floor cleaning cloth or floor cleaning
cloth and carpet glider, see the chapter Floor nozzle
and carpet glider.
Illustration D
Illustration E
2. Remove moisture from the floor nozzle/device.
3. Wind the power cable around the upper and lower
cable hooks.
Illustration V
4. Store the device in vertical position on a solid base
or on the wall.
Illustration I
5. Store the device in a dry location that is protected
from frost.
Important application instructions
Cleaning the floor areas
We recommend sweeping the floor or vacuum cleaning
it before using the appliance. In this way the floor will be
cleared of dirt and loose particles before the wet clean-
ing.
Cleaning coated or painted surfaces
ATTENTION
Damaged surfaces
Steam can loosen wax, furniture polish, plastic coatings
or paint and edge band from edges.
Do not direct the steam at glued laminated edges as the
edge band may loosen.
Do not use the device for cleaning unsealed wood or
parquet floors.
Do not use the device for cleaning painted or plastic
coated surfaces such as kitchen or living room furniture,
doors or parquet.
How to use the Accessories
Floor nozzle
The floor nozzle is suitable for cleaning washable floor
coverings, e.g. stone floors, tiles and PVC floors, and al-
so sealed wooden floors such as parquet and laminate.
ATTENTION
Damage due to steam effect
Heat and the effects of steam can lead to damage.
Check the heat resistance and steam effect on an in-
conspicuous area using a minimal volume of steam pri-
or to use.
Steam clean sealed wooden floors using the correct,
preset steam level, and do not remain in the same posi-
tion on the floor for too long.
Note
Detergent residue or care emulsions on the surface to
be cleaned can lead to streaks during steam cleaning,
which will disappear however once these have been
used several times.
몇
CAUTION
Beware of burns to your feet
The floor nozzle/floor cleaning cloth heats up during
steaming.
Hot water may drip out when pulling off the floor cloth.
Only operate or remove the floor nozzle/floor cleaning
cloth with suitable footwear.
1. Fasten the floor cleaning cloth to the floor nozzle.
a Place the floor cleaning cloth with the hook and
loop fastener pointing upwards on the floor.
b Place the floor nozzle onto the floor cleaning
cloth, applying slight pressure.
Illustration D
The floor cleaning cloth will stick to the floor nozzle
of its own accord due to the hook and loop fastener.
Micro fibre cloth
The microfibre floor cloth is suitable for cleaning stone
floors and PVC floors, and also sealed wooden floors
such as parquet and laminate. The microfibre floor cloth
is also suitable for freshening carpets when used in con-
junction with the carpet glider.
Abrasive floor cloth
The abrasive floor cloth is suitable for cleaning insensi-
tive surfaces such as tiles or stone.
ATTENTION
Damage to floor coverings
The abrasive floor cloth can damage sensitive floor cov-
erings and surfaces.
Do not use the abrasive floor cloth for cleaning wooden
surfaces.
Summary of Contents for SC 3
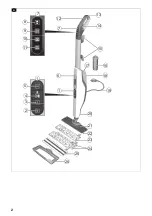
Page 2: ...6 1 7 2 3 4 5 11 10 9 8 13 16 19 20 23 26 22 24 18 14 7 1 12 15 17 21 25 A 2...
Page 3: ...B C 1 2 D 1 2 E 2 1 F MAX 0 5 l G MAX 0 5 l 1 2 3 H I 1 2 3 J K ON L M 3...
Page 4: ...30 sec N O P I II III IV Q 1 2 3 1 3 3 R OFF S T 1 2 3 4 U V 1 2 W 4...
Page 150: ...150 5 6 1 1 30 3 1 I 2 K 3 L 4 LED M 5 30 LED N P 3 O 0 5 G 0 5 H 20 1 OFF S 1 OFF S 2 T 2 3 U...
Page 151: ...151 1 D E 2 3 V 4 I 5 PVC laminate 1 a b D PVC laminate 1 D 1 OFF S 2 T 3 U 4 5...
Page 152: ...152 6 W 7 5 1 D 2 E 3 1 2 E 2 1 OFF 2 3 4 U III IV I II 2 R 1 LED 1 30 1 OFF 2 3...
Page 156: ...156 26 1 1 F 2 1 30 3 1 2 B 1 2 C 360 1 2 3 J 1 2 0 5 G 3 1 2 3 4 0 5 H 5 6...
Page 157: ...157 1 1 30 3 1 I 2 K 3 L 4 M 5 30 N P 3 O 0 5 G 0 5 H 20 1 S 1 S 2 T 2 3 U 1 D E 2 3 V 4 I...
Page 158: ...158 5 1 a b D 1 D 1 S 2 T 3 U 4 5 6 W 7...
Page 159: ...159 5 1 D 2 E 3 1 2 E 2 1 2 3 4 U III IV I II 2 R 1 1 30 1...
Page 163: ...163 1 F 2 30 3 1 2 B 1 2 C 360 1 2 3 J 1 2 0 5 G 3 1 2 3 4 0 5 H 5 6...
Page 164: ...164 1 30 3 1 I 2 K 3 L 4 M 5 30 N P 3 O 0 5 G 0 5 H 20 1 S 1 S 2 T 2 3 U 1 D E 2 3 V 4 I 5...
Page 165: ...165 1 a b D 1 D 1 S 2 T 3 U 4 5 6 W 7...
Page 166: ...166 5 1 D 2 E 3 1 2 E 2 1 2 3 4 U III IV I II 2 R 1 30 1 2 3 4...
Page 170: ...170 1 1 F 2 1 30 3 1 2 B 1 2 C 360 1 2 3 J 1 2 0 5 G 3 1 2 3 4 0 5 H 5 6...
Page 171: ...171 1 30 3 1 I 2 K 3 L 4 M 5 30 N P 3 O 0 5 G 0 5 H 20 1 S 1 S 2 T 2 3 U 1 D E 2 3 V 4 I 5...
Page 172: ...172 1 a b D 1 D 1 S 2 T 3 U 4 5 6 W 7...
Page 173: ...173 5 1 D 2 E 3 1 2 E 2 1 2 3 4 U III IV I II 2 R 1 1 30 1 2 3 4 5 6 RESET 4 Q 7 8 30...
Page 177: ...177 3 1 2 B 1 2 C 360 1 2 3 J 1 2 0 5 l G 3 1 2 3 4 0 5 l H 5 6 1 1 30 3...
Page 178: ...178 1 I 2 K 3 L 4 M 5 30 N P 3 O 0 5 l G 0 5 l H 20 1 S 1 S 2 T 2 3 U 1 D E 2 3 V 4 I 5...
Page 179: ...179 PVC 1 a b D PVC 1 D 1 S 2 T 3 U 4 5 6 W 7...
Page 180: ...180 5 1 D 2 E 3 1 2 E 2 1 2 3 4 U III IV I II 2 R 1 1 30 1 2 3 4 5 6 RESET 4 Q 7 8 30...
Page 185: ...185 PVC 1 a b D PVC 1 D 1 S 2 T 3 U 4 5 6 W 7 5 1 D 2 E 3 1 2 E 1 2 3...
Page 186: ...186 30 3 1 I 2 K 3 L 4 LED M 5 30 LED N P 3 O 0 5 G 0 5 H 20 1 S 1 S 2 T 3 U 1 D E 2 3 V 4 I 5...
Page 189: ......
Page 190: ......
Page 191: ......


