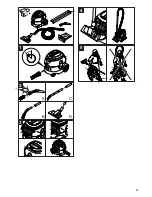
– 3
Caution
Risk of injury and damage! Note the weight
of the appliance in case of storage.
This appliance must only be stored in inte-
rior rooms.
Danger
First pull out the plug from the mains before
carrying out any tasks on the machine.
Main filter basket (washable), clean it
under running water if necessary.
Caution
Risk of damage! Never insert the main filter
basket while wet.
Exhaust filter: Change once a year
Release and remove the cover.
Replace exhaust filter.
Install and lock the cover.
Release and remove the suction head.
Push the grids of the motor protection
filter down, turn and remove.
Remove the motor protection filter.
Insert the new motor protection filter.
Insert the grid of the motor protection fil-
ter and lock it into place.
Insert and lock the suction head.
Danger
First pull out the plug from the mains before
carrying out any tasks on the machine.
–
Motor thermal protector has responded.
Replace the fleece filter bag or paper fil-
ter bag (option).
Replace motor protection filter.
Replace exhaust filter.
Check all parts for plugging.
Switching back on after the motor turbine
has cooled off, after approx. 30 to 40 min-
utes.
Check the receptacle and the fuse of
the power supply.
Check the power cable and the power
plug of the device.
Turn on the appliance.
Remove choking of suction nozzle, suc-
tion tube or suction hose.
Replace the fleece filter bag or paper fil-
ter bag (option).
Clean the main filter basket under run-
ning water.
Insert/lock the suction head correctly.
Replace defective suction hose.
Replace motor protection filter.
Replace the fleece filter bag or paper fil-
ter bag (option).
Check the fleece filter bag or paper filter
bag (option).
Insert/lock the suction head correctly.
Insert undamaged main filter basket.
Reinsert motor protection filter correct-
ly.
Storage
Maintenance and care
Clean main filter basket
Replace exhaust filter
Replace motor protection filter
Troubleshooting
The appliance shuts off during the
operation
Suction turbine does not run
Suction capacity decreases
Dust comes out while vacuuming
8
EN
Summary of Contents for T 12/1
Page 2: ...3 1 2 6 7 8 10 11 12 2 13 14 15 16 21 22 25 26 9 4 5 24 19 20 23 18 17 17 2...
Page 3: ...1 A B C D 2 3 4 5 3...
Page 25: ...T 12 1 25...
Page 26: ......
Page 27: ......


