38
Maintenance
Do not use a pressure washer to clean around the
brush motors. Use tap pressure only.
N’utilisez pas de nettoyeur haute pression pour
nettoyer autour des moteurs des brosses. Utilisez
seulement la pression du robinet.
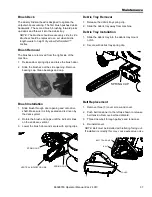
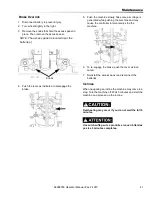
Remove Brush Deck
1. Lower brush deck.
2. Turn off machine
3. Disconnect motor harness connectors and remove
vacuum hose from top of deck.
4. Remove bumper bolts and bumper to access
linkage mount brackets.
5. Pull down and disconnect spring mount bracket
from deck lift arm. Keep spring attached to mount
bracket.
6. Remove four (4) bolts and associated hardware
that connect deck lift arm to linkage mount
brackets on drive assembly.
7. Remove two (2) bolts and associated hardware
that connect deck lift arm to lift linkage plate.
8. Pull out deck with attached deck lift arm.
9. Reverse to reassemble.
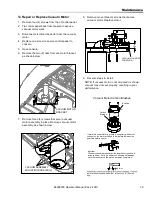
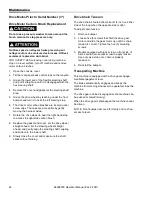
Replace Brush Deck Motor
1. Remove brush deck from machine.
2. Remove two (2) nuts to free rear mounting bracket
from deck.
3. Remove six (6) motor mount bracket face screws.
4. Remove rear mounting bracket.
5. Remove motor with attached coupler, leaving front
motor mounting bracket still attached to deck.
6. Remove coupler from old motor for reuse.
7. Inspect spider coupler for wear replace as needed.
Reverse process to reassemble with new motor.
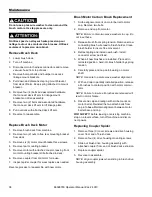
Brush Motor Carbon Brush Replacement
1. Scribe alignment mark on motor barrel to motor
cap. Remove two bolts.
2. Remove end cap from motor.
NOTE: Motors contain two wave washers in cap. Do
not lose these.
3. Release brush from spring tension. Remove screw
connecting brush wire lead to brush holder. Clean
brush holder to insure free movement.
4. Retract spring and install new brush. Install
connector screw and lead.
5. When all new brushes are installed. Place all in
retracted position, held into brush holder by spring
tension.
6. Carefully place end cap onto bearing on motor
shaft.
NOTE: Use care to assure wave washer alignment.
7. With end cap in partially installed position, release
all brushes to contact position with motor commu-
tator.
NOTE: Failure to insure all brushes are released will
result in motor failure.
8. Reset end cap and realign with scribe marks on
motor barrel. Reinstall the two attach bolts from
cap into base.Maintain alignment between motor
barrel base and cap.
FOR SAFETY:
before leaving or servicing machine,
stop on a level surface, turn off machine and discon-
nect powe
r.
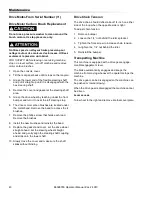
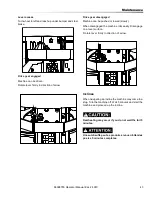
Replacing Coupler Spider
1. Remove three (3) cover screws and drive housing
cover from end of brush deck.
2. Remove four (4) drive housing mounting screws
3. Slide out brush drive housing assembly with
attached coupler from end of brush deck extrusion.
4. Replace coupler spider.
5. Reverse to assemble.
NOTE: Align coupler jaws when sliding in brush drive
housing assembly.
86398780 Operator Manual iVac 24 ATV

