7
6
•
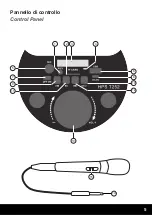
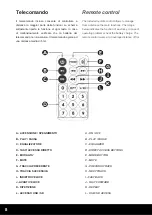
VOLUME (13)
Regola il volume dell’apparecchio.
•
TASTO MODE (10)
Premete il tasto per scegliere la modalità
desiderata (Bluetooth, MP3, microSD)
Per disattivare l’illuminazione dei woofer
tenetelo premuto per circa 3 secondi.
•
DISPLAY (3)
Vi permetterà di visualizzare le funzioni scelte
o le tracce Mp3 riprodotte.
•
INDIETRO / TRACCIA PRECEDENTE (9)
Premete il tasto per tornare all’inizio del brano
o per scegliere la traccia precedente.
•
TASTO PLAY/PAUSA (11)
Utilizzatelo per avviare la riproduzione o
metterla in pausa.
•
TRACCIA SUCCESSIVA (12)
Premete il tasto per passare alla traccia
successiva.
•
VOLUME (13)
It adjusts the device volume.
•
MODE BUTTON (10)
Press this button to choose the desired mode
(Bluetooth, MP3, microSD).
If pressed for 3 seconds it disables the
woofer’s lighting.
•
DISPLAY (3)
Use it to view the selected functions or the
MP3 tracks that are being played.
•
FAST BACKWARD/ PREVIOUS TRACK (9)
Press this button to select the previous track
or rewind quickly a track.
•
PLAY/PAUSE BUTTON (11)
Use it to start playback and/or pause.
•
FOLLOWING TRACK (12)
Press this button to skip to the following track.
Funzioni
Functions
Preparazione
Assicuratevi che la batteria interna sia ricaricata
adeguatamente. Per procedere alla ricarica è
sufficiente collegare il cavo in dotazione alla presa DC
5V (8) e quindi ad una normale presa USB da almeno
1A. La ricarica completa richiede alcune ore. Durante
la ricarica il led (4) si illuminerà per poi spegnersi a
ricarica ultimata.
Collegate il Jack (14) del microfono in dotazione alla
presa MIC (5).
Se disponete di un apparecchio audio esterno, potrete
collegarlo alla presa AUX (1) tramite jack 3,5mm.
Il lettore MP3 è in grado di riprodurre brani presenti
su chiavette o schede microUSB che potrete inserire
nelle relative prese (2-6). Terminati i collegamenti
potete accendere l’apparecchio agendo sul tasto di
accensione (7).
Getting started
Make sure that the internal battery is properly
charged. To recharge it, just connect the supplied
cable to the DC 5V socket (8) and then to any USB
socket providing at least 1A. Full charging takes a
few hours. During the recharge the led (4) will light
on until it is completed.
Connect the jack (14) of the supplied microphone to
the MIC socket (5).
If you have an external audio device, you can
connect it to the AUX socket (1) through a 3.5mm
jack.
The MP3 player can play songs from USB sticks
or microUSB cards, which can be inserted into the
related sockets (2-6). Once the connections are
complete, you can turn on the appliance using the
ON/OFF button (7).


