PRODUCT INSTALLATION GUIDE
KARTNERS.COM 1.877.490.3537 604.628.0567
V2_03/23
TOOLS NEEDED
5/16"
PARTS
Magnification Mirror
Hardware Bag
(2) Wall Anchor
(3) Wire Nut
(2) Mounting Screw
(must be flat head crew
)
Page 1: ...Parts 2 Notes 3 Hardwired Assembly 4 6 Use and Maintenance 7 GENERAL INFORMATION This instruction sheet contains information on how to install the Wall Mounted Magnification Mirror This series comes i...
Page 2: ...PRODUCT INSTALLATION GUIDE KARTNERS COM 1 877 490 3537 604 628 0567 V2_03 23 TOOLS NEEDED 5 16 PARTS Magnification Mirror Hardware Bag 2 Wall Anchor 3 Wire Nut 2 Mounting Screw must be flat head crew...
Page 3: ...hing only for its intended use as described in these instructions Do not use attachments not recommended by the manufacturer 4 Never operate this furnishing if it has a damaged cord or plug if it is n...
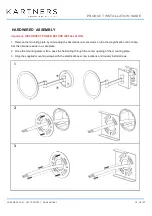
Page 4: ...he mounting plate by unscrewing the decorative nuts or screws on the the magnification mirror base Set this hardware aside in a safe place 2 Once the mounting plate is free pass the field wiring throu...
Page 5: ...604 628 0567 V2_03 23 HARDWIRED ASSEMBLY 4 Using a level adjust the rotation of the mounting plate until it s level 5 While holding the mounting plate level tighten the screws must be flat head screw...
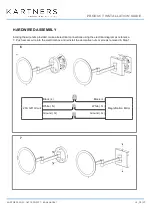
Page 6: ...Using the wire nuts provided make all electrical connections using the electrical diagram as reference 7 Push excess wire into the electrical box and reinstall the decorative nuts or screws removed in...
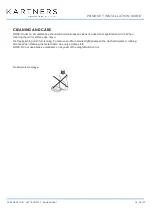
Page 7: ...aner be used on magnification mirror When cleaning the mirror surface use only a lint free polishing cloth for cleaning To remove stubborn stains slightly dampen the cloth with water or rubbing alcoho...