background image

8

PLANETARY MIXER

USING THE MIXING BOWL

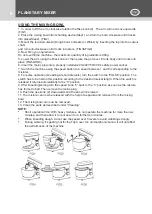
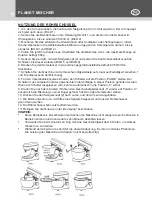
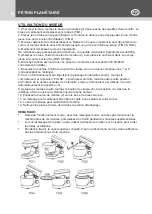
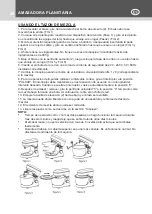
1. In order to lift the arm, clockwise rotation the Rise knob (2) . The arm will now move upwards.

(FIG1)

2. Place the mixing bowl into its holding device(Step1)  and turn the bowl clockwise until it locks 

into place(Step2). (FIG2)

3. Mount the required utensil (Dough hook or Beater or Whisk) by inserting the top into the output 

shaft,

and turn anti-clockwise until it locks into place. (FIG3&FIG4)

4. Now fill in your ingredients. 

Do not overfill the machine - the maximum quantity of ingredients is 900g.

5. Lower the arm using the Rise knob (2) ,then place the pot cover into its body until it locks into 

place (FIG5&FIG6)

6. Insert the mains plug into a properly installed 220-240V 50/60 Hz safety power socket.

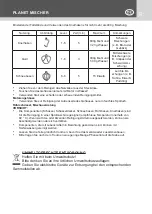
7. Switch the machine using the speed button to a speed between 1 and 8 (corresponding to the 

mixture).

8. For pulse operation (kneading at short intervals), turn the switch to the “PULSE” position. The 

switch has to be held in this position according to the desired interval length. When the switch is 

released it returns automatically to the “0” position.

9. After kneading/stirring turn the speed knob “5” back to the “0” position as soon as the mixture 

has formed a ball. Then remove the mains plug.

10. Push the rise knob (2) downwards and the arm will be raised.

11. The mixture can now be released with the help of a spatula and removed from the mixing 

bowl.

12. The mixing bowl can now be removed.

13. Clean the parts as described under “Cleaning”.

NOTE:

• 

Short operation time: With heavy mixtures, do not operate the machine for more than six 

minutes, and then allow it to cool down for a further ten minutes.

• 

When kneading dough, do not use the speed over 5 levels to avoid wobbling strongly. 

• 

During working, it’s getting hot for the Top Cover. It’s normal phenomenon. It will not affect 

the performance of the machine.

Summary of Contents for SAD000001-2

Page 1: ...IMPASTATORE PLANETARY MIXER PLANET MISCHER P TRIN PLAN TAIRE AMASADORA PLANETARIA INSTRUCTIONS MANUAL BEDIENUNGSANLEITUNG MANUEL D INSTRUCTION MANUAL DE INSTRUCCIONES MANUALE DI ISTRUZIONI SAD000001 2...

Page 2: ...stazione di lavoro spegnere sempre la macchina o rimuovere la spina dalla presa tirare la spina non il cavo Controllare regolarmente che l apparecchio e il cavo non siano danneggiati Non usare l appar...

Page 3: ...nei ganci rotanti mentre la macchina in funzione Posizionare la macchina su una superficie di lavoro liscia piana e stabile Non inserire la spina di alimentazione della macchina nella presa di corrent...

Page 4: ...velocit compresa tra 1 e 8 corrispondente alla miscela 8 Per la modalit a impulsi impastando a brevi intervalli portare l interruttore nella posizione IMPULSO L interruttore deve essere tenuto in ques...

Page 5: ...imontare il dispositivo Si prega di applicare una piccola quantit di olio vegetale agli schermi dopo essersi asciugati TRATTAMENTO DEL DISPOSITIVO ELETTRICO ED ELETTRONICO A FINE VITA Il simbolo del c...

Page 6: ...from the socket pull the plug itself not the lead Check the appliance and the cable for damage on a regular basis Do not use the appliance if it is damaged Do not try to repair the appliance on your...

Page 7: ...ng Place the machine on a smooth flat and stable working surface Do not insert the mains plug of the machine into the power socket without having installed all the necessary accessories CAUTION Ensure...

Page 8: ...ing to the mixture 8 For pulse operation kneading at short intervals turn the switch to the PULSE position The switch has to be held in this position according to the desired interval length When the...

Page 9: ...dough hook are suitable for cleaning in a dishwasher suggested temperature within 60 C If exposed to heat or caustic cleaners they might become misshapen or discolored Components that have come into...

Page 10: ...eiben Sie das Ger t nicht ohne Aufsicht Wenn Sie den Arbeitsplatz verlassen sollten schalten Sie das Ger t immer aus oder ziehen Sie den Stecker aus der Steckdose ziehen Sie den Stecker selbst nicht d...

Page 11: ...nur unter Aufsicht Keine Sicherheitsschalter st ren Stecken Sie w hrend der Arbeit der Maschine nichts in die drehbaren Haken Stellen Sie die Maschine auf eine glatte ebene und stabile Arbeitsfl che...

Page 12: ...ntsprechend der Mischung 8 F r den Impulsbetrieb kurzes Kneten den Schalter auf die Position PULSE stellen Der Schalter muss entsprechend der gew nschten Intervalll nge in dieser Position gehalten wer...

Page 13: ...Au enseite des Geh uses nur ein feuchtes Sp ltuch R hrsch ssel Mischausr stung VORSICHT Die Komponenten Sch ssel Sch sseldeckel Schneebesen R hrbesen Knethaken sind f r die Reinigung in einer Sp lmas...

Page 14: ...achine sans surveillance Si vous devez quitter le lieu de travail teignez toujours la machine ou d branchez la de la prise tirez sur la fiche elle m me et non sur le c ble V rifiez r guli rement si l...

Page 15: ...c les interrupteurs de s curit Ne rien ins rer dans les crochets en rotation pendant le fonctionnement de la machine Placez la machine sur une surface de travail lisse plane et stable N ins rez pas la...

Page 16: ...entre 1 et 8 correspondant au m lange 8 Pour un fonctionnement par impulsions p trissage intervalles courts tournez le commutateur sur la position PULSE L interrupteur doit tre maintenu dans cette pos...

Page 17: ...ger par exemple Avant le nettoyage d branchez le cordon d alimentation de la prise Ne plongez jamais le bo tier avec le moteur dans l eau N utilisez pas de d tergents tranchants ou abrasifs Boitier mo...

Page 18: ...re el enchufe de la toma tire del enchufe no del cable Revise el aparato y el cable en busca de da os regularmente No utilice el aparato si esta da ado No intente reparar el aparato por su cuenta Siem...

Page 19: ...ras la maquina esta funcionando Coloque la maquina sobre una superficie de trabajo lisa plana y estable No inserte el enchufe de la maquina en la toma de corriente sin haber instalado todos los acceso...

Page 20: ...elocidad entre 1 y 8 correspondiente a la mezcla 8 Para la operaci n de impulsos amasar a intervalos cortos gire el interruptor a la posici n PULSAR El interruptor debe mantenerse en esta posici n de...

Page 21: ...Antes de limpiar retire el cable de alimentaci n del enchufe Nunca sumerja la carcasa con el motor en agua No utilice detergentes afilados o abrasivos Carcasa del motor Solo se debe usar un pa o de en...

Page 22: ...Manuale d Istruzione Instructions manual Importato da imported by importiert aus import de importado de KASANOVA S p A Viale Monterosa 91 20862 Arcore MB MADE IN P R C...

Reviews: