9
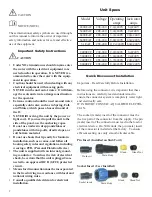
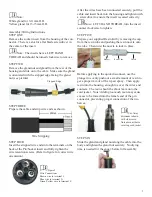
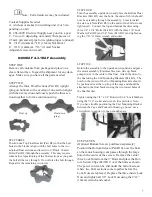
STEP FOUR
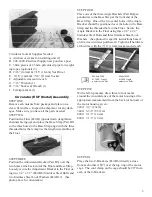
Place one of the three Angle Brackets (Part B4)per-
pendicular to the Base Strap at the front end of the
Base Strap. One of the two center holes of the Angle
Bracket should be positioned over the hole in the Base
Strap and the threaded hole in the Float. Secure the
Angle Bracket to the Float using three 1/4” x 1/2”
Stainless Steel Bolts and three Stainless Steel Lock
Washers. (See photos for specifi c instructions based
on the size circulator purchased.) Tighten all hardware
at this time with the 7/16” (11mm)socket and wrench.
Models 2400
& 3400 - Angle
posterior to bolts.
Model 8400
& 4400 Angle
anterior to bolts.
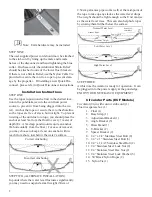
STEP FIVE
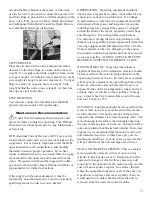
With a felt-tip marker, draw three to four marks
around the circumference of the motor housing at the
appropriate measurement from the back (or bottom) of
the motor housing given:
2400: 3/4” (1.9cm)
3400: 3-3/8” (8.57cm)
4400: 5-1/2” (14 cm)
8400: 7-1/2” (19 cm)
STEP SIX
Place the two U-Brackets (Part B6) directly across
from each other (180
O
) over the top ring of the motor
cage. The cord clamp on the cage should be 90
O
from
each of the U-Brackets
Circulator Tools & Supplies Needed
A. Anchors or stakes for installing unit (2)
B. 208-240V Electrical Supply near pond on a post
C. 30cm pieces of 2.54cm galvanized pipe for weight-
ing ropes (optional) (3)
D. 9/16” (14mm) & 7/16” (11mm) Nut Driver
E. 9/16” (14cm) & 7/16” (11mm) Socket
F. Adjustable crescent wrench
G. 7/16” Wrench (1)
H. 7/16” Socket & Wrench (1)
I. Felt-tip marker (1)
Circulator (ECF Model) Assembly
STEP ONE
Remove all contents from package and place on a
clean, fl at surface. Inspect the shipment for any dam-
ages. Make sure you have all the parts needed.
STEP TWO
Position the Float (Part B1)upside down (lengthwise
channels facing up) and place the Base Strap (Part B2)
so the three holes in the Base Strap align with the three
threaded holes that comprise the lengthwise midline of
the Float.
STEP THREE
Position the Adjustment Bracket (Part B3) over the
two holes at the back end of the Float and Base Strap.
Loosely secure the Adjustment Bracket to the Float us-
ing two 1/4” x 1/2” (Part B8) Stainless Steel Bolts and
two Stainless Steel Lock Washers (Part B13). (See
photo above for orientation.)


