5.1JF ASSEMBLY AND INSTALLATION INSTRUCTIONS
STEP ONE
Remove all contents from package and place on a
clean, flat surface. Inspect the shipment for any dam-
ages. If damages are found, immediately notify your
carrier and your Kasco Marine, Inc. representative.
Next, cross reference the parts included in the ship-
ment with the Parts Included sheet in this manual on
page 9. Make sure you have all the parts needed. If
any shortages are found, contact your Kasco repre-
sentative immediately.
STEP TWO
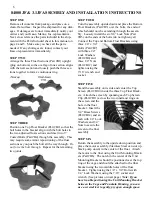
Arrange the three Float Sections (Part #B1) upright
(plug on bottom) so the overlap of one section aligns
with the next section and loosely push the three sec-
tions together to form a continuous ring.
STEP THREE
Position one Top Float Bracket (Part #B2) so that the
bolt holes in the bracket align with the bolt holes in
the two adjoined float sections and insert two 9”
Coated Bolts (Part #B4) through the assembly. This
may require some minor repositioning of the float
sections as you push the bolt all the way through.
Do
not force the bolt through.
Repeat for the remaining
two joints.
STEP FOUR
Turn the assembly upside down and place the Bottom
Float Brackets (Part #B3) over the bolts, the ends of
which should now be extending through the assem-
bly. Loosely install the six 3/8” Lock Nuts (Part
#B5) on the ends of the bolts (do not tighten yet).
Connect the Top and Bottom Float Brackets using
three 1/4” x 3/4”
Bolts (Part #B7)
with three 1/4”
Lock Washers
(Part #B8) and
three 1/4” Nuts
(Part #B12) and
tighten using the
7/16” wrench and
socket.
STEP FIVE
Stand the assembly on its side and center the Top
Screen (Part #B10) inside the three Top Float Brack-
ets. Attach the screen by spanning each Top Screen
Clip (Part #B11) across the two innermost rings on
the screen and the
hole in the float
bracket. Insert the
3/4” Brass Screws
(Part #B14) and at-
tach with 1/4” Lock
Washers and 1/4”
Nuts to secure the
screen to the float
assembly.
STEP SIX
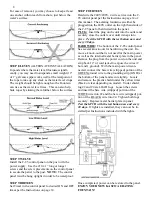
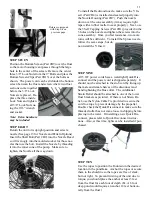
Return the assembly to the upside down position and
place the motor assembly (Stainless Steel can side up,
black pump down) in the center of the float. Attach
the motor to the float using the Unit Mounting Brack-
ets (Part #B6). The lower notch of the Unit Mounting
Bracket should be positioned over the top ring of the
cage and should be attached to the Float Bracket us-
ing the two lowest holes (closest to the Lower
Bracket) of the Top Float Bracket. Tighten using the
1/4” x 3/4” Bolts with 1/4” Lock Washers using the
7/16” socket and wrench.
(See pictures on next page)
Note: If you have trou-
ble positioning the Unit Mounting Bracket between
the Cage and Fountain Housing, you can use a
screwdriver to gently pry open enough space.
10


