background image

32

33

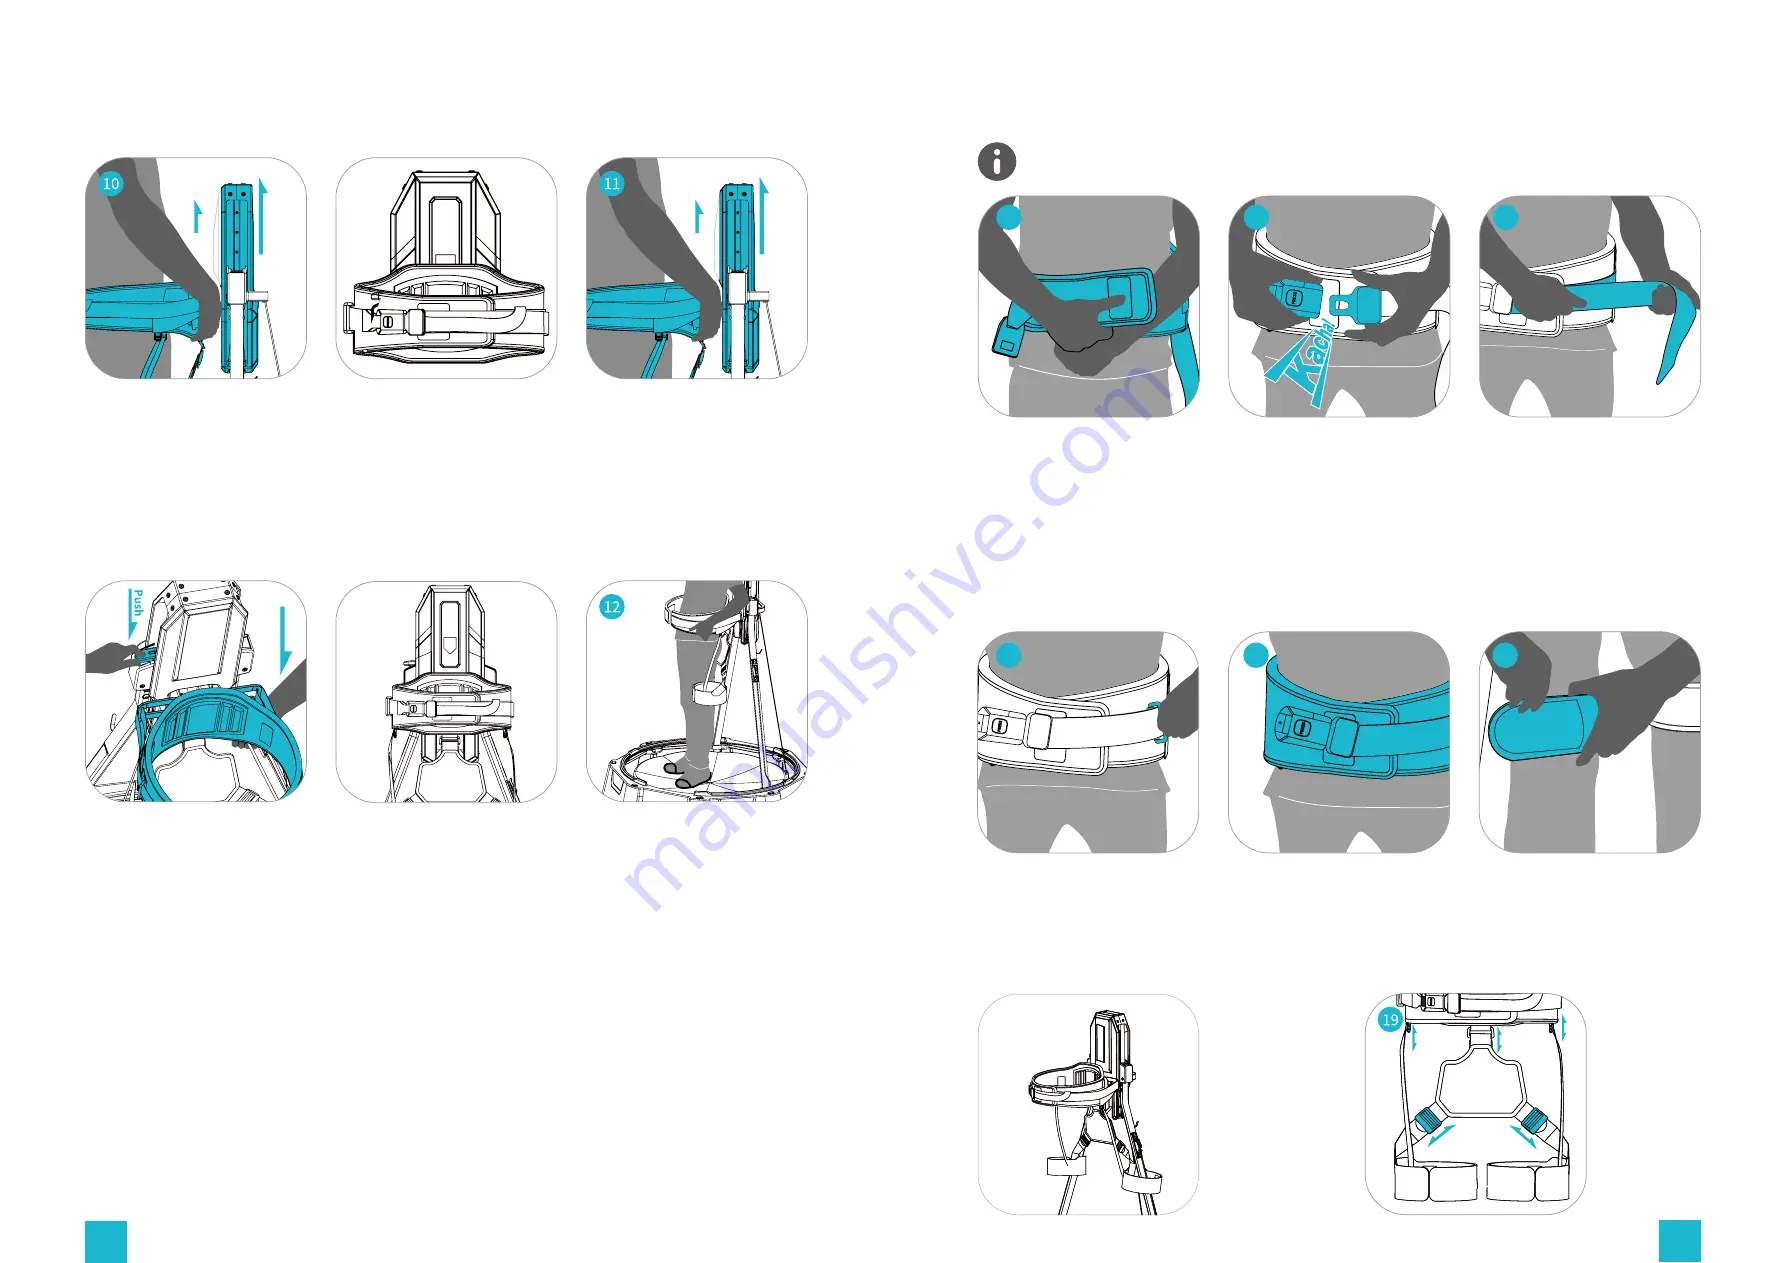
Lift the back of the harness, 
adjust it to a comfortable 
position on your waist and 
then slightly press it down to 
fix.

T h e n   p r e s s   t h e   h e i g h t 
adjuster  with  one  hand 
letting  the  back  support 
slide down to the intended 
position. 

This is the highest possible 
position.

This is the lowest possible 
position.

For lowering, slightly lift up 
the harness with both hands.

Lean closely against the inner 

side of the harness and pull 

both sides of the strap, closing 

the ring around the thinnest 

part of your waist (make sure 

both sides connect above your 

crotch). Then, stick the velcro 

as tight as you can to ensure 

there is no space left.

Buckle up the harness 

for safety.

P u l l   t h e   c l a s p   b e l t , 

tightening it until reach the 

t i g h t e s t   c o m f o r t a b l e 

position,  and  fasten  the 

remaining part of the belt.

when  you  don't 

need leg straps, 

please hang them 

to the supporting 

rods  or  simply 

u n d o   t h e m ,

ot h e r w i s e   t h e

hanging part may

become the signal

interference.

Take  advantage 

of the adjustable 

buckles  behind 

and use them to 

adjust the length 

between the leg 

straps and seat to 

your comfortable 

position.

Reconfirm the harness and 

adjustable belt to be tight 

enough so that there is no 

space  left  between  your 

waist and the harness.

To tighten the harness, pull 

the left side of the strap 

with both hands until the 

adjustable  belt  is  to  the 

tightest. Meanwhile, fit your 

waist to the strap.

Turn forward to prepare to 
wear the harness.

Height Adjustment

Harness Wearing

This procedure is crucial! Improperly fastened harness will affect your 

walking experience!

As to the leg straps, tighten 

the  velcro  around  your 

thigh, ensuring there is no 

space left.

13

16

14

17

15

18

Summary of Contents for Walk mini S

Page 1: ...Walk mini S OWNER S MANUAL Please read this instruction manual carefully and keep it safely stored for future use This product is a commercial product...

Page 2: ...uctions Disassembly Procedure Product Maintenance Appendix 1 Optional Accessories List Appendix 2 KAT Control Center Product packaging Item List Installation steps Software content Product s maintenan...

Page 3: ...to be used with the Walk mini S only and it is forbidden to use them for any other purpose Check the device before use to confirm that it s in a normal state without cracks scratches bumps bends odd...

Page 4: ...be present to ensure that they do not experience any of the above discomforts If it s your first time shorter periods of use are advised Only when you have adapted to the virtual reality is it advise...

Page 5: ...k Leg Straps Supporting Rods LED Lights Base Shell Base Plate Safety Step Suitable age Suitable weight Suitable height Product weight Range of waist Length of leg straps Base plate height Step height...

Page 6: ...he suggestions we ve compiled for you carefully before attempting installation Precautions Tool preparation before unboxing Before unboxing the Walk mini S please prepare a pair of scissors a screwdri...

Page 7: ...the proper number of each tool or accessory If any item is missing please contact customer service service katvr com List of Items Main Components Base Back support Supporting rods Safety step Tools A...

Page 8: ...bly of the Back Support Due to necessary quality control testing in the factory minor scratches may be found on component connections but they will not affect the normal operation of the device Take o...

Page 9: ...5 are aligned Use the hex key allen key to tighten the four screws in place on both sides holding the supporting rods firmly Securely tighten the bolt joining the connecting wire to the base frame Re...

Page 10: ...the Content Library 1 The software dashboard allows to easily add your local industry application content and game content into The Content Library to experience them on your Walk Mini S devices Meth...

Page 11: ...lete a content application move the cursor onto the app image and click the bin icon that appears in the top right corner 4 4 Library Manage To open the library management panel 5 first go to the libr...

Page 12: ...evice initialization status informs you whether the device is already initialized 2 Parameter Setting 7 The parameter settings show Walking Speed Adjustment Slider Movement Trigger Sensitivity Adjustm...

Page 13: ...re are any connection errors of the device HMD or SteamVR a pop up window will appear If the application has been started but the experience is not normal refer to the instructions below After success...

Page 14: ...on of the controller to enter the Steam VR menu 2 Click the icon of KAT Industry application software named Industry in the lower left corner to enter the calibration page 3 Click Direction Calibratio...

Page 15: ...alk mini S Moved the VR headset s base station if any Re doing the room settings for your VR headset Please note that the treadmill height adds 18 6cm to your standing level Thus the VR ground level s...

Page 16: ...Put on the special shoe covers Grab the supporting rod as indicated by the sticker Rotate the supporting rods to the position shown above Fit your heel into the special shoe covers then fasten the buc...

Page 17: ...s t c o m f o r t a b l e position and fasten the remaining part of the belt when you don t need leg straps please hang them to the supporting rods or simply u n d o t h e m ot h e r w i s e t h e han...

Page 18: ...eadset and controller on the hooks behind the back support for easy access while on the device Try to sit down Lock the rotational safety mechanism Undo the leg straps Unfasten the buckle on the harne...

Page 19: ...ts to ensure they are firmly tightened parts that are prone to wear and tear for timely replacement e g the waist and leg straps In case of necessary component part replacement contact customer servic...

Page 20: ...ccessories that you can choose to match VR Headset Option 1 Base stand 1 set includes two stands Deluxe Control Center Deluxe Control Center as the example KAT Station 2 0 VR Headset Option 2 Cord bra...

Page 21: ...Business Management System and a 3D Surround Sound Stereo System The device is an all in one solution aimed to provide easy access maintenance and management of the KAT VR equipment while ensuring the...

Page 22: ...d fix well with screws M4 20_3 on both sides 5 Using the connector install the beam on the support and fix it well with screws M8 20 6 Remove the screws on the Control Center s top back plate 7 Place...

Page 23: ...rting beam s round opening and push inch by inch into the pipe until it comes out from the other side 11 Once the HMD cable is inserted into the beam place the seal plate back on the structure and fix...

Page 24: ...issue 1 KAT Industry platform allows its users to perform a quick manual calibration within VR Just click at the APP button on your controller and select the calibration option 2 Does the initializati...

Page 25: ...in after replacing the malfunctioning CPU Please follow the steps below 1 Please check if the cooling system works as normal and the CPU cooling fan rotates smoothly 2 Please scan your hard disk for p...

Reviews: