background image


13 


Introduction  

This section intends to introduce the reader to basic dispensing techniques and to 

familiarize him or her to the XFP-01. 

Flux weighing 
basics 

When  preparing  samples  for  XRF  by  fusion,  the  spectrometer  will  measure  the 

concentration  of  the  sample  atomic  components  in  the  flux  matrix.  This  means 

that the matrix itself must be accurately known and prepared. 

This assumption means that there are two methods to dispense the sample and 

flux: an “absolute” (fixed weights) method and a “relative” (ratio) method. 

In  the  absolute  method,  both  the  sample  and  the  flux  are  dispensed  in  pre-

established amounts, e.g. 7.0000g flux and 0.2000g sample. This is the traditional 

method, when both the sample and the flux are weighed by hand. 

In the ratio method, the sample is weighed first, and then the flux is added in an 

accurate proportion. In the previous example, the ratio is 7:0.2. If the amount of 

sample was actually, say, 6.9303g then the amount of flux should be 0.1980g to 

maintain  the  desired  ratio.  As  long  as  the  ratio  is  maintained,  there  will  be  no 
analytical difference, but  that requires  manual  calculations, unless an  automatic 

dispenser is used. 

Automatic 
dispensers 

Because  of  the  risk  of  human  errors,  and  to  increase  productivity,  many 

laboratories  are  now  adopting  automated  flux  dispensers  as  the  standard 

equipment to weigh the fusion flux. 

Furthermore, while the XFP-01 does not dispense the sample, it can dispense the 

flux as a function of the sample amount, which does not need to be accurate as 

the dispenser will ensure that the desired ration is maintained. 

Summary of Contents for FLUXPENSER XFP-01

Page 1: ...Automatic flux dispenser FLUXPENSER XFP 01...

Page 2: ......

Page 3: ...ime saving instrument please read this manual thoroughly and keep it in a safe and handy place for future reference Should you have any question regarding the use maintenance or repair of your instrum...

Page 4: ...ing modes 16 Using the XFP 01 basic 17 The main running screen 17 Amount of flux and sample to use 17 Installing the crucible 18 Dispensing the flux 18 Manual mixing 20 A complete dispensing procedure...

Page 5: ...3 Warranty 27 Contacting Katanax 28...

Page 6: ...e Flux hopper Communication cable Power supplies two one for scale one for controller Rubber mat This instruction manual Location The counter on which the instrument is to be used must be very stable...

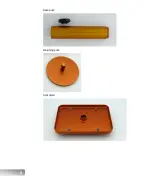
Page 7: ...5 Parts nomenclature Base Head compartment Head compartment post...

Page 8: ...6 Base post Weighing post Spill plate...

Page 9: ...7 Crucible holder Assembly instructions To assemble the XFP 01 follow these steps 1 Screw the Base post into the Base...

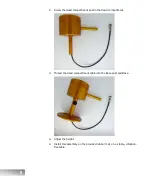
Page 10: ...Head compartment post in the Head compartment 3 Thread the Head compartment cable into the Base post and Base 4 Adjust the height 5 Install this assembly on the provided rubber mat on a stable vibrati...

Page 11: ...nnect the mechanical head compartment cable 5 conductor into connector A 8 Connect the balance connection cable 6 conductor into connector B 9 Connect the power supply into connector D 10 Follow the s...

Page 12: ...10 11 On the scale weighing sensor carefully lay the weighing post 12 Then place the spill plate 13 And finally the crucible holder...

Page 13: ...k like this 15 Flip the switch C to turn the unit on Questions Should you have any question regarding the proper installation and start up of your instrument please contact Katanax directly see inform...

Page 14: ...of spherical micro beads which are very slippery when spilled on a floor Promptly clean up any flux spill to prevent hazardous situations Original accessories For your safety use only the original pow...

Page 15: ...h the sample and the flux are weighed by hand In the ratio method the sample is weighed first and then the flux is added in an accurate proportion In the previous example the ratio is 7 0 2 If the amo...

Page 16: ...f an analytical balance with the convenience of an automatic dispensing system The LCD screen and keypad Upon turning the instrument on the system will boot up and be ready to accept commands from the...

Page 17: ...erwise your balance must be pre registered in the Balance Menu Mainfeaturesof theKatanax XFP 01 Accuracy Real time weight display Safety No strain on workers due to keeping the same position Versatili...

Page 18: ...ng a sample for fusion with a view to analyze the results by XRF X ray fluorescence the analytical instrument will measure the concentration of the elements present in the flux and sample mix So of th...

Page 19: ...play will appear allowing the user to change parameters or start a dispensing Amountofflux andsampleto use Today s market has seen a proliferation of various mold diameters Consequently one must adapt...

Page 20: ...mold are more critical Installingthe crucible When the system prompts you to do so place the crucible or other suitable weighing container on the crucible holder under the flux chute and close the do...

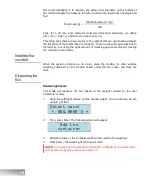
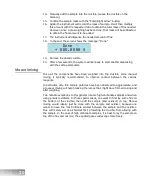
Page 21: ...g the Left Right Up Down arrows set the needed ratio In our example we are using 1 g of sample to 8 g of flux Select Ratio 1 00 08 0 10 Then press Enter The following screen will appear Add the contai...

Page 22: ...ghed into the crucible some manual mixing is typically recommended to improve contact between the various reagents In particular very fine sample particles have been observed to agglomerate and a manu...

Page 23: ...a scale use the Function button to toggle modes 3 Select the appropriate dispensing mode fixed weight or ratio 4 Set the current weight or ratio and press Enter 5 Follow instructions on display and wa...

Page 24: ...is why the menu to access those is hidden To access the hidden advanced parameters 1 Use the arrows to navigate to the Config menu 2 Use the arrows to select and display the Build version 3 Press twic...

Page 25: ...u find that the unit overshoots in coarse mode increase this parameter Conversely if the unit switches too early to fine mode and thus takes longer to dispense then lower this parameter Vib Thold This...

Page 26: ...n the one that was provided with the XFP 01 another model may be selected from a list of pre registered units Tolerance The tolerance defines the acceptable accuracy of the dispensing Acceptable toler...

Page 27: ...button on the balance the red light on the XFP 01 keypad should light If the light does not turn on please follow the steps 1 Check if all the cables are plugged 2 Check if the selected balance is the...

Page 28: ...supply input 100 240VAC 50 60 Hz Power supply output 12 VDC 2 5A Physical Total weight 6 kg 13 lbs Weighing unit Width 20 cm 8 in Depth 45 cm 18 in Controller Width 20 cm 8 in Depth 20 cm 8 in Total f...

Page 29: ...oper installation and maintenance of equipment Katanax makes no warranty or representation regarding the fitness for use or the application of its products by the purchaser Katanax is not liable for c...

Page 30: ...QC Canada G2C 1X1 Tel 1 418 915 4848 E mail info katanax com Web www katanax com When contacting us kindly have the serial number of the instrument at hand Customers are invited to visit our web site...

Reviews: