29
POLARISATION SETTING
8. Press
the
button and the turntable will move to the selected elevation angle.
9. Turn off the UFS 740 using the main switch on the front and disconnect it from the power.
10. Use the socket driver supplied (size 20) to slacken the securing screw of the clamp on the LNB.
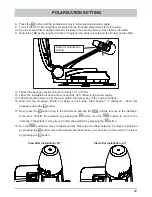
11. Rotate the LNB by the required number of degrees (the scale is located on the bottom on the LNB).
Scale for polarisation
setting
12. Tighten the hexagon socket screw to a torque of 3.3-3.5 Nm.
13. Leave the installation location and reconnect the UFS 740sw to the power supply.
15. First switch the receiver on at the main switch, then press any of the numeric buttons.
16. Wait until the message “Position of Astra is not known. Start search?” is displayed – abort this
procedure using the
button.
17. Next, press the
button to go to the main menu and use the
buttons to move to the “Settings”
menu item. Confi rm the selection by pressing the
button. Use the
buttons to move to the
“Antenna Confi guration” menu item. Confi rm the selection by pressing the
button.
18 Use
the
buttons to move to the menu item “Reset the turn table antenna”. Confi rm the selection
by pressing the
button. Once the antenna has been reset, you can return to the normal TV picture
by pressing the
button.
View after instal45°
View after installation -45°


