background image

5

SET UP

INITIAL SET UP

Before operating the device for the fi rst time remove the T 8.0 A fuse from the packaging and place it 
in the fuse holder on the rear of the device.

The removal of this fuse prevents the device switching on unintentionally during transport.

Important!
Please remove this fuse again on renewed shipping of the device!

Now remove the AC power unit (100V...250V) supplied from the packaging and connect it to the device 
and mains. The integrated lithium-ion rechargeable battery and the green light emitting diode indicate 
the external supply of power. You can check the charge state of the rechargeable battery by pressing 
the “Test” button.

SETTING UP THE DEVICE

When setting up the device pay attention to adequate ventilation of the device!

To avoid a build up of heat, the openings for the fan and the ventilation holes must always be clear.
Set up the device as shown in the fi gure.

Note!

See also “Charge state indication” and “DC supply socket” in the chapter “Interfaces”!

OPTIONS FOR SETTING UP

After fi tting the fuse, the device must be operated/charged for approx. two hours on the mains. Then the 
device must be operated on the battery and the battery fully discharged at least once (until the device 
switches itself off). Only after complete charging and subsequent discharging of the device can the battery 
charge state indication be correctly displayed by the device.

Summary of Contents for MSK 200

Page 1: ...Manual Antenna measuring system MSK 200 Valid from software version V 3 8...

Page 2: ...delines standards and additional technical specifications The product is state of the art and ensures the maximum level of safety However this safety level can only be reached in practice if all of th...

Page 3: ...GUAGE FOR THE HELP FUNCTION 7 KEYBOARD OPERATION 7 TOUCHSCREEN OPERATION 8 OPERATION 11 SELECTION OF THE SIGNAL SOURCE AND THE MEASUREMENT 11 SELECTION OF THE SIGNAL SOURCE 11 SELECTION OF THE CHANNEL...

Page 4: ...te control as well as for acceptance measurements on antenna and distribution systems SCOPE OF SUPPLY 1 antenna measuring system MSK 200 75 1 AC power unit Transport case 1 measuring cable BNC plug BN...

Page 5: ...ge state of the rechargeable battery by pressing the Test button SETTING UP THE DEVICE When setting up the device pay attention to adequate ventilation of the device To avoid a build up of heat the op...

Page 6: ...lide your head through the belt For left handers Reach with the left hand through the belt and also slide your head through the belt You can move the softkeys from right to left by pressing the follow...

Page 7: ...thods of measuring OPERATION BASIC INFORMATION ON OPERATION KEYBOARD OPERATION SETTINGS SETUP PRINT PREFERENCES RF SETTINGS SWITCH ON AND OFF the device and switch the device to standby Forced shut do...

Page 8: ...tion ANALYSE If the SOURCE button is pressed the source selection buttons appear which can be used to select the signal path When the ANALYSE button is pressed the measurement selection buttons appear...

Page 9: ...tion of various settings e g selection of a channel This type of button enables letters and numbers to be entered e g programme name entry Using this button you can enter numbers e g programme number...

Page 10: ...inger e g for the scope the delay time for the spectrum analyser the centre frequency This type of button indicates an option that is not currently available on this unit This type of button indicates...

Page 11: ...ependent of each other SELECTION OF THE SIGNAL SOURCE By pressing the hard key you can open the selection of the signal source The following sources can be selected Digital cable TV Digital satellite...

Page 12: ...equired frequency is entered in the Frequency field 4 3 The frequency entry is automatically corrected to the correct video carrier frequency or channel mid frequency You can fine tune the frequency u...

Page 13: ...settings are saved in the MSK 200 for each measurement However you can also make many settings to suit the related measurement These are displayed on the related menu Additional settings can be opened...

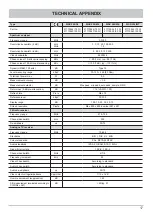
Page 14: ...parallel ASI Digital video encrypted DVB C J83 B CI CA DVB T DVB T2 ATSC CI CA DVB S DVB S2 CI CA TS parallel ASI CI CA DISPLAY Position Green signal Red signal Operation stand by Front via ON OFF but...

Page 15: ...el measurement video audio carrier level of digital signals C N Frequency measurement frequency spacing Constellation analyser Constellation 4 16 32 64 128 256 QAM COFDM MER BER frequency offset Echo...

Page 16: ...standards J83B DOCSIS ATSC Video measurement options for video amplitude with line selection S N measurement and hum measurement Videotext decoder S N measurement typ 57 dB Display of SID PMT PID PCR...

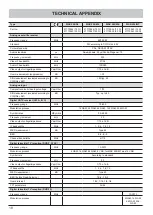
Page 17: ...peak auto peak sample RMS Return loss 5 dB pre attenuation dB 16 VSWR 1 35 Refresh rate Pic s Max 10 Reference level dB V 30 130 Display range dB 100 70 50 30 20 10 Screen resolution Pixels Max 800 x...

Page 18: ...d according to CCIR Rec 567 dB Typ up to 80 Digital CATV receiver J83 A B C Frequency range MHz 10 895 Modulation process 16 QAM 32 QAM 64 QAM 128 QAM 256 QAM Symbol rates MSymb s 0 5 6 999 Frequency...

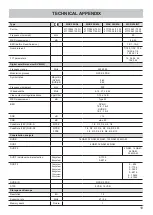
Page 19: ...dths MHz 8 18 27 36 54 Video output voltage impedance Vpp Ohm 1 75 1 dB MER measurement dB Type 20 BER DVB S 1E 2 1E 9 DVB S2 1E 1 1E 9 SNR dB 14 CNR dB max 20 CodeRate FEC DVB S QPSK 1 2 2 3 3 4 5 6...

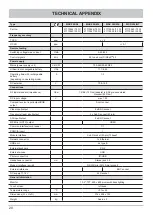
Page 20: ...BNC pre assembled N socket 50 Ohm DC input voltage V max 100 Composite colour input output RGB output Scart socket Video input output 2 x BNC socket Transport stream input output 2 x Sub D socket 25 p...

Page 21: ...21 The figure shows the MSK 200 M4 21710026 with 75 BNC socket Depending on the version of the MSK 200 some of the connections shown here are optional TECHNICAL APPENDIX...

Page 22: ...e personnel The device should be freed of dust deposits inside at regular intervals app every 1 to 2 years to ensure optimum ventilation The cleaning interval is based on the length of time the device...

Page 23: ...ted with the device or using it correctly or if unexpected problems occur please contact the Kathrein customer hotline Tel 08031 184 700 CUSTOMER SERVICE ESW GmbH Elektronik Service Wetzlar GmbH Phili...

Page 24: ...Internet http www kathrein de KATHREIN Werke KG Anton Kathrein Stra e 1 3 P O Box 100 444 83004 Rosenheim GERMANY 936 4677 1013 VKDF Technical data subject to change...

Reviews: