background image

Operating Manual


Original Operating Manual 

15 


6. 

Maintenance and servicing 

6.1 

General 

 
Regular maintenance is essential to ensure reliable operation and long service life of the KAUP 
attachment

.


Ensure that maintenance and servicing are performed by qualified and authorised 
personnel only.


Lubrication and cleaning work on the attachment may also be performed by the lift truck 
operator.


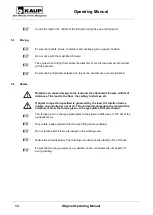
Perform maintenance and servicing work only when the attachment is parked securely 
on a stable, level foundation. For installing and removing, it is recommended to use a 
pallet to take the attachment. The attachment can thus be securely placed and 
transported.


Pay attention to a sufficient load-carrying capacity of the lifting means. 


Replace missing or defective warning signs on the attachment.


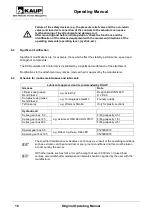
Do not use third party spare parts. Through poor quality or incorrect matching 
they can result in a risk of accident. The EC Declaration of Conformity by the 
manufacturer becomes invalid and you assume full responsibility in the case of 
accident.


Use only original spare parts from the manufacturer.


The hydraulic system is under pressure. During work on hydraulic components 
oil spurting out can cause injuries. Unload the system in accordance with the 
operating instructions of the lift truck manufacturer. In the case of injuries caused 
by high pressure oil, inform the works physician and seek out a specialist 
immediately. 


Screw connections can loosen due to vibration of the attachment. During routine 
maintenance check that screw connections are correctly torqued and replace 
screws which are visibly damaged. 

 
Note the following tightening torques which are valid for screws with connecting surfaces according 
to ISO 4762, ISO 4014, ISO 4032 etc.: 
 

Screw/bolt rating 

8.8 

10.9 

12.9 

M6 thread 

9,3Nm 

14Nm 

16Nm 

M8 thread 

23Nm 

33Nm 

39Nm 

M10 thread 

45Nm 

66Nm 

77Nm 

Μ12 thread 

77Nm 

115Nm 

135Nm 

Μ16 thread 

190Nm 

280Nm 

330Nm 

Μ20 thread 

385Nm 

550Nm 

640Nm 


Summary of Contents for 2T456Z

Page 1: ...ations Rotating Fork Positioner 2T456Z 2T456ZA 2T496Z 2T496ZA T456Z T496Z Rotating Fork Positioner without sideshift Rotating Fork Positioner with sideshift T456ZA T496ZA Rotating Fork Positioner with...

Page 2: ...2 Safety aspects 6 3 Design 7 3 1 Slide and flange 7 3 2 Rotator with mounting 7 3 3 Proper use of the equipment 8 3 4 Improper use 8 4 Installation and checking out 9 4 1 Installation 9 4 1 1 Model...

Page 3: ...rating Manual 26 12 EC Declaration of Conformity Summary 26 Our service department in Aschaffenburg will be happy to answer your technical questions and to provide additional support Technical Support...

Page 4: ...following symbols are used in this operating manual to highlight details of special importance Identifies details relating to do s and don ts for the purpose of avoiding injury and property damage Spe...

Page 5: ...nents Inappropriate installation maintenance inspection and servicing Assignment of unqualified or non authorised personnel Claims raised by third parties 1 7 Limits of applicable use KAUP attachments...

Page 6: ...safe distance away from moving reciprocating or rotating parts of the attachment to avoid danger of crushing pinching or entanglement Notify the responsible department person immediately of changes a...

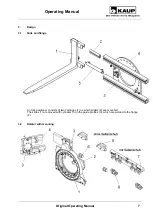
Page 7: ...nual 7 3 Design 3 1 Slide and flange An fork positioner consists of two carriages 1 on which sliders 2 are mounted The slides 1 are moved with cylinders 5 in the guide profiles 3 which are welded to t...

Page 8: ...iners etc that have been picked up with fork arms Proper use of the machine and or equipment includes the following Observance of the operating manual at all times Observance of the technical data on...

Page 9: ...rease wear Please refer to the following Specifications ISO Class Model family Oil flow 2328 l min 2 1T 2 5T 20 5 3 2 5T 4 8T 40 10 4 4 5T 5T 50 20 6T 8T 60 15 4 Installation and checking out 4 1 Inst...

Page 10: ...Operating Manual 10 Original Operating Manual 4 1 1 Model T456Z without sideshift...

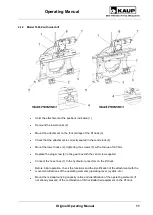
Page 11: ...crews 5 with a torque of 190 Nm Replace the plug screw 6 in the gear box with the vent screw supplied Connect the hose lines 7 to the hydraulic connectors on the lift truck Before initial operation ch...

Page 12: ...stem Start the lift truck Move the sideshifter repeatedly in both directions to maximum extent Rotate the rotator left and right several times Repeatedly cycle the fork positioner from the fully open...

Page 13: ...port any load exceeding that specified on the residual load plate for the particular combination of lift truck and attachment Note the load bearing capacity of the attachment as stated on the rating p...

Page 14: ...icient distance of the load to the floor the ceiling to shelves etc If higher torque than specified is generated by the load the rotation device rotates uncontrolled or not at all This can lead to dam...

Page 15: ...they can result in a risk of accident The EC Declaration of Conformity by the manufacturer becomes invalid and you assume full responsibility in the case of accident Use only original spare parts from...

Page 16: ...ufacturer 6 3 Schedule for routine maintenance and lubricants Lubricants approved and recommended by KAUP Greases Note Lithium soap grease NLGI Class 2 e g Avialith 2 Designation DIN51825 K 2 K 30 Com...

Page 17: ...and damage After 50h every 500h thereafter Check screws 1 on the clamp body 2 slewing ring 3 11 on the slide 6 model T4xxZA Replace loose or damaged screws Torque the screws as specified in Chapter 6...

Page 18: ...een the cylinder mount and nut of the cylinder 8 Cylinders are installed with axial clearance of 1 5 to 2 mm Yearly Inspect the heel of the fork 9 for wear and cracks Remove forks from service when we...

Page 19: ...Operating Manual Original Operating Manual 19 6 3 2 Rotator and flange 6 3 3 Rotator mounting without sideshift...

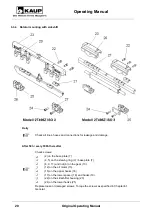
Page 20: ...every 500h thereafter Check screws 2 on the base plate 7 4 5 on the slewing ring 3 base plate 7 8 9 11 and nut 6 on the gear 10 12 on the oil motor 13 15 on the upper hooks 16 17 on the lower spacer...

Page 21: ...ce in the rotary joint 3 Information KAUP customer service As necessary Renew worn sliders 21 by removing the hooks 25 Remove the complete rotating fork positioner in the reverse order to that describ...

Page 22: ...by quality department 2 Before putting into operation carefully read and take note of the operating and security instructions 0100016401 3 Never reach into the unit as long as parts could still be mo...

Page 23: ...lding Pressure too low Increase the pressure from the lift truck Pressure too low on pressure relief valve Increase pressure on the pressure relief valve Cylinders have internal leaks Replace sealing...

Page 24: ...for backward position Cusion for backward position defective Replace piston rod Oil leakage Leaking Screw fitting is leaking Tighten seal screw fitting Sealing kit defective Replace sealing kit Pisto...

Page 25: ...dance with local legislation and regulations 9 Transport During transport of the attachment care should be given to using appropriate means of support e g pallets These must not be damaged The attachm...

Page 26: ...ry KAUP GMBH Co KG Braunstra e 17 D 63741 Aschaffenburg we hereby declare that the machinery Model Rotating fork positioner Type T456Z T456ZA T496Z T496ZA conforms to the latest valid version of the M...

Reviews:

Related manuals for 2T456Z