Instructions for use ELECTROmatic M/C and PM/PC
4 Installation | 4.7 Installation position 4: Mount control panel as remote control (PM/PC only)
42 / 80
4.7.2 Mount control panel on a holder / on the backside
of a holder
CAUTION
Damage to the dentist element.
Installations involving an intervention on the dental unit might damage compo-
nents, which can interfere with the safe function and cause injury.
▶
Have installations involving an intervention on the dental unit performed by
trained expert personnel only.
▶
Have the treatment center subjected to a safety check after installation.
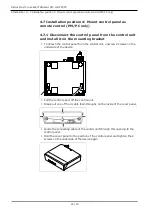
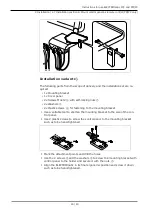
The following parts from the scope of delivery and the installation set are re-
quired:
▪ 1x Insert holder
▪ 1x Mounting bracket
▪ 1x Cover panel
▪ 4x + 2x Screws M4x12
④
with self-locking nuts
①
▪ 4x + 2x Washers
②
▪ Optional: 4x Spacer bolts, 35 mm
⑦
▪ Optional: 1x Mounting plate
▪ 2x Plastic screws
⑥
▶
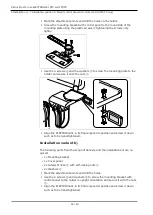
Define the position of the control panel on the holder or on the rear of the
holder and draw a hole pattern for attachment. If possible, use existing
screws or perforations as screw positions.
▶
Drill the holes.
▶
Screw the mounting bracket with control panel to the holder or to the rear
of the holder using the 2 screws
④
, washers
②
and nuts
①
.


