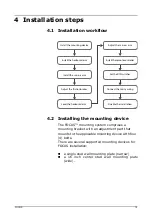
4 Installation steps
FOCUS
23
3.
Rotate the adjuster screw observing at the
same time the level on the horizontal arm.
4.
Perform the adjustment until the arm is
horizontal.
5.
Tighten the four lock screws on the side of the
wall mounting bracket to assure that the
horizontal arm stays in position.
6.
After adjusting the horizontal arm, cut off the
safety strap to release the scissors arm.
4.7 Adjusting the scissors arm
Although the factory adjustment usually suffices,
the scissors arm balance can be adjusted.
1.
Attach a cone to the tube head for added
weight.
2.
Adjust the scissors arm, remove the covers
shown in the picture below by pressing the clip
with a screwdriver and pulling the cover out.
Summary of Contents for FOCUS 215720
Page 2: ......
Page 4: ......
Page 6: ...ii...
Page 12: ...2 Unit description 6 FOCUS Exposure time control...
Page 55: ...6 Dimensions FOCUS 49 6 Dimensions Wide wall mount plate measures in mm...
Page 56: ...6 Dimensions 50 FOCUS Narrow wall mount plate measures in mm...
Page 57: ...6 Dimensions FOCUS 51 Remote control frame measures in mm...
Page 58: ...6 Dimensions 52 FOCUS Wall mount installation dimensions...
Page 59: ...6 Dimensions FOCUS 53...
Page 60: ...6 Dimensions 54 FOCUS...
Page 61: ...6 Dimensions FOCUS 55...
Page 62: ...6 Dimensions 56 FOCUS OpenMount installation dimensions...


