Page
155
11
Appendices
3.
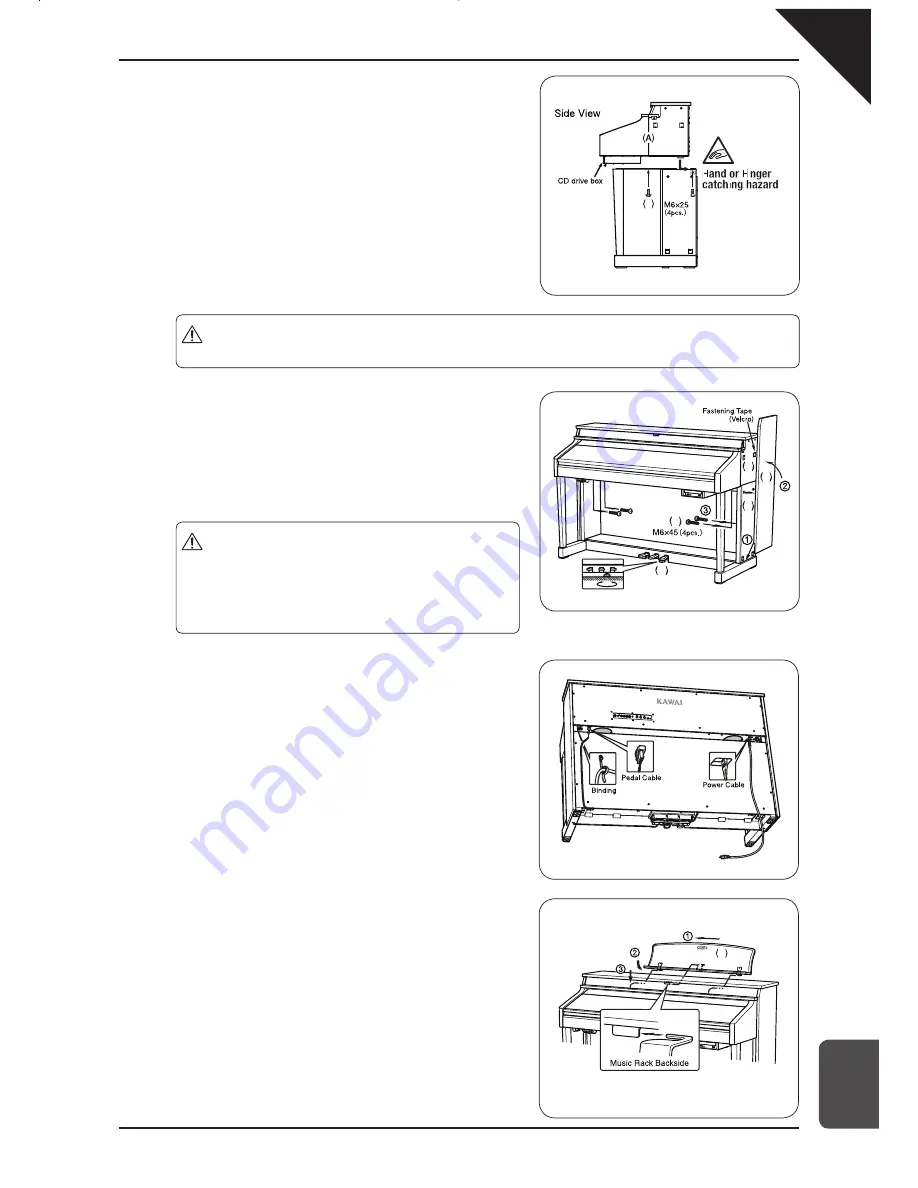
Place the Main Unit (A) on the front half of the stand so that
the metal fitting holes are seen when viewed from the top.
Slide the piano backward while holding it with one hand so
that it does not incline and fall from the stand. The hooks on
the piano are then engaged with the metal fittings on the Side
Panels. Pay attention so that hands or fingers are not caught
between the stand and piano.
Fasten the piano and the stand with four short bolts (with plain
washers and spring washers) (K).
First, loosely tighten the bolts to adjust the unit position in
order to make sure that all four bolts can be inserted straight,
then tighten the bolts.
Make sure that the bolts are tightened until the spring washers
collapse.
4.
Attach the bottom of the End Panel (E) to the bottom of the
Side Panel (B) using the Velcro fastening tape. Then attach
the top of the End Panel to the top of the Main Unit (A). Finally,
secure the panels using two Long Bolts (J) on either side.
Turn the Adjuster (L) anti-clockwise, extending the bolt until it
makes contact with the floor and supports the
pedals firmly.
5.
Insert the pedal connection cord that comes from Pedal Board
(C) into the piano’s pedal jack and fasten with cord clamps..
Connect the power cable to the AC IN terminal on the base
of the main body, then pass the cable through the back board
aperture, and out to the rear of the instrument.
6.
Attach the music rack by first positioning it slightly to the right
of centre of the instrument.
Then slide the music rack to the left to lock it into position at
the centre of the instrument.
* In order to remove the music rack, first raise it slightly, then
slide it to the right.
Caution
y
Ensure that the CP139 digital piano is correctly secured to the stand by using the bolts included.
Failing to do so may result in the unit falling from the stand, causing damage or personal injury.
Caution
y
The pedal board may break if the adjuster
is not touching the floor correctly. When
moving the CP139 digital piano, ensure
that the unit is lifted clearly from the floor
and not dragged.
K
E
J
B
A
L
F
Summary of Contents for Concert Performer CP139
Page 1: ...1 OVERVIEW OF CONTROLS 2 SOUNDS 3 STYLES 4 RECORDER 5 USB USAGE Quick Start Guide ...
Page 2: ......
Page 38: ...Page 38 USER NOTES ...
Page 39: ...Page 39 ...
Page 42: ...All descriptions and specifications in this manual are subject to change without notice ...
Page 217: ...Page 177 11 Appendices User Notes ...
Page 218: ......
Page 219: ......


