Page
49
4
Recording a Song
Track Settings
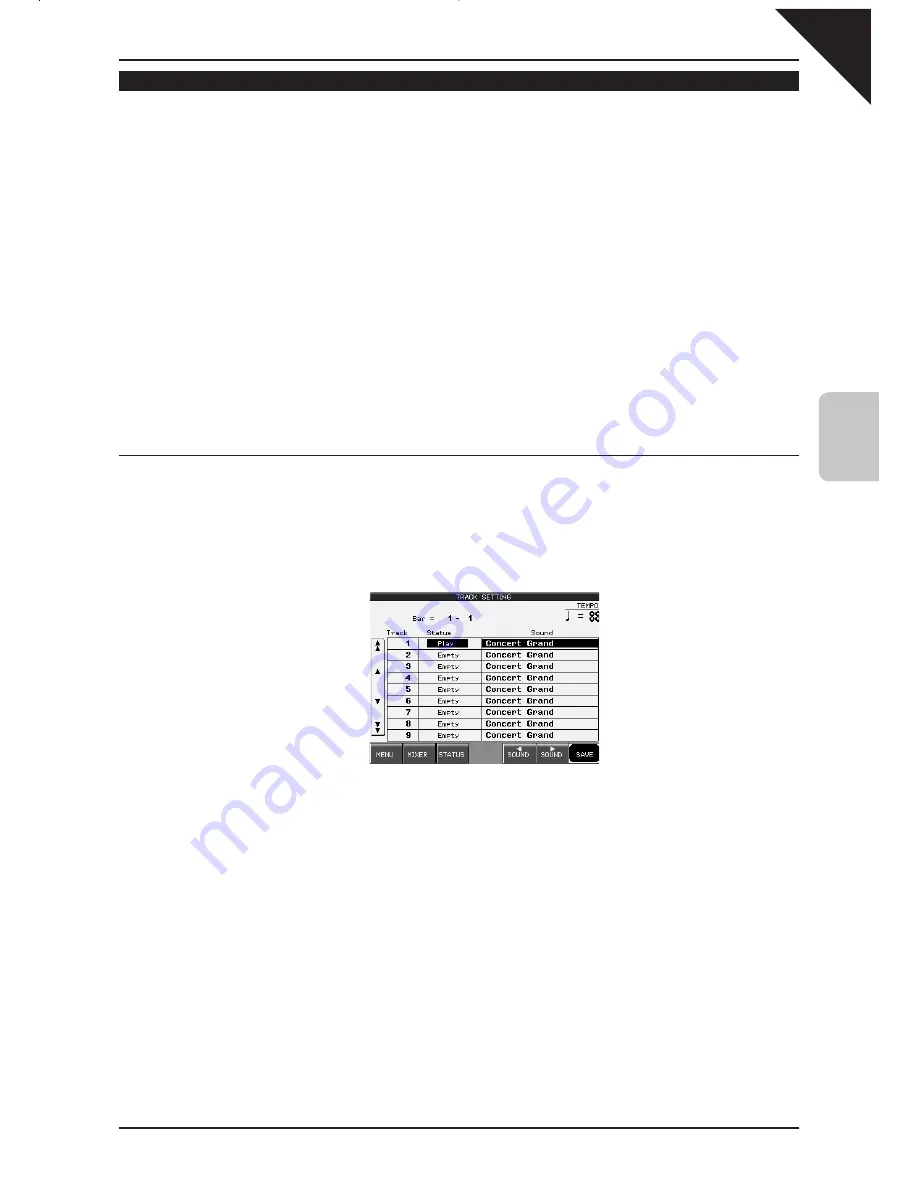
The Track Settings screen shows you the Play, Record, and Mute status for each track. In addition it shows you
what sound is assigned for the sixteen instrument tracks. You can change the track status or select a different
sound for each track.
The Track Status screen will show the following Status messages.
Rec
This track is ready to be recorded.
Play
This track has been recorded and will be heard both on playback and while recording.
MIDI Rec
MIDI Rec enables the CP to record incoming MIDI data from an external MIDI instrument connected
to the MIDI jacks. You can set more than one track to MIDI Rec, enabling the CP to record on several
tracks simultaneously over MIDI.
Mute
This track has been recorded but will be silent both on playback and while recording.
Empty
This track has not been recorded.
After you have recorded a song you can change the status for a track by touching the STATUS button at the bottom
of the LCD screen. Touching the STATUS button during playback will select Play or Mute. Touching the STATUS
button after entering Real-time record but before recording begins, will select Play, MIDI Rec, or Mute. Rec can only
be selected from the Real-time Record screen. The Track settings screen cannot be accessed during recording.
¡
To use the Track Settings screen:
Step 1
Touch TRACK SETTINGS in the Advanced Recorder menu.
Step 2
Touch the arrows at the side of the screen to select the track that you wish to edit.
Jumps to tracks 1-9.
Selects the tracks one at a time.
Jumps to tracks 10-16, Tempo, and Style.
TEMPO : Changes the tempo. Use the Dial to
change the value.
MENU : Returns you to the Advanced Recorder menu.
MIXER : Takes you to the Mixer.
STATUS : Changes the track’s status.
SOUND : Selects a different sound for the track.
SAVE : Saves the Track settings as part of the song.
Step 3
Touch the STATUS button to change the status to PLAY, MUTE or MIDI REC.
Step 4
If you wish to change the sound assigned to the track, touch the < SOUND > buttons. You can also select
sounds by pressing any of the SOUND buttons, or using the Dial.
Step 5
When you are finished, touch the MENU button to return to the Advanced Recorder menu or touch the
MIXER button to go to the Mixer menu.
Summary of Contents for Concert Performer CP139
Page 1: ...1 OVERVIEW OF CONTROLS 2 SOUNDS 3 STYLES 4 RECORDER 5 USB USAGE Quick Start Guide ...
Page 2: ......
Page 38: ...Page 38 USER NOTES ...
Page 39: ...Page 39 ...
Page 42: ...All descriptions and specifications in this manual are subject to change without notice ...
Page 217: ...Page 177 11 Appendices User Notes ...
Page 218: ......
Page 219: ......


