11
strument off by turning the switch back to the right to
its original position.
7. Changing the bulb:
To replace the lamp, remove
the head from the handle and pull out the old lamp. If
necessary, clean the glass bulb of the new lamp with
alcohol. The bulb should be free of fingerprints and
grease. Insert the new lamp as follows: Align the side
centring pin on the new lamp with the groove on the
instrument head and slide the new lamp all the way
into the socket.
Note:
Proper operation of the instrument is only gua-
ranteed when original KaWe vacuum bulbs are used.
These bulbs ensure optimal illumination quality!
When handling the instrument, the examiner
should try to keep the instrument as close as
possible to his/her eye. If the examiner directs
the light laterally into the fundal region at
a distance from the subject of no more than
2-3 cm, a diagnosis can be made without the
use of medication.
8. Window cover:
When the instrument is not in use,
close the cover on the viewing window to prevent dust
from entering the instrument head.
How to View a Patient’s Fundus: 1.
When exam-
ining the patient’s right eye, hold the ophthalmoscope
with your right hand and observe with your right eye.
For examination of the left eye, use your left hand and
eye.
2.
Put your index finger on the edge of the Rekoss
Disc so that you can rotate it any time and hold the
ophthalmoscope with your remaining four fingers.
3.
Place the ophthalmoscope on the side of your nose
and position it so that you can look through the view-
ing aperture.
4.
Look through the viewing aperture
and rotate the Rekoss disc so that you can clearly see an
object placed at a distance. By doing this, your refrac-
tive error will be corrected.
5.
Seat the patient with his
face toward the dark side of the room and direct him
to look at an object placed at a distance. This proce-
dure is necessary for keeping the patient’s eye still and
relaxed. Keeping the patient’s eye still is essential to
ophthalmoscopy since it is almost impossible to obtain
a fundus image when the patient’s eye is constantly
moving.
6.
When examining the right eye, stand at the
patient’s right side. Hold the ophthalmoscope close
to your right eye and direct the light beam into the
patient’s pupil at a distance of about 15 cm from the
patient’s eye. You will then be able to see a red reflec-
tion in the patient’s pupil.
7.
Move slowly toward this
red reflection while holding the ophthalmoscope close
to your eye. Always keep the light beam in the patient’s
pupil while approaching the patient. When the oph-
thalmoscope is close enough to the patient’s eye (2 to
3 cm), you will see the fundus image.
8.
If the fundus
image is not in sharp focus, rotate the Rekoss disc and
bring the image into focus. If it is not possible to get an
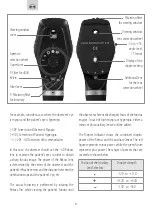
image that is in focus within the range of powers of
the Rekoss lenses, add a minus or a plus auxiliary lens
by moving the Auxiliary Lens Selector and rotate the
Rekoss disc again.
9.
When examining various areas
of the fundus, hold the ophthalmoscope close to your
eye and move it with your head around the patient’s
pupil, always keeping the same distance from the pu-
pil. The light beam should always stay in the patient’s
pupil while moving. To stabilize the ophthalmoscope,
put your middle finger on the patient’s cheek and
it will become easier to move the ophthalmoscope.
10.
If the reflection from the patient’s cornea disturbs
the fundus image, come as near to the patient as
possible and direct the light beam through the lower


