background image

6

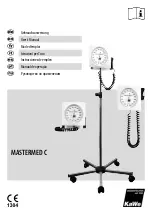
User’s Manual: MASTERMED C, 
Aneroid Blood Pressure Measuring Device (for Doctors)

Dear Customer, thank you for choosing our innovative an-
eroid blood pressure measuring device. Our products are 
known for their high quality and longevity. This KaWe 
product meets the requirements of EC guidelines 93/42/
EWG (standards for medical products) and the standard 
DIN EN ISO 81060-1:2012 “Non-invasive blood pressure 
measuring devices – Part 1: Requirements and test proce-
dures for non-automated models”.

Please read these instructions thoroughly and 
carefully before attempting to use this product 
and heed the given care instructions.

Familiarize yourself fully with this product before 

using it. These instructions are intended for those familiar 
with the operation of a blood pressure monitor.

Purpose:

 This device is intended for the non-invasive 

measurement of systolic and diastolic blood pressure.

Unsuited use/contraindication of the products: 

Any use other than that described here is not in accord-
ance with the intended use of the unit. The manufacturer 
is not liable for any resulting damages. The user alone 
bears the risk.

Checking the device:

 Before taking a measurement, 

insure that the blood pressure monitor is in perfect work-
ing order. 

1. 

Inspect the cuff to ensure that it is not heavily 

worn or damaged. 

2.

 Check the instrument gauge dial to 

make sure that it is within the zero range when the ma-
nometer is subject to normal atmospheric pressure. 

3.


Ensure that no connection exists between the blood pres-
sure monitor and the intravascular system so that air can-
not be accidentally pumped into the blood stream. 

Measurement procedure:
1. 

The patient should sit in a comfortable position with 

their legs not crossed and their back and arm supported. 
The operator of the instrument should position him/her-
self close enough to the patient to be able to place the 
stethoscope exactly in the correct location and at the same 
time be able to clearly see the blood pressure monitor 
display. 

2. 

Help the patient to relax and remind them not 

to speak or move during the measurement. The cuff is to 
be strapped onto the arm such that the middle of the cuff 
is at the same height as the right atrium. 

3. 

In order to 

ensure that you are using the correct cuff size, place the 
arrow on the cuff over the brachial artery just above the 
elbow. Close the cuff and check to see if the end of the cuff 
is within the printed markings. If this is the case then the 
cuff size is appropriate for the size of the upper arm. A 
complete assortment of cuff sizes is available. Allow the 
patient to relax for 5 minutes before the measurement is 
begun. 

4. 

Open the air valve in order to insure that the cuff 

is not under pressure. 

5. 

Close the air valve. 

6. 

Estimate 

the systolic and diastolic blood pressure as follows: 

a) 

Find 

the pulse of the brachial artery. 

b)

 Fill the cuff with air 

until the pulse disappears. 

c) 

Make note of the reading. 

d)


Release the air from the cuff. 

7.

 Measure the systolic and 

diastolic pressure as follows: 

a)

 Place the stethoscope 

gently over the spot on the brachial artery where the pulse 
is the strongest. 

b)

 Pump up the cuff to approx. 30 mmHg 

over the previously estimated systolic pressure. 

c)

 Reduce 

the pressure by 2 to 3 mmHg per second. Check the actual 
pressure release rate using the pressure gauge. 

d) 

Make 

note of the systolic pressure value as soon as you hear two 
successive heartbeats. 

e)

 Make note of the diastolic pres-

sure value as soon as the rhythmic heartbeat sound dissi-
pates (K5). 

Summary of Contents for Mastermed C

Page 1: ...Gebrauchsanweisung User s Manual Mode d emploi Istruzioni per l uso Instrucciones de empleo Manual de opera o MASTERMED C...

Page 2: ...versehentlich in ein Blutgef gepumpt werden kann Messprozedur 1 Der Patient sollte bequem sitzen die Beine nicht ber schlagenunddenR ckenunddenArmunterst tzthaben Der Bediener des Instuments sollte si...

Page 3: ...Manschetten wurden mit den folgenden emp fohlenen Desinfektionsmitteln auf Best ndigkeit gepr ft Buraton fl ssig Cidex Ethanol 70 Isopropyl Alkohol 70 MikrozidundSporicidin NachderDesinfizierungdie Ma...

Page 4: ...san weisung betr gt die Gew hrleistung zwei Jahre beginnend mit dem Verkaufsdatum Das Produkt hat beisachgem erHandhabungundBer cksichtigung unserer Anleitung Anweisung eine Lebensdauer von mind 10 Ja...

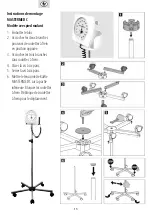
Page 5: ...stecken 2 Zwei Fu rohre mit Bremsrollen gegen ber einh ngen 3 Drei Fu rohre ohne Bremsrollen einh ngen 4 Sechskantschraube eindrehen 5 Sechskantschraube anziehen 6 MASTERMED C auf Fu teil schieben Bre...

Page 6: ...am Measurement procedure 1 The patient should sit in a comfortable position with their legs not crossed and their back and arm supported The operator of the instrument should position him her self clo...

Page 7: ...hen the cuff is not connected to the gauge always use a tube stopper to prevent accidental penetration of liquid The penetration of liquid into the tube may cause damage to the gauge 2 Periodically in...

Page 8: ...isprod uct has an expected service life of at least 10 years when used properly and with attention to our manual instruc tions Accessories Reusable 2 hose cuff 04 85204 211 Infants 04 85204 221 Childr...

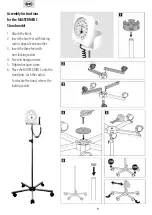
Page 9: ...2 Insert the two feet with locking castors opposite one another 3 Insert the three feet with non locking castors 4 Screw in hexagon screw 5 Tighten hexagon screw 6 Place the MASTERMED C onto the stan...

Page 10: ...de mesure 1 Le patient doit tre assis confortablement les jambes noncrois es ledosbienappuy etlebrassoutenu L op rateur de l instrument doit se tenir debout proximit du patient pour pouvoir placer ex...

Page 11: ...toute p n tration accidentelle de liquide utilisez toujours une fiche pour le tube si le brassard n est pas connect l appareil de mesure La p n tration de liquide dans le tube peut endommager l appar...

Page 12: ...fs m dicaux Sur toute la plage de la gradua tion l appareil devrait indiquer une pression de brassard avec une pr cision de 3mmHg Garantie l gale Nous accordons une garantie l gale de deux ans compter...

Page 13: ...branches pourvues de roulettes frein en position oppos e 3 Accrocher les trois branches sans roulettes frein 4 Visser la vis six pans 5 Serrer la vis six pans 6 Mettre le tensiom tre KaWe MASTERMED C...

Page 14: ...seduto comodamente non deve incrociare le gambe e deve avere un sostegno per schiena ebraccio L operatoredovrebbesistemarsivicinoalpazien te al fine di consentire il posizionamento preciso dello steto...

Page 15: ...ugare all aria Avvertenze 1 Per evitare l ingresso accidentale di liquidi utilizzare sempre un tappo per il tubo se il bracciale non collegato al dispositivo di misurazione La penetrazione di liquido...

Page 16: ...o ilprodotto coperto da garanzia legale per due anni a partire dalla data di acquisto dello stesso Il prodotto se utilizzato in modo appropriatoerispettandolenostreindicazioni istruzioni ha una durata...

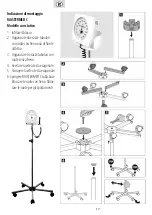
Page 17: ...due razze tubolari con ruote con freno una di fronte all altra 3 Agganciare tre razze tubolari con ruote senza freno 4 Avvitare la vite a testa esagonale 5 Stringere la vite a testa esagonale 6 Spinge...

Page 18: ...tre el tensi metro y el sistema intravascular ya que el aire podr a ser bombeado accidentalmente en un vaso sangu neo Procedimiento de medici n 1 El paciente debe estar sentado c modamente no cruzar l...

Page 19: ...on l quido Cidex etanol 70 alcohol isoprop lico 70 Mikrozid y Sporicidin Despu s de haber desinfectado el brazalete se deber a enjuagar con agua y dejar secar al aire Advertencias 1 Cuando el brazalet...

Page 20: ...tregar el dispositivo al fabricante o a una entidad de servicio competente para un control metrol gico adecuado por lo menos una vez cada 2 a os de acuerdo con las reglas de operaci n de dispositivos...

Page 21: ...o cuyas ruedas tienen freno en posiciones opuestas 3 Enganchar las tres barras de apoyo cuyas ruedas no tienen freno 4 Enroscar el tornillo de cabeza hexagonal 5 Apretar el tornillo de cabeza hexagona...

Page 22: ...cos de um vaso sangu neo Procedimento de medi o 1 O paciente dever estar sentado confortavelmente n o cruzar as pernas e fornecer um suporte agrad vel para as costas e o bra o O utilizador do instrume...

Page 23: ...e deixar secar ao ar Avisos 1 Quando o manguito n o estiver conectado ao aparelho de medi o use sempre um plugue para o tubo a fim de evitar a entrada acidental de l quidos a entrada acidental de l q...

Page 24: ...ia de qualidade com a dura o de dois anos a partir da data de venda Utilizando o produto deacordocomasuafinalidadeerespeitandoonossoma nual instru es este poder apresentar uma vida til de pelo menos 1...

Page 25: ...com os rod zios com trav o cada um no lado oposto do outro 3 Aplicar os tr s tubos de base sem rod zios com trav o 4 Aplicar o parafuso de cabe a sextavada 5 Apertar o parafuso de cabe a sextavada 6 A...

Page 26: ...26 KaWe KaWe G93 42 EWG DINENISO81060 1 2012 1 1 2 MASTERMED C a 3 co 1 2 3 5 4 5 6 7 30...

Page 27: ...27 2 3 2 3 K5 3 12 4 K4 K5 K4 Buraton Cidex 70 70 Mikrozid Sporicidin 1 2 3 4 5 6 7 8 9 10 300 11 KaWe 12 0 300 3...

Page 28: ...30 C 70 C 15 85 10 C 40 C 20 C 55 C 10 C 40 C 15 90 70 1700 13 8 21 5 20 5 28 5 27 5 36 5 36 46 2 3 2 10 2 04 85204 211 04 85204 221 04 85204 231 04 85204 241 49 7141 68188 0 www kawemed com REF LOT...

Page 29: ...29 MASTERMEDC 1 2 3 4 5 6 MASTERMEDC...

Page 30: ...30...

Page 31: ...31...

Page 32: ...esenzaalcunagaranziaepossonoesseremodificate ES Todalainformaci n sin compromiso Nos reservamos el derecho de realizar cambios PT Todas as indica es entendem se sem compromisso Sujeito a altera es sem...

Reviews: