background image

20

Directly touching the electrodes is not dangerous; in order to avoid 
spots of excessive current density, it is recommended however, that as 
much of the surface of the body part to be treated as possible rests on 
the electrodes and the pressure is uniformly distributed. The parame-
ters that can be selected blink on the display.  The current intensity for 
the treatment can be selected with the UP and DOWN buttons. --> 
Confirm selection by pressing the SET button. --> Select pulsing cur-
rent with the UP button and continuous current with the DOWN but-
ton. --> Confirm selection by pressing the SET button. --> Set the 
treatment time in minutes (MIN) using the UP and DOWN buttons. 
--> Confirm selection by pressing the SET button. --> Set the treat-
ment time in seconds (SEC) using the UP and DOWN buttons.  --> 
Confirm selection by pressing the SET button. --> Setting selection is 
completed when the treatment starts, the time countdown begins and 
the clock symbol begins to blink. To begin the treatment, complete the 
electric circuit by putting your hands or feet into the water trays. 
•  By pressing the

 button on the membrane keypad on the upper 

side of the device the treatment current can be increased until a 
mild to strong tingling can be felt. The intensity of the current can be 
seen on the display. Similarly, the current can also be reduced dur-
ing the treatment by pressing the

button. When the current is 

being changed during the treatment, the current reading on the 
display does not blink. 

•  The treatment stops automatically after the set treatment time has 

been reached or when the current circuit is broken before the set 
time has elapsed. The treatment will resume for the remainder of 
the set treatment time when the current circuit has once again been 
closed. The clock symbol 

 blinks and the time countdown re-

sumes. 

•  If the clock showing the treatment time  

 has run down to 

00:00 and the current circuit is still complete, the + / - symbols on 
the display both begin to blink. Once the set treatment time has 
expired, none of the settings can be changed until the circuit has 
been interrupted by removing the hands or feet from the water 
trays. The + / - symbols then stop blinking and the MIN symbol 
begins to blink, signaling that new settings can now be selected. 
The previously set treatment time will be saved.  

•  Turn the SwiSto3 iontophoresis device off after completing treat-

ment by pressing the power button 

. The device will also turn 

off automatically after two minutes.

•  The last-used treatment settings are automatically saved and used 

when the device is restarted for the next treatment. These settings 
can be changed with an open current circuit as described in Section 
9.

•  The SwiSto3 iontophoresis device can also be plugged into the local 

power supply network to be charged using the charging plug. The 
battery symbol 

 shows the battery charge up in the top right-

hand corner of the display. 

• The charging symbol

appears when the charging plug is 

plugged in. After testing the rechargeable battery for at most one 

minute, the charging function begins and the battery symbol  
begins to blink. 

•  When the charging plug is plugged in, the treatment is interrupted. 

10. Treatment of underarm perspiration

• Prepare device for use as described in Section 8 “Start-up/prepara-

tion”.

•  Power-on the device by pressing the power button 

 for one 

second.

•  For the underarm perspiration treatment, 

wet the sponge pock-

ets evenly with tap water.

 In order to avoid the occurrence of 

current densities that are too high on isolated spots on the body 
however, ensure that as large a contact surface as possible is touch-
ing the electrodes with a pressure distribution that is as uniform as 
possible.

• Insert the plate electrodes (REF 05.19080.021) into the sponge 

pockets.

•  The parameters that can be selected blink on the display. The cur-

rent intensity for the treatment can be selected with the UP and 
DOWN buttons. --> Confirm selection by pressing the SET button. 
--> Select pulsing current with the UP button and continuous cur-
rent with the DOWN button. --> Confirm selection by pressing the 
SET button. --> Set the treatment time in minutes (MIN) using the 
UP and DOWN buttons. --> Confirm selection by pressing the SET 
button. --> Set the treatment time in seconds (SEC) using the UP 
and DOWN buttons. --> Confirm selection by pressing the SET but-
ton. --> Setting selection is completed when the treatment starts, 
the time countdown begins and the clock symbol begins to blink. To 
begin the treatment, complete the electric circuit by placing the 
sponge pockets with the plate electrodes in them under your arm-
pits. 

•  Raise the upper arm and place the sponge pocket on the armpit. 
•  The sponge pocket is then held in place by pressing the upper arm 

down against the body. Before lowering your upper arm ensure that 
the electrodes and connector cables are inserted completely into 
the sponge pockets, as direct contact between the metal and the 
skin could cause localised burns. Especially when performing an 
underarm perspiration treatment, ensure that the pressure exerted 
by the upper arm remains as constant as possible for the entire du-
ration of the treatment – which can be up to 30 minutes. 

•  By pressing the

 button on the membrane keypad on the upper 

side of the device the treatment current can be increased until a 
mild to strong tingling can be felt. The intensity of the current can be 
seen on the display. Similarly, the current can also be reduced dur-
ing the treatment by pressing the

button. When the current is 

being changed during the treatment, the current reading on the 
display does not blink. WARNING: Do not exceed the recommended 
maximum current intensity of 5 mA.

•  The treatment stops automatically after the set treatment time 


has been reached  00:00 or when the circuit is broken before the set 

Summary of Contents for SwiSto 3

Page 1: ...Gebrauchsanweisung User s Manual Mode d emploi Istruzioni per l uso Instrucciones de empleo Manual de operação Руководство по применению SwiSto 3 ...

Page 2: ... 4 SwiSto3 Iontophoresis device 16 SwiSto3 Appareil d iontophorèse 28 SwiSto3 Apparecchio per iontoforesi 40 SwiSto3 Aparato de iontoforesis 52 SwiSto3 Dispositivo de iontoforese 64 SwiSto3 Прибор для проведения ионтофореза 76 ...

Page 3: ...re ogni trattamento dal livello più basso dell intensità di corrente per il trattamento 2 Non immergere mai nella vasca prima le dita punte dei piedi bensì direttamente tutta la pianta esercitando una pressione uniforme Nota importante a leer antes de cada utilización 1 Comenzar el tratamiento con la intensidad más pequña de la corriente de tratamiento ajustable en la visualización 2 Nunca introdu...

Page 4: ...mart Behandlungszeit An Aus Taster Senkung der Stromstärke Stromart Behandlungszeit Tasterfunktion Menü Set Stop führt durch das Menü unterbricht die Behandlung B C D E A F G Sonderzubehör zur Achselschweißbehandlung Flächenelektroden mit Schwammtaschen Ersatzschwammtaschen F G SwiSto3 Iontophorese Set zur Hand und Fußschweißbehandlung EU VERSION 240 V Lieferumfang 1 SwiSto3 Iontophoresegerät 1 La...

Page 5: ...n 9 12 2 Behandlung wird abgebrochen mögliche Ursachen 9 12 3 Der Anwendungsstrom wird als zu schwach empfunden mögliche Ursachen 10 12 4 Display bleibt erloschen mögliche Ursachen 10 13 Wiederkehrende Sicherheitstechnische Kontrollen gemäß 6 MP BetreibV für SwiSto3 Geräte 10 14 Reinigung und Desinfektion 10 15 Aufbewahrung während Behandlungspausen 11 16 Transport und Lagerung 11 17 Entsorgung 11...

Page 6: ...ungen durchgeführt werden ggf Anwendung sofort beenden Gerät aus schalten Vom Gerät abgegebene Ströme und Spannungen sind auf Werte begrenzt welche die Bestimmung für elektromedizinische Geräte vorgibt Eine Gefährdung des Patienten ist deshalb ausgeschlossen Stromschläge werden in erster Linie durch Kontaktierungsfehler zwischen den Anschlussleitungen und den Elektroden verursacht Zwischen den Ele...

Page 7: ...nwendung erneuert werden AchtenSiedarauf dassdasDisplaywährendderAnwendunglesbar ist und nicht durch Lichtverhältnisse unlesbar wird Das Gerät muss vor jeder Anwendung auf Unversehrtheit überprüft werden wie intakte Folientastatur etc Im Falle einer Auffälligkeit wie Abnutzung etc bitte Gerät an den Hersteller einsenden Die zu erwartende Betriebs Lebensdauer des Gerätes beträgt je nachNutzungundPf...

Page 8: ...beimvorzeitigenUnterbrechendesStromkreisesangehalten Durch erneutes Schließen des Stromkreises kann die Behandlung bis zum Ablauf der Zeit fortgesetzt werden Das Uhrsymbol blinkt und die Zeit läuft rückwärts ab Wenn die Behandlungszeit auf 00 00 abgelaufen und der Stromkreis noch geschlossen ist blinken die beiden Symbole im Display Es können keine neuen Einstellungen nach Ablauf der Behandlung vo...

Page 9: ...ker Nach max 1 minütiger Prüfung desr Ladebatterie startet der Ladevor gang und das Batteriesymbol blinkt Die Behandlung wird beim Einstecken des Ladesteckers unterbro chen 11 Zur besonderen Beachtung Wird der Behandlungsstromkreis unterbrochen so wird die Behand lungsspannung automatisch herunter geregelt so dass es zu keinem elektrischen Schlag kommt Bei erschöpfter Ladebatterie blinkt das Lades...

Page 10: ...uf 25mA gestellt Dabei muss ein Strom von 25 mA 2 mA fließen Danach erfolgt ein Kurzschlusstest des Ausgangs dabei dürfen sich die Werte nicht verändern Durch Betätigung der Taste wird das Gerät schrittweise wieder nach unten geregelt Dabei muss sich bei jedem Anzeigeschritt der Stromwert verringern Mit einem Referenzgerät wird der Behand lungsstrom überprüft Bei jeder Sicherheitstechnischen Kontr...

Page 11: ...Ladebatterie Voraussetzunghierfüristjedocheinsachge mäßerUmgangmitdemProduktentsprechenddieserBetriebsanleitung DieGewährleistunggiltabdemKaufdatum AlsNachweishierfürgiltdie Rechnung Verschleißteile z B Elektroden Schaumstoffauflagen Schwammtaschen fallen nicht unter den Gewährleistungsanspruch Vor Rücksendung des Gerätes bei eventuell auftretenden Störungen sollten Sie die im Abschnitt Störungen ...

Page 12: ... Gruppe 1 Das SwiSto3 verwendet HF Energie ausschließlich zu seiner internen funktion Daher ist seine HF Aussendung sehr gering und es ist unwahrscheinlich dass benachbarte elektronische Geräte gestört werden HF Aussendungen nach CISPR 11 Klasse B Das SwiSto3 ist für den Gebrauch in allen Einrichtungen einschließlich Wohnbereichen und solchen bestimmt die unmittelbar an ein öffentliches Versorungs...

Page 13: ...Spannung Außenleiter Außenleiter 2kV Spannung Außenleiter Erde Die Qualität derVersorgungsspannung sollte der einer typischen Geschäfts und Krankenhausumgebung entsprechen Spannungseinbrüche Kurzzeitunterbrechungen und Schwankungen der Versorgungsspannung nach IEC 61000 4 11 5 UT für 1 2 Periode 95 Einbruch 40 UT für 5 Perioden 60 Einbruch 70 UT für 25 Perioden 30 Einbruch 5 UT für 5 ѕ 95 Einbruch...

Page 14: ...enzen gemäß einer Untersuchung vor Ort geringer als der Übereinstimmungspegelb sein In der Umgebung von Geräten die das folgende Bildzeichen tragen sind Störungen möglich Anmerkung 1 Bei 80 MHz und 800 MHz gilt der höhere Frequenzbereich Anmerkung 2 Diese Leitlinien mögen nicht in allen Fällen anwendbar sein Die Ausbreitung elektromagnetischer Größen wird durch Absorptionen und Reflexionen der Geb...

Page 15: ...P 0 01 0 12 0 12 0 23 0 10 0 38 0 38 0 73 1 1 20 1 20 2 30 10 3 80 3 80 7 30 100 12 12 23 Für Sender deren Nennleistung obigerTabelle nicht angegeben ist kann der Abstand unterVerwendung der Gleichung bestimmt werden die zur jeweiligen Spalte gehört wobei P die Nennleistung des Senders inWatt W gemäß der Angabe des Senderherstellers ist Anmerkung 1 Zur Berechnung des empfohlenen Schutzabstandes vo...

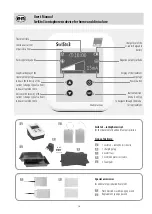
Page 16: ...t increase treatment time Power button Decrease the intensity of the current change type of current increase treatment time Button function Menu Set Stop to navigate through the menu to stop treatment B C D E A F G Scope of delivery 1 SwiSto3 iontophoresis device 1 charging plug 2 water trays 2 electrode plates incl cable 2 foam pads B C D E A Special accessories for underarm perspiration treatmen...

Page 17: ...splay does not illuminate possible causes 21 13 Recurring safety inspections pursuant to 6 MP regulations for SwiSto3 devices 21 14 Cleaning and disinfection 22 15 Storage while not in use 22 16 Transport and storage 22 17 Disposal 22 18 Technical information 23 19 Guarantee 23 20 Guidance and manufacturer s declaration electromagnetic immunity 23 21 Recommended separation distances between portab...

Page 18: ...e connector cables and the electrodes Over time transfer resist ance occurs between the electrodes and the connector cables due to the direct contact with water This can be avoided by disconnect ing the cable on the electrode just before beginning treatment and then reinserting it with a twisting motion The friction thereby pro duced creates a clean metal to metal contact which is essential for ac...

Page 19: ...n cause a safety hazard If the device be comes very cold during storage or transport ensure that it reaches room temperature before using it When operating the device heed the instructions given in Guide lines and manufacturer declaration Electromagnetic immunity To charge the battery first plug the low voltage connector into the socket on the back side of the unplugged SwiSto3 SwiSto3 ionto phore...

Page 20: ...using the charging plug The battery symbol shows the battery charge up in the top right hand corner of the display The charging symbol appears when the charging plug is plugged in After testing the rechargeable battery for at most one minute the charging function begins and the battery symbol begins to blink Whenthechargingplugispluggedin thetreatmentisinterrupted 10 Treatment of underarm perspira...

Page 21: ...a twistingmotion Thenclosethetreatmentcircuitthroughyourbody byplacingyourhandsorfeetintothewaterontothefoampad cov eredelectrodes orwhentreatingunderarmperspiration byplacing the sponge pockets under your arms Sponge pockets for underarm perspiration treatment are not wet enough The entire surface of the sponge pockets must be uniform ly moistened Too little tap water in the trays The level of th...

Page 22: ...wed The surface that is to be disin fected must be wiped with the disinfectant using light pressure suchthatthesurfaceiswetenoughandenoughoftheactiveingre dientofthedisinfectingagentisdeposited Theapplieddisinfectant solutionistobeallowedtodryonthesurfacesandtheymaynotbe wiped dry The reaction wait time for the above named disinfect ing agents is 5 minutes and must be observed TheSwiSto3Iontophore...

Page 23: ...oubleshoot ing should all be examined thoroughly Should we discover upon inspecting the returned device a reason for the malfunction that is described in the user s manual that could have been easily solved by the customer themself we will charge an inspection fee This fee in cludes the cost of labour postage and packing as well as VAT EMC instructions Medical electrical equipment is subject to sp...

Page 24: ...2kV voltage line to ground Mains power quality should be that of a typical commercial or hospital environment Voltage dips short interruptions and voltage variations on power supply input lines IEC 61000 4 11 5 UT for 1 2 cycle 95 dip 40 UT for 5 cycles 60 dip 70 UT for 25 cycles 30 dip 5 UT for 5 seconds 95 dip 5 UT for 1 2 cycle 95 dip 40 UT for 5 cycles 60 dip 70 UT for 25 cycles 30 dip 5 UT fo...

Page 25: ...mitters as determined by an electromag netic site survey should be less than the compliance levelb in each frequency range Interference may occur in the vicinity of equipment marked with the following symbol Note 1 At 80 MHz and 800 MHz the higher frequency range applies Note 2 These guidelines may not apply in all situations Electromagnetic propagation is affected by absorption and reflection fro...

Page 26: ...2 3 P 0 01 0 12 0 12 0 23 0 10 0 38 0 38 0 73 1 1 20 1 20 2 30 10 3 80 3 80 7 30 100 12 12 23 For transmitters rated at a maximum output power not listed above the recommended separation distance d in meters m can be estimated using the equation applicable to the frequency of the transmitter where P is the maximum output power rating of the transmitter in watts w according to the transmitter manuf...

Page 27: ...27 ...
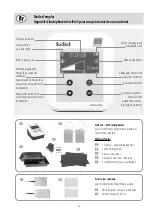
Page 28: ...uton Marche Arrêt Réduction de l intensité du courant type de courant temps de traitement Fonctions des boutons Menu Set Arrêt guidant dans le menu interrompt le traitement B C D E A F G Matériel fourni 1 SwiSto3 appareil d iontophorèse 1 fiche de chargement 2 bacs de traitement 2 plaques à électrodes câble inclu 2 revêtements en mousse synthétique B C D E A Accessoires spéciaux pour le traitement...

Page 29: ...de la sécurité technique selon 6 du décret relatif à l exploitation des dispositifs médicaux pour les appareils SwiSto3 34 14 Nettoyage et désinfection 34 15 Conservation pendant les pauses de traitement 35 16 Transport et emmagasinage 35 17 Élimination 35 18 Données techniques 35 19 Garantie légale 36 20 Lignes de conduite et déclaration du fabricant Immunité électromagnétique 36 21 Distances d i...

Page 30: ...ge le cas échéant arrêter immédiatement le traitement débrancher l appareil Les courants et les tensions émis par l appareil sont limités aux va leurs prescrites par les réglementations sur les dispositifs électro médicaux Une mise en danger du patient est donc exclue Les électrocutions sont causées en premier lieu par des défauts de contact entre les câbles de raccordement et les électrodes Suite...

Page 31: ...onvient de masser les mainsetlespiedsdansunbainàl eauchaudeavantdecommencer le traitement Renouveler l eau avant chaque application Veillez à ce que le panneau d affichage soit toujours bien lisible pendant l application et qu il ne devienne pas illisible à cause des conditions d éclairage Avantchaqueutilisationdumatériel ilfautvérifiers ilestenparfait état par exemple clavier à membrane sans défa...

Page 32: ... augmenter le courant de traitement pendant le traitement jusqu à ce qu un pico tementlégeràmoyennementfortpuisseêtreressenti L intensitédu courant est indiquée à l affichage Il est également possible de ré duire le courant pendant le traitement en appuyant sur le bou ton poussoir Si le courant change pendant le traitement il n est pas affiché sous forme clignotante Le traitement est terminé dès q...

Page 33: ... Une fois terminé le traitement éteindre l appareil d iontophorèse SwiSto3 en appuyant sur le bouton poussoir L appareil s éteint automatiquement au bout de deux minutes Auredémarragedel appareil lesdernièresvaleursrégléesdutraite ment antérieur sont prises en compte Celles ci peuvent être modi fiées lecircuitélectriqueétantouvert ensuivantladescriptionsous point 9 Le cas échéant l appareil d iont...

Page 34: ...ositif SwiSto3 ceux ci doivent être exécutés par des per sonnes qui de par leur formation leurs connaissances et leurs expé riences gagnées dans la pratique sont à même de les exécuter correc tement et qui concernant leur activité de contrôle ne sont pas sou mises à des instructions Faireuncontrôlevisueldel appareiletdesaccessoirespourdétecter des dégâts mécaniques pouvant gêner le fonctionnement ...

Page 35: ...9170 002 sinon il y a risque d électro cution 15 Conservation pendant les pauses de traitement Afin d éviter toute détérioration de l appareil d iontophorèse SwiSto3 ilfautconserverl appareiletsesaccessoiresdansl emballaged origine si la thérapie est arrêtée pendant longtemps 16 Transport et emmagasinage L appareil d iontophorèse SwiSto3 doit être emballé pour le transport de façon à ce que tout r...

Page 36: ... le port et l emballage ainsi que laTVA en plus Indications concernant la compatibilité électromagnétique CEM L emploi de tout dispositif électromédical est soumis à des mesuresdeprécautionspécifiquesafind assurerqu ilrépondauxnormesdecompatibilitéélectromagnétique Lesinformations qui suivent contribuent à la sécurité du fonctionnement 20 Lignes de conduite et déclaration du fabricant émissions él...

Page 37: ...on conducteur extérieur terre La qualité du secteur électrique doit être identique à celle d un environnement commercial et hospitalier conventionnel Creux de tension coupures brèves et variations de tension sur les lignes d alimentation selon IEC 61000 4 11 5 UT pour un demi cycle creux de 95 40 UT pour 5 cycles creux de 60 70 UT pour 25 cycles creux de 30 5 UT pour 5 ѕ creux de 95 5 UT pour un d...

Page 38: ... des champsa produits par des transmetteurs RF fixes établies par une étude électromagnétique du site doivent être inférieures au niveau de conformitéb de toutes les fréquences Des interférences peuvent apparaître au voisinage de tout équipement portant le symbole suivant Remarque 1 A 80 MHz et à 800 MHz la plage de fréquences plus élevée s applique Remarque 2 es lignes de conduite ne s appliquent...

Page 39: ... 5 GHz d 2 3 P 0 01 0 12 0 12 0 23 0 10 0 38 0 38 0 73 1 1 20 1 20 2 30 10 3 80 3 80 7 30 100 12 12 23 Pour les transmetteurs dont la puissance nominale ne figure pas dans le tableau ci dessus la distance recommandée peut être établie par l équitation applicable à la fréquence du transmetteur colonne correspondante où P est la puissance nominale du transmetteur en watts W selon les indications du ...

Page 40: ...rattamento Pulsante per accendere o spegnere Riduzione di intensità di corrente tipo di corrente durata del trattamento Funzione tasto Menu Set Stop per accedere al menu interrompe il trattamento B C D E A F G Volume di fornitura 1 SwiSto3 apparecchio per iontoforesi 1 alimentatore di rete 2 vasche terapeutiche 2 elettrodi a piastra incl cavo 2 involucri in materiale plastico espanso B C D E A Acc...

Page 41: ...i sensi del 6 Legge sui dispositivi medici Disposizione per l esercizio per apparecchi SwiSto3 45 14 Pulizia e disinfezione 46 15 Mantenimento durante le fasi di riposo 47 16 Trasporto e immagazzinamento 47 17 Smaltimento 47 18 Dati tecnici 47 19 Garanzia legale 47 20 Direttive e autocertificazione Immunità a interferenze elettromagnetiche 48 21 Distanze di protezione consigliate tra dispositivi d...

Page 42: ...gli apparecchi elettromedi cali Si escludono quindi possibili pericoli per il paziente Lescosseelettrichesonoprincipalmentelaconseguenzadiguastial contattotraleconduttureeglielettrodi Traglielettrodielecondut tureconilpassardeltempovengonoaformarsiresistenzeditransi zione a causa del contatto con l acqua Si può ovviare se prima del trattamentosistaccabrevementeiconnettorideglielettrodi Dopo diché ...

Page 43: ...il suo rappresentante al fine di ottenere supporto e segnalare un eventuale funzionamento inaspettato o un eventuale avvenimento inaspettato 8 Messa in funzione Preparazione Attenzione pericolo che non ci sia contatto elettrico Gli apparecchi raffreddatisi estremamente durante il trasporto o l immagazzina mento devono essere portati a temperatura ambiente prima della messa in funzione Allamessainf...

Page 44: ...erminato il trattamento spegnere l apparecchio per ion toforesiSwiSto3servendosidell appositopulsante L apparec chio si spegnerà automaticamente dopo due minuti Riattivando l apparecchio vengono acquisiti automaticamente i va lori impostati nell ultimo trattamento Tali valori possono essere modificati a circuito elettrico aperto seguendo le indicazioni di cui al punto 9 Se necessario l apparecchio...

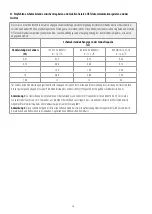
Page 45: ...rica l appa recchio si spegne automaticamente A batteria completamente scaricata il display lampeggia durante il processo di ricarica Dopo max 30 minuti il display è acceso in modo fisso Le possibili cause alla base del guasto sono descritte nel seguente paragrafo Disturbi Valori massimi consigliati mA Trattamento dell iperidrosi ascellare 5 Iperidrosi delle mani 15 Iperidrosi dei piedi 25 12 Dist...

Page 46: ...pparecchio di riferimento Per ogni controllo tecnico di sicurezza bisogna eseguire un controllo elettricodisicurezzasecondoDINVDE0751 1 VDE0751parte1 Con trolli periodici e controlli prima della messa in funzione di apparecchi e sistemi elettrici medicali parte 1 Nozioni generali oppure DIN EN IEC 60601 1 Lecorrentidisperseausiliaridevonoesserealmassimo1 5voltesupe riori al primo valore misurato e...

Page 47: ...o parte d impiego del tipo BF Grado di protezione IP 41 Dimensioni largh 110 x alt 84 x lungh 120 mm Corrente nominale in uscita regolabile da 1 25 mA Resistenza di carico max 1 5 kΩ Potenza assorbita 1 5W Alimentazione di tensione batteria ricaricabile Li ion Modo operativo modo continuo Peso alimentatoredireteca 0 10kg apparecchioperiontoforesica 0 36kg Dispositivi di sicurezza limitazione elett...

Page 48: ...rebbe accertarsi che l uso avvenga in un tale ambiente Misurazioni delle emissioni Concordanza Ambiente elettromagnetico Direttive Emissioni RF secondo CISPR 11 Gruppo 1 L apparecchio SwiSto3 utilizza energia RF esclusivamente per il suo funzionamento interno Perciò le emissioni RF sono molto ridotte e difficilmente possono provocare interferenze con altre apparecchiature elettroniche presenti nel...

Page 49: ...uttore esterno massa 1kV tensione conduttore esterno conduttore esterno 2 kV tensione conduttore esterno massa La qualità della tensione di alimentazione deve essere quella di un ambiente commerciale e ospedaliero tipico Cali brevi interruzioni e variazioni della tensione di alimentazione secondo IEC 61000 4 11 5 UT per 1 2 ciclo 95 calo 40 UT per 5 cicli 60 calo 70 UT per 25 cicli 30 calo 5 UT pe...

Page 50: ...trasmettitori fissi dovrebbe essere inferiore al livello di concordanzab in base ad una verifica sul luogo Disturbi sono possibili nei dintorni di apparecchiature che portano il simbolo seguente Annotazione 1 a 80 MHz e 800 MHz vale il campo di frequenza rispettivamente maggiore Annotazione 2 è possibile che queste direttive non siano applicabili in tutti i casi La propagazione di grandezze elettr...

Page 51: ...0 12 0 23 0 10 0 38 0 38 0 73 1 1 20 1 20 2 30 10 3 80 3 80 7 30 100 12 12 23 Per trasmettitori la cui potenza nominale non è indicata nella tabella sopra riportata la distanza può essere definita mediante l equazione appartenente alla corrispettiva colonna essendo P la potenza nominale del trasmettitore inWatt W in base alle indicazioni del produttore del trasmettitore Annotazione 1 per calcolare...

Page 52: ...ador ON OFF encendido apagado Reducción de la intensidad de corriente tipo de corriente tiempo de tratamiento Función de las teclas Menú Set Parada para acceder al menú para interrumpir el tratamiento B C D E A Volumen de suministro 1 SwiSto3 aparato de iontoforesis 1 conector de carga 2 bandejas de tratamiento 2 platinas de electrodos con cable 2 alfombrillas de material celular para colocar enci...

Page 53: ...ento demasiado débil Causas posibles 58 12 4 La pantalla permanece apagada Causas posibles 58 13 Pruebas periódicas de seguridad técnica de acuerdo con las prescripciones alemanas 6 de la Ley de Productos sanitarios MP BetreibV para aparatos SwiSto3 58 14 Limpieza y desinfección 58 15 Conservación durante las pausas entre tratamientos 59 16 Transporte y almacenamiento 59 17 Eliminación 59 18 Datos...

Page 54: ...arato en las proximidades por ejemplo 1 metro de un equipo terapéutico de microondas u ondas cortas ya que puede provocar variaciones en los valores de salida del aparato de iontoforesis Norealizarnuncaeltratamientoduranteunatormenta encasodado interrumpirinmediatamenteeltratamiento apagarelaparato Lascorrientesytensionesqueemiteelaparatoestánlimitadasalos valoresestipuladosenlasdisposicionessobre...

Page 55: ...de tratamiento por separado Para evitar irritaciones de la piel o quemaduras sólo deberán utili zarse los electrodos recomendados por KaWe Cuide de que las alfombrillas de material celular suministradas es tén siempre colocadas sobre los electrodos planos Afindereducirlaresistencianaturaldelapiely encasodado crear unapercepciónmásagradabledelacorriente convienedarunma saje de manos y o de pies en ...

Page 56: ... tecla SET En el mo mento de iniciar el tratamiento los ajustes son terminados el tiempo es contado atrás y el símbolo del reloj parpadea Para iniciar el trata miento cerrarelcircuitoeléctricosumergiendolospiesomanosenlas bandejas Accionando el botón pulsador situado en la parte superior del aparato teclado de membrana es posible aumentar la corriente de tratamiento hasta que se sienta un cosquill...

Page 57: ...ibles reajustes El tiempo de tratamiento ajustado previamente es adoptado Una vez terminado el tratamiento desconectar el aparato de ionto foresisSwiSto3alpulsarelbotónpulsador Además elaparato se desconecta automáticamente después de dos minutos Enelcasodeunreiniciosemuestranlosvaloresajustadosdeltrata mientoprevio Estospuedensermodificadosalestaractivoelcircui to eléctrico tal y como se describe...

Page 58: ... personal que por su formación sus conocimientos y la experiencia adquirida en sus actividades prácticas sea capaz de efectuarlas adecuada e independientemente Controlar visualmente el aparato y los accesorios para descartar daños mecánicos que pudieran afectar su funcionamiento Controlar que los rótulos relevantes para la seguridad sean bien le gibles y controlar la pantalla Controlar el funciona...

Page 59: ...Sto3 se deberá conservar tanto el aparato como sus accesorios en el embalaje origi nal si la terapia es interrumpida durante largo tiempo 16 Transporte y almacenamiento El aparato de iontoforesis SwiSto3 debe ser embalado para su trans porte de manera que quede descartado todo riesgo de deterioro En caso de no usar el aparato durante un periodo mayor debería cargarse el aparato completamente antes...

Page 60: ...e la compatibilidad electromágnetica Los equipos electromédicos están sujetos a medidas especiales de precau ción lascualesgaranticenlaoperaciónseguraconrespectoalacompatibilidadelectromagnética Lassiguientesinformacio nes contribuyen al funcionamiento seguro 20 Líneas directrices y declaración del fabricante emisiones electromagnética El dispositivo SwiSto3 está diseñada para su funcionamiento en...

Page 61: ... exterior 2kV tensión conductor exterior tierra La calidad de la red de energía eléctrica debe ser equivalente a la existente en un comercio y hospital Caída de tensión interrupciones breves y variaciones de tensión en líneas de alimentación eléctrica según IEC 61000 4 11 5 UT durante medio ciclo caída de 95 40 UT durante 5 ciclos caída de 60 70 UT durante 25 ciclos caída de 30 5 UT para 5 ѕ caída...

Page 62: ...se determina en la evaluación electromagnética del lugar debe ser inferior al nivel de cumplimientob en todas las frecuencias Pueden producirse interferencias en proximidad de equipos marcados con el símbolo siguiente Nota 1 A 80 MHz y 800 MHz se aplica el intervalo de frecuencia superior Nota 2 Estas pautas pueden no ser aplicables en todas las situaciones La propagación electromagnética se ve af...

Page 63: ... P de 800 MHz a 2 5 GHz d 2 3 P 0 01 0 12 0 12 0 23 0 10 0 38 0 38 0 73 1 1 20 1 20 2 30 10 3 80 3 80 7 30 100 12 12 23 Para transmisores cuya potencia nominal no se enumera aquí la distancia de separación recomendada se puede determinar utilizando la ecuación equivalente a la frecuencia del transmisor siendo P la potencia nominal del transmisor en vatios W indicada por su fabricante Nota 1 Se uti...

Page 64: ...tamento Tecla de ligamento desligamento Redução da intensidade de corrente do tipo de corrente tempo de tratamento Função da tecla Menu Set Stop dirige pelo menu interrompe o tratamento B C D E A F G Extensão do fornecimento 1 SwiSto3 dispositivo de iontoforese 1 ficha de carregamento 2 bacias de tratamento 2 placas de elétrodos incl cabo 2 coxins de espuma B C D E A Acessórios especiais para o tr...

Page 65: ...permanece apagada causas possíveis 70 13 Controlos periódicos de segurança técnica de acordo com as prescrições legais em vigor 6 MP BetreibV Regulamento alemão relativo à aplicação e exploração de dispositivos médicos para dispositivos SwiSto3 70 14 Limpeza e desinfeção 70 15 Armazenamento durante o período de interrupção dos tratamentos 71 16 Transporte e armazenamento 71 17 Disposição final 71 ...

Page 66: ...oondas dado que poderá provocar variações nos valores de saída do dispositivo de iontoforese Nunca realizar o tratamento durante uma tempestade Neste caso interromper o tratamento imediatamente e desligar o dispositivo Correntes e tensões geradas pelo dispositivo estão limitadas pelos valores determinados pelas disposições relativas a dispositivos ele tromédicos Pode se portanto excluir qualquer p...

Page 67: ...escutâneasouqueimaduras sósedeveutilizaros elétrodos recomendados pela KaWe Certifique se de que os coxins de espuma fornecidos sempre sejam colocados sobre as placas de elétrodos Para reduzir a resistência natural da pele e quando necessário tor nar a corrente de tratamento mais agradável convém fazer se uma massagemnasmãosresp nospésantesdeprocederaotratamento em banho de água Deve se renovar a ...

Page 68: ...aligeiraatémédiasensaçãodeformiguei ro A tela exibe a intensidade de corrente A passagem de corrente também pode ser reduzida do mesmo modo durante o tratamento premindo o botão de pressão Ao alterar a intensidade de cor renteduranteotratamento osímbolodecorrentenatelanãopisca O tratamento é concluido depois de finalizado o tempo de trata mento ou quando o circuito for antecipadamente interrompido...

Page 69: ... de carregamento é exibido com a ficha de carrega mento conectada Depois de um ensaio de no máximo 1 minuto da pilha recarregável é iniciado o carregamento e o símbolo da pilha pisca então Ao inserir a ficha de carregamento é interrompido o tratamento 11 Para especial atenção No caso de o circuito de tratamento for interrompido a tensão de tra tamento é reduzida automaticamente é deste modo evitad...

Page 70: ... dispositivo SwiSto3 não há peças que deverão ser submetidas a trabalhos de manutenção pelo utilizador Não se pode abrir o invólucro Premindo a tecla a intensidade de corrente é ajustada com o valor de 25 mA tendo a corrente ativa que ter um valor de 25 mA 2 mA Segue se um ensaio de curto circuito da saída os valores não devem variar durante este ensaio Premindo a tecla volta se a reduzir o dispos...

Page 71: ...ispositivo de iontoforese SwiSto3 deve se embalá lo de tal modo que o conteúdo não possa ser danifi cado No caso de não utilizar o dispositivo durante um período prolongado deverá carregá lo completamente antes de guardá lo Dispositivo e acessórios deverão ser guardados em ambiente seco as temperaturasdearmazenamentocompreendidasentre0 Ce 40 C 17 Disposição final Na parte não acessível do disposit...

Page 72: ...jeitos a medidas de precaução especiais garantindo um funcionamento seguro quanto à compatibilidade eletromagnética As informações seguintes contribuem ao funciona mento seguro 20 Orientações e declaração do fabricante Emissões eletromagnética O SwiSto3 destina se a ser utilizada no ambiente electromagético especificado a seguir O cliente ou utilizador do aparelho deverá garantir a aplicação em ta...

Page 73: ...ase terra A qualidade da corrente elétrica deve ser equivalente à de um ambiente hospitalar ou comercial típico Quebras de tensão interrupções breves e flutuações da tensão de alimentação de acordo com IEC 61000 4 11 5 UT para 1 2 ciclo quebra de 95 40 UT para 5 ciclos quebra de 60 70 UT para 25 ciclos quebra de 30 5 UT para 5 ѕ quebra de 95 5 UT para 1 2 ciclo quebra de 95 40 UT para 5 ciclos que...

Page 74: ... por uma pesquisa no local eletromagnético deve ser inferior ao nível de conformidadeb em cada amplitude da frequência Poderá ocorrer interferência na proximidade de equipamento portador do seguinte símbolo Nota 1 A 80 e 800 MHz é aplicável o valor de frequência mais elevado Nota 2 Estas diretrizes poderão não se aplicar em todas as situações A propagação eletromagnética é afetada pela absorção e ...

Page 75: ... 2 5 GHz d 2 3 P 0 01 0 12 0 12 0 23 0 10 0 38 0 38 0 73 1 1 20 1 20 2 30 10 3 80 3 80 7 30 100 12 12 23 Para transmissores com uma potência nominal não indicada na lista acima a distância de separação recomendada poderá ser estimada utilizando a equação aplicável à frequência do transmissor em que P é a potência nominal do transmissor emWatts W de acordo com as indicações do fabricante do mesmo N...

Page 76: ... продолжительности процедуры вкл выкл понижение силы тока вида тока продолжительности процедуры основные функции меню выбор функции стоп ведёт через меню прерывает процесс B C D E A F G Объем поставки 1 SwiSto3 прибор для ионтофореза 1 зарядное устройство 2 процедурные ванны 2 пластинчатых электрода с кабелями 2 поролоновые прокладки B C D E A Дополнительные аксессуары для терапии подмышечного пот...

Page 77: ...ные причины 82 12 4 отсутствие показаний на дисплее возможные причины 82 13 регулярная техническая проверка безопасности в соответствии с 6 MP директив по продаже приборов для ионтофореза SwiSto3 82 14 чистка и дезинфекция 82 15 хранение во время перерывов в процедурах 83 16 транспортировка и хранение 83 17 утилизация 83 18 технические данные 83 19 гарантия 83 20 предписания и объяснения производи...

Page 78: ...езопасность Одновременное использование во время лечения высокоча стотного хирургического инструмента может привести к ожо гам кожи в местах соприкосновения с электродами Необходимо избегать проведения процедур вблизи напр на расстоянии 1 го м коротковолнового или микроволнового терапевтического аппарата это может привести к колебаниям исходных значений прибора для ионтофореза Запрещено проводить ...

Page 79: ...рук и ног не возможно Лечение ла доней стоп и подмышечных впадин должно проводиться как отдельные процедуры в соответствии с описанием Чтобы избежать раздражения кожи или ожогов необходи мо использовать только электроды рекомендованные компа нией KaWe Просим обращать внимание на то чтобы поролоновые про кладки всегда находились на пластинчатых электродах Чтобы снизить естественную чувствительность...

Page 80: ... нажатия кнопки в верхней ча стиприбора плёночнаяклавиатуры можноувеличитьтокдо такой степени что появится ощущение от легкого до умерен ного покалывания Интенсивность тока выводится на дисплее Кроме того нажатием кнопки можно уменьшить ток во время лечения При изменении силы тока в процессе лечения дисплей не мигает Лечение прекращается по истечении времени процедуры или при преждевременном размы...

Page 81: ...ствавысвечиваетсязначок зарядки После максимально одноминутной проверки аккумуляторной батарейки начинается процесс зарядки и ми гает значок батарейки При подключении зарядного устройства процесс лечения пре кращается 11 Для особого внимания Если электрическая цепь прерывается автоматически прекра щается подача тока что даёт возможность избежать удар элек трическим током При разрядке аккумуляторны...

Page 82: ...жатии на кнопку устанавливается сила тока до 25 мА При этом идёт поток тока 25 мА 2 мА Затем происходит тест на короткое замыкание на выходе при этом значения не должны меняться При нажатии на кнопку постепенно снижаются показания прибора При каждом нажатии уменьшается значение тока С помощью специального прибора проверяется процедурный ток Для каждого элемента управления имеющего отношение к без ...

Page 83: ...этим руководством на данное изделие мы предоставля ем гарантию 48 месяцев за исключением литийионной аккуму ляторной батарейки Гарантия действует от даты покупки Дока зательством приобретения является счет На быстроизнашиваю щиеся части такие как электроды поролоновые прокладки карманы из губки гарантия не распространяется Прежде чем Вы вышлете прибор назад в случае нару шения его работы вниматель...

Page 84: ...омагнитная среда руководство ВЧ излучения согласно CISPR 11 Группа 1 SwiSto3 использует энергию высокой частоты исключительно для своей внутрен ней функции Поэтому высокочастотные излучения являются незначительными и не создают помех находящимся вблизи электронным приборам ВЧ излучения согласно CISPR 11 Класс B SwiSto3 предназначен для использования во всех помещениях в том числе и жилых которые н...

Page 85: ... Противофазное напряжение симметричное 2 кВ синфазный сигнал Качество напряжения питания должно соответствовать напряжению питания характерного для учреждений и больниц Кратковременное понижение напряжения перерыв и перепады в подаче электроснабжения и перепады напряжения на выходных линиях снабжения электроэнергией в соответствии с IEC 61000 4 11 5 UT 95 понижение в Uτ на 0 5 цикла 40 UT 60 пониж...

Page 86: ...ть поляа от стационарных радиопередатчи ков установленная обследованием электромагнитного излучения места должна быть меньше уровня соответствия требованиям в каждом частотном диапазонеб Помехи могут произойти вблизи оборудования обозначенного следующим символом Примечание 1 При 80 МГц и 800 МГц применяется более высокий диапазон частот Примечание 2 Эти рекомендации могут быть применимы не во всех...

Page 87: ...3 P 0 01 0 12 0 12 0 23 0 10 0 38 0 38 0 73 1 1 20 1 20 2 30 10 3 80 3 80 7 30 100 12 12 23 Для передатчиков максимальная номинальная мощность которых не указана в вышеупомянутой таблице рекомендуемое расстояние можно рассчитать с помощью формулы указанной в соответствующей колонке в которой P максимальная номинальная мощность передатчика в ваттах Вт согласно указаниям производителя передатчика Пр...

Page 88: ...modificate ES Toda la información sin compromiso Nos reservamos el derecho de realizar cambios PT Todas as indicações entendem se sem compromisso Sujeito a alteraçõessemavisoprévio RU Информацияпредставленабезгарантийлюбогорода оставляемзасобойправовноситьизменения QM 1 065G B 26300 2018 04 KIRCHNER WILHELM GmbH Co KG Eberhardstraße 56 71679 Asperg Germany Phone 49 7141 68188 0 Fax 49 7141 68188 1...

Reviews: