21
time has elapsed. The treatment will resume for the remainder of
the set treatment time when the circuit has once again been closed.
• If the clock showing the treatment time
has run down to 00:00
and the current circuit is still complete, the + / - symbols on the
display both begin to blink. Once the set treatment time has ex-
pired, none of the settings can be changed until the circuit has been
interrupted by removing the electrodes. The + / - symbols then
stop blinking and the MIN symbol begins to blink, signaling that
new settings can now be selected. The previously set treatment
time will be saved.
• Turn the SwiSto3 iontophoresis device off after completing treat-
ment by pressing the power button
. The device will also turn
off automatically after two minutes.
• The last-used treatment settings are automatically saved and used
when the device is restarted for the next treatment. These settings
can be changed with an open current circuit as described in Section
9.
• The SwiSto3 iontophoresis device can also be plugged into the local
power supply network to be charged using the charging plug. The
battery symbol
shows the battery charge up in the top right-
hand corner of the display.
• The charging symbol
appears when the charging plug is
plugged in. After testing the rechargeable battery for at most one
minute, the charging function begins and the battery symbol
begins to blink.
• When the charging plug is plugged in, the treatment is interrupted.
11. Important information
If the treatment circuit is broken, the current is automatically shut off
so that electric shock does not occur. When the battery charge is low,
the battery symbol begins to blink. Treatment is only to be carried out
after first charging the battery. When the battery is empty, the device
turns off automatically.
If the rechargeable battery has an extremely low charge, the display
blinks while charging. After being charged for max. 30 minutes, the
display will illuminate normally without blinking.
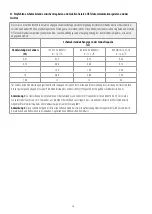
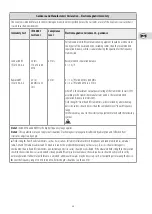
Recommended maximum values
mA
Underarm perspiration treatment
5
Hand perspiration treatment
15
Foot perspiration treatment
25
12. Troubleshooting
12.1 Treatment does not start – possible causes
• Treatment circuit is not closed. Eliminate possible contact failure
between the connector cables and the electrodes by unplugging
the electrode connection pin and reinserting it into its socket with a
twisting motion. Then close the treatment circuit through your body
by placing your hands or feet into the water onto the foam pad-cov-
ered electrodes, or when treating underarm perspiration, by placing
the sponge pockets under your arms.
• Sponge pockets (for underarm perspiration treatment) are not wet
enough. The entire surface of the sponge pockets must be uniform-
ly moistened.
• Too little tap water in the trays. The level of the water in the trays
must be approx. 3-4 cm.
• The electric conductivity of the tap water is not sufficient. In this
case, the conductivity of the tap water must be increased by adding
minerals to the water.
• The battery charge is low. The battery symbol
blinks, + and
- symbols blink when the treatment circuit is complete.
12.2 Treatment is interrupted – possible causes
• Disruption of the treatment circuit – such as by suddenly removing
hands/feet from the trays or raising your arm during an underarm
perspiration treatment.
• Electrode contact failure. Eliminate possible contact failure between
the connector cables and the electrodes by unplugging the elec-
trode connection pin and reinserting it into its socket with a twist-
ing motion.
• The battery charge is low. The treatment current is turned off. The
battery symbol
blinks, + and - symbols blink when the treat-
ment circuit is complete. Charge the battery as described in section 8.
12.3 Treatment current feels too weak – possible causes
• Electrodes are worn. After prolonged use, the condition of the elec-
trodes can deteriorate (due to calcium deposits on their surface, for
example) to such an extent as to inhibit the power output of the
device. The electrodes are to be replaced.
12.4 Display does not illuminate – possible causes
• Battery is completely discharged. First charge the battery with the
supplied charging plug. The charging symbol will appear on the
display. Soon after the battery has begun charging, the device
switches automatically to charging mode.
• If the charging plug is plugged in and still no charging symbol
appears on the display, check the voltage of the electrical outlet that
is being used with appropriate equipment. If the electrical outlet
is functioning properly, the SwiSto3 and the charging plug must
be inspected at a location authorised by KaWe – see as well the
Section “Safety Inspections”.
13. Recurring safety inspections pursuant
to § 6 MPG regulations for SwiSto3 devices
For the SwiSto3, the following inspections must be performed at least
every 12 months by individuals able to perform such safety inspec-
tions properly due to their training, knowledge and practical experi-
Summary of Contents for SwiSto 3
Page 27: ...27 ...

